Author Topic: Hi all, anyone clued up with Maltron Keybaords or Teenseys?  (Read 1264 times)

0 Members and 1 Guest are viewing this topic.

Offline phillismable

  • Thread Starter
  • Posts: 13
Hi all, anyone clued up with Maltron Keybaords or Teenseys?
« on: Tue, 08 February 2022, 09:08:34 »
I now have a Maltron keyboard, 2nd or maybe 3rd hand which cost me all of £45 plus a 80 mile round trip to collect it before it was grabbed by someone else, which I count as a massive result.

There are a few things that are annoying the living crap out of me, I've tried reaching out to Maltron but have not received any reply to date, so I thought I would come here and ask.

Escapu on this site was doing the same kind of upgrade but the thread seems to have ended...  I have PM'd them, so I might get a reply.


I've already swapped out the nasty Cherry Browns for some lovely VERY CLICKY Blues, I did that as I can now feel and hear when a key is pressed, before it was hit and miss with the browns.  This is already making me love this layout even more.

And I've ordered some replacement 145 DSA keycaps in white and blue, as the one's that come with it aren't the best.  I might get a set in black Ergodox one's and loose the blue keys depends how they end up looking.

Ok so parts that I could do with a help with.

Firstly I would love to remap the keys as some of them are not where I really want them to be, at the moment I've had to rewire and swap the TAB (left side 2nd large thumb) with the Backspace key (left side 1st small upper thumb).   This works but is annoying as I know that the wiring is all nasty now and we all know that feeling when something isn't just right.

So that is where the Teensey comes in to play, how difficault would it be to change out the existing board and get a teensey in place?  as there seem to be a lot of grids to work out,   
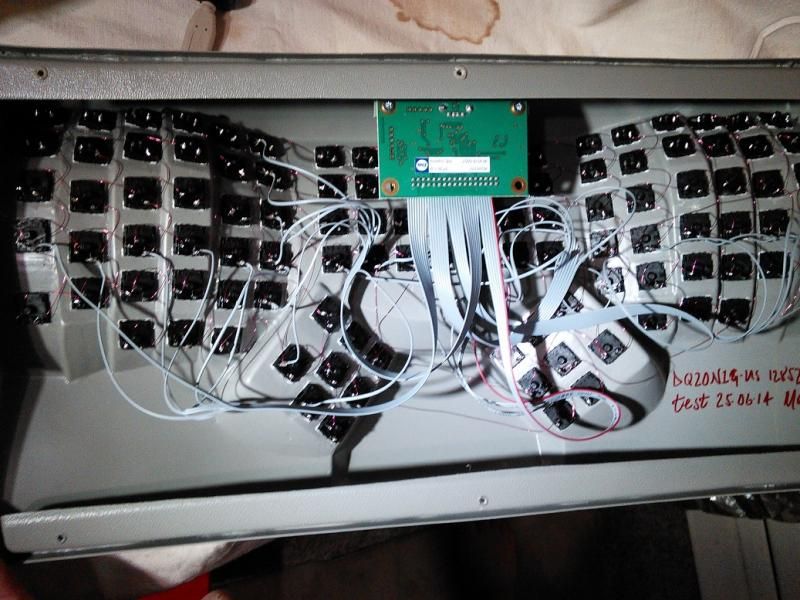
If this pic is visible this is the same as my one.

I have noticed that people on youtube are putting reistors on each switch, the strange thing is my board doesn't have any on it, so I have no idea about that.

Also can anyone tell me what kind of thin wire the red coper ones are? I take it that its some kind of motor or coated magnet wire.  But I can't seem to see what type it is online or what gauge it is.  As I have a feeling that I'm going to be using a lot of it when I take out the switches to cover the case with carbon fibre and install the Teensey.

Thanks for any help that you guys can offer.


Offline suicidal_orange

  • * Global Moderator
  • Posts: 4771
  • Location: England
Re: Hi all, anyone clued up with Maltron Keybaords or Teenseys?
« Reply #1 on: Tue, 08 February 2022, 11:47:44 »
It would be easy enough to wire that to a Teensy, how many keys are there total?  A search revealed a replacement Maltron controller built built around the Teensy 2.0++ which suggests there may be more switches than I think there are.

You will want a diode for each switch as this will stop any problems with ghosting when you press lots of keys at once, if there are none it's probably done in the firmware by default.

As to wire you can use anything, there is very little power in a switch matrix so it only has to be strong enough to survive you bending and soldering it and thick enough not to drive you crazy while doing so.  Usually you use the diode leads to go one way (rows or columns) then some insulated wire the other, enamelled magnet wire is probably what was used originally from your description but old IDE (hard drive) and network cables are more commonly used options as many people have them lying around.
120/100g linear Zealio R1  
GMK Hyperfuse
'Split everything' perfection  
MX Clear
SA Hack'd by Geeks     
EasyAVR mod

Offline phillismable

  • Thread Starter
  • Posts: 13
Re: Hi all, anyone clued up with Maltron Keybaords or Teensys?
« Reply #2 on: Tue, 08 February 2022, 12:37:14 »
Hi

Thanks for the quick reply I'm not an electronics type person so your helps great.

110 switches in total, I know this as I've had to desolder the switches from a donor keyboard, then desolder the ones on the maltron and finally resolder the new Blues in their place.  :eek:
But I did this using the existing wiring and that's looking a bit messy, the guys that built it did a little loop over each switch pin, and I'd like to be proud when I post some pics of it on here.

So if someone can let me know what kind of wire I need I will get some, prefer the type that's already on the switches, its copper coated isn't very thick, and solders very easily, I don't even have to burn off the coating it just melts with the solder.
I really don't want to use ribbon cables unless it's the wires going to the Teensy from the rows/cols, as I want it to be as clean as possible at the end of the day.

Ok I have done a keylayout from www.keyboard-layout-editor.com and then imported it in to kbfirmware where it's given me an 8 x 19 grid, so now I have an idea on where I need to head, no issues it said I don't have a soft reset but I thought that was on the Teensy board.

What kind of Diodes you guys recommend (think it's something like 1N4148), I will then order the bits and get cracking.

Many thanks

Offline phillismable

  • Thread Starter
  • Posts: 13
Re: Hi all, anyone clued up with Maltron Keybaords or Teenseys?
« Reply #3 on: Sat, 12 February 2022, 12:42:35 »
Hi,

  So I have all of my parts aprt from the Teensy 2++ that's on it's way and should be here on Tues (UK time).

  To make my Maltron I bought a non working keyboard with MX Blues, took them out and swapped out the MX Browns from the Maltron.

  So I thought today that I might as well use the savaged parts for a dry run, and make a number pad with control and arrow keys.

  Used 30 Diodes and get to grips with my new solder station.


  Ignore all the bits past the parts that I've wired as it going to be cut off and go in the bin.

  Is this right, or should a be doing things differently, I ran out of yellow cable as used the non working keybaords USB cable, so the last one is Black  :eek:

  Many thanks

Offline suicidal_orange

  • * Global Moderator
  • Posts: 4771
  • Location: England
Re: Hi all, anyone clued up with Maltron Keybaords or Teenseys?
« Reply #4 on: Sat, 12 February 2022, 15:34:00 »
The diodes are all connected the same way and each row and column has a wire attached to go to the teensy - as long as the row and column wires aren't touching it will work, even if one column wire is black and one red :P.   One thing is that the switches look a bit melted but it's the same past where you've added diodes so it's probably because desoldering factory solder requires more heat than even lead free stuff sold for DIY.  The pins are directly connected to the leaf which connects when you press the switch so it's important that the pins don't wobble in the housing which can cause the leaf to bend and the switch to not work reliably.  The housing is quite thick so you're probably fine but it's worth mentioning just in case some are more damaged than others, probably the first ones you desoldered.

Also you could have saved a pin by connecting 4 5 6 to to Page Down and 7 8 9 to Page Up and / * - to Scroll Lock(?).  You could connect 4 to Scroll Lock now but that would make the firmware slightly confusing.  Just something to watch out for in the Maltron where you might be pushed for pins if you try to keep the rows and columns simple :)
120/100g linear Zealio R1  
GMK Hyperfuse
'Split everything' perfection  
MX Clear
SA Hack'd by Geeks     
EasyAVR mod

Offline phillismable

  • Thread Starter
  • Posts: 13
Re: Hi all, anyone clued up with Maltron Keybaords or Teenseys?
« Reply #5 on: Sun, 13 February 2022, 07:46:11 »
Yeah the salvaged switches kind of suck as only had on older soldering iron available at the time, but I've now invested ina 65w station that regulates the heat I can solder directly to the pin without buring off the enamle.  I wrap the thin wire around each pin twice then move on to the next row leaving a little slack, then the next and then solder then up on mass.

I checked each switch via my meter once I'd soldered them up, and I also did a line parity test on each connection, and then to the end of the coloured wires some everything should work.

Didn't think about the pg up, pg down save a pin, but year the code would be harder.

This keyboard building is so much hard work but fun at the same time, just hope I do a fair job on the Maltron.  It's going to take about a day to solder everything up and test it, before I even start to code.   :thumb: