Author Topic: 3D Printed 3-piece 60% plate - with support fins  (Read 5407 times)

0 Members and 1 Guest are viewing this topic.

Offline KHAANNN

  • Thread Starter
  • Posts: 1660
3D Printed 3-piece 60% plate - with support fins
« on: Sun, 24 May 2015, 06:00:03 »
Instead of continuing my 3d printed 60% venture from the swillkb thread, I decided to continue here

A 1-piece 60% plate is impossible to print for me, as the dimensions are larger than the build plate, so I decided to slice it into 3, also adding the possibility of a double coloured plate (sides + middle)

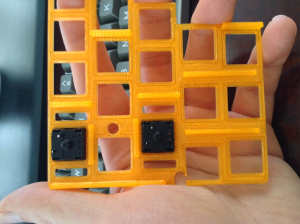
prototype1:
101580-0

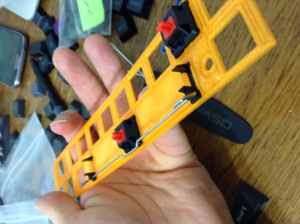
prototype2:
101582-1

I also decided to add support fins, to both add bulk and support, the prototype 2 explores this option, it's definitely going to stay

I made the fins 5mm from the plate top, however it was too much

I'm intending to make them flush with the switch stress points, so both switches and the plate will share the stress

The fins are especially needed for the stabs, otherwise the spacebar stabiliser wiggles the plastic plate

One other option is to leave the support fins higher, and let the plate handle all the stress, but I don't think it's a good idea, the keypresses might be weaker, as the switches will be in air

---

I'm just experimenting at this point, I need to enlarge the plate from the left side, which isn't easy by keeping the original borders, so I will probably need to re-do the borders
I'm also not sure how much enlargement they need

I also need to improve the rightmost screw hole a bit

So the design is far from finalised, I will likely extend the plate to be 4mm+ in the end and manually remove holes for the stabs and the switches, which will make it very bulky and strong :)
Endgame | 1.25 Cmd for GMK Sets Please | Or Just 1.25 Blanks Like The Good Old Days

Offline vvp

  • Posts: 887
Re: 3D Printed 3-piece 60% plate - with support fins
« Reply #1 on: Sun, 24 May 2015, 07:51:26 »
You can make the plate as thick as the switch is. That way it will touch the PCB to which you are going to solder the switches. If you solder diodes from the other side of the PCB as the switches then there is no problem.
Cut only a small indentations for the switch clips as I do on my Katy keyboard:

Print with 25% infill, 1 mm shell thickness. It will not use much more material and will be very strong. You will not need a PCB if you add some support legs down to the bottom of the case and are OK with hand wired the matrix.

Edit: But you do not need thick plate for PCB mounted board. What I wanted to say is that FFF/FDM printers can print sparse infill so it is often easier (and not much more expensive) to add volume. Increasing volume adds a lot to strength and not that much to the price (if with sparse infill is used).
« Last Edit: Sun, 24 May 2015, 07:56:38 by vvp »

Offline KHAANNN

  • Thread Starter
  • Posts: 1660
Re: 3D Printed 3-piece 60% plate - with support fins
« Reply #2 on: Sun, 24 May 2015, 08:05:24 »
Interesting, so you are making the switch latch on with those small cutouts?

It seems many people use the switches unlatched with fully thick plates (like acrylic cut etc.), that's not desirable for me, that's why I was keen on keeping the plate part 1.5mm, but this small gaps idea is just perfect

Other than that, I'm definitely using ~100% infill (maybe 80% to prevent warping If I decide to go with a fully thick plate), strength and heft are desired properties for me

I was using 0.82 extruder multiplier with prototype 1, it generally produces clean prints, even bumping it to 0.88 on prototype 2 made the result less bendable

Anyway, thanks a lot for the input, have you experimented with finishing alternatives?
I'm thinking of experimenting with a 2000 grit sandpaper and some spray paints / matte coating

sandpaper + coat + sandpaper + spray paint + coat might produce a nice lasting and pleasing surface, on the other hand, just using the raw material is plain and simple
« Last Edit: Sun, 24 May 2015, 08:08:58 by KHAANNN »
Endgame | 1.25 Cmd for GMK Sets Please | Or Just 1.25 Blanks Like The Good Old Days

Offline vvp

  • Posts: 887
Re: 3D Printed 3-piece 60% plate - with support fins
« Reply #3 on: Sun, 24 May 2015, 14:02:14 »
Interesting, so you are making the switch latch on with those small cutouts?
Yes. It works acceptably on curved plates I use. Definitely better than not having the cutouts at all. It should work much better on your straight plate (especially when you print it upside down and the cutout edge is not printed in air (as a bridge) ... as it is in my case of curved plates.

Other than that, I'm definitely using ~100% infill (maybe 80% to prevent warping If I decide to go with a fully thick plate), strength and heft are desired properties for me
From the strength point of view, it is better to print it with bigger volume and sparse infill than small volume and full infill. The reason is that the strength of the part grows with second power of part size. If you make your plate 2 times thicker it will be 2*2 = 4 times stronger when bending. Most of the resistance to bending is on the surface of the part so using sparse infill will not decrease part strength much. I did not investigate this in detail but on reprap forums it is claimed that using more than 80% infill will add almost nothing to the strength. About 50% seems a good compromise if you want strong parts. About 25% is the minimum which should be used. Shell thickness is typically in the rage of 1 - 2 mm.

Anyway, thanks a lot for the input, have you experimented with finishing alternatives?
I only clean up my parts from support material and any possible strings and paint with acetone. If I would want a nice finish I would probably:
  • paint with acetone
  • smooth with sand paper
  • paint with acetone xor acetone vapor bath

Offline berserkfan

  • Posts: 2135
  • Location: Not CONUS Not CONUS Not CONUS Not CONUS
  • changing diapers is more fun than model f assembly
Re: 3D Printed 3-piece 60% plate - with support fins
« Reply #4 on: Mon, 25 May 2015, 10:47:35 »
I find this discussion awesomely interesting and hope that more info sharing will do us a lot of good.

That said, OP I don't think most geeks will agree in having the switches share the stress. The plate is supposed to take all the stress so that no stress is placed on the PCB or the solder points/ pads.

Another concern it the lack of latching on if the plate is too thick. Switch is only held in by friction. When you pull off keycaps it will stress the solder joints.

I find it unavoidable that plates will have to be made of metal for the forseeable future.
Most of the modding can be done on your own once you break through the psychological barriers.

Offline KHAANNN

  • Thread Starter
  • Posts: 1660
Re: 3D Printed 3-piece 60% plate - with support fins
« Reply #5 on: Mon, 25 May 2015, 12:20:14 »
I find this discussion awesomely interesting and hope that more info sharing will do us a lot of good.

That said, OP I don't think most geeks will agree in having the switches share the stress. The plate is supposed to take all the stress so that no stress is placed on the PCB or the solder points/ pads.

Another concern it the lack of latching on if the plate is too thick. Switch is only held in by friction. When you pull off keycaps it will stress the solder joints.

I find it unavoidable that plates will have to be made of metal for the forseeable future.

For pulling, I generally find solder to be exceptionally strong, I only once pulled a switch out of the PCB, and in that case, I was pulling the switch with a plier in a rage

In my opinion, most metal cases don't deserve your trust either, especially non-square cutouts don't, the metal plate would probably need to be 1.52mm or something to make the most use of the latching, even in that case, the pull probably transfers to the solder too

For my usage, I will probably run 5-10 trials to perfect the dimensions within 0.1mm, especially with 3d-printing it's needed, as the actual product dimensions are bound by the layer height and the printer precision

I also think it's practically impossible to level the fully thick plate with the switches, either the switch or the plate will take the lead, better make it the plate
The reason I want switches to touch the pcb is to make the pcb absorb the bottom out forces, as I'm afraid a plastic plate might prove to be clumsy, but that will most probably not be the case, it might turn out to be the opposite, I guess I will try and see :)

So, currently, I'm planning on printing a fully thick plate that stands ~0.1mm taller than the switch bottoms, with vvp's latch-holes optimized as much as possible
The switches are also pcb-mounts :) (The actual challenge will probably be removing a switch, if issues occur :)
Endgame | 1.25 Cmd for GMK Sets Please | Or Just 1.25 Blanks Like The Good Old Days

Offline vvp

  • Posts: 887
Re: 3D Printed 3-piece 60% plate - with support fins
« Reply #6 on: Mon, 25 May 2015, 14:59:47 »
Soldering to PCB will make sure you cannot pull out the switch.
The plate will make sure the swithes cannot bend/twist.
If you make the plate thick enough it will be strong enough. Especially together with PCB. If you want it even stronger then you can screw the PCB to the plate on few places. That will help
I use my first Katy v0.6 for about half a year and the strength is no issue (at least with my curved plate).

I would not make the plate thicker than the distance to the PCB. I would make it so that they just touch, sparse infill (probably 33%), and possibly some screws to screw PCB to the plate on more spaces. But I think it is not a big difference.
Remember, if you want to use through hole diodes (which will not be in the switch housing) then you need some space for them on both sides of the pcb.  That means additional cutouts in the plate.)

Offline KHAANNN

  • Thread Starter
  • Posts: 1660
Re: 3D Printed 3-piece 60% plate - with support fins
« Reply #7 on: Tue, 26 May 2015, 02:43:38 »
I also noticed another possibility today, but I'm not sure whether I want to entertain this possibility

I like DSA keycaps, yet a little bit of sculpture would be nice too, the idea is to build a sculptured 60% plate for flat keycaps

An 3mm of height variance is possible by keeping the solderability of the switches (barely) - or it would be possible to glue them to the plate and extend the terminals with wires

So the idea is to shift the A row by 1mm, Q row by 2mm and 1! row by 3mm

It's obviously an overkill, also I'm not sure whether I like sculptured keycaps after all but it's still nice to be able to solve the issue on the plate level with DSA keycaps that I have plenty (or I might just seek an unused GMK keyset, or wait ctrlalt's jtkeycaps to produce actually usable keysets, which seems more logical)
« Last Edit: Tue, 26 May 2015, 02:59:07 by KHAANNN »
Endgame | 1.25 Cmd for GMK Sets Please | Or Just 1.25 Blanks Like The Good Old Days

Offline vvp

  • Posts: 887
Re: 3D Printed 3-piece 60% plate - with support fins
« Reply #8 on: Tue, 26 May 2015, 03:42:21 »
So the idea is to shift the A row by 1mm, Q row by 2mm and 1! row by 3mm
It looks like a linear increase. You can achieve something very similar by simply tilting the whole keyboard. That changes the angle of the switches a bit too but I doubt it represents a significant difference. If you want then try it and you will see :)

Offline KHAANNN

  • Thread Starter
  • Posts: 1660
Re: 3D Printed 3-piece 60% plate - with support fins
« Reply #9 on: Tue, 26 May 2015, 04:17:27 »
So the idea is to shift the A row by 1mm, Q row by 2mm and 1! row by 3mm
It looks like a linear increase. You can achieve something very similar by simply tilting the whole keyboard. That changes the angle of the switches a bit too but I doubt it represents a significant difference. If you want then try it and you will see :)

I initially didn't get it, but I see your point now - abandoned the varying height idea altogether :)
Endgame | 1.25 Cmd for GMK Sets Please | Or Just 1.25 Blanks Like The Good Old Days

Offline KHAANNN

  • Thread Starter
  • Posts: 1660
Re: 3D Printed 3-piece 60% plate - with support fins
« Reply #10 on: Wed, 27 May 2015, 14:07:40 »
here is my prototype3, with vvp-style cutouts - it's a very rough prototype, however the cutouts are just perfect, the switches fit in instantly, there is 0 wiggle, they are tight, the removal is easy, it's a match made in heaven

the only remaining issue is the costar calculations of the swillkb builder, they are off by 1mm, the stabilisers are too stiff to be usable, before the lube kicks in, the switch gets stuck

I've used rough holes both for switch latches and as stabiliser holes, both 1.52mm below the plate top, they worked pretty well without any issue - the plate is 5mm, the nudges of the switches won't touch the pcb, but they will probably be <0.5mm away from the pcb, I will use these dimensions for my endgame plate as well

101788-0

I'm even considering removing the PCB-feet of the switches, in case the PCB holes aren't as perfect as the plate and in case they cause the switches to be leaned when mounted
« Last Edit: Wed, 27 May 2015, 14:10:22 by KHAANNN »
Endgame | 1.25 Cmd for GMK Sets Please | Or Just 1.25 Blanks Like The Good Old Days

Offline CPTBadAss

  • Woke up like this
  • Posts: 14365
    • Tactile Zine
Re: 3D Printed 3-piece 60% plate - with support fins
« Reply #11 on: Wed, 27 May 2015, 14:11:50 »
We used to do acetone vapor bathes at work to get a good finish on our 3D printed parts. I work in the aerospace industry.

And at Keycon, obra was telling us for his keyboardio prototypes, he was using wirewrapping on the switches for a simple and strong method of securing the switches in a handwired prototype. Wire-wrapping and soldering would be even stronger. Maybe you could use that?
« Last Edit: Wed, 27 May 2015, 14:18:25 by CPTBadAss »

Offline KHAANNN

  • Thread Starter
  • Posts: 1660
Re: 3D Printed 3-piece 60% plate - with support fins
« Reply #12 on: Wed, 27 May 2015, 14:25:26 »
We used to do acetone vapor bathes at work to get a decent finish on our 3D printed parts.

And at Keycon, obra was telling us for his keyboardio prototypes, he was using wirewrapping on the switches for a simple and strong method of securing the switches in a handwired prototype. Wire-wrapping and soldering would be even stronger. Maybe you could use that?

The plate is going on top of an infinity pcb, so it would probably not apply, tho, I wonder how it looks :)

Preparing an acetone bath seems like a daunting task too, I also find it much easier to use PLA for printing, haven't tested printing a plate with ABS yet

I've tried sanding the parts a bit, didn't get any promising results

I will probably just coat them with a clear acrylic matte coating spray, mainly to make them anti bacterial, otherwise sweat + 3d printed part pores might create biological pockets inside the keyboard in the long run - don't want that to happen (I always grip my keyboards from the sides, that's where the sweat comes from)
Endgame | 1.25 Cmd for GMK Sets Please | Or Just 1.25 Blanks Like The Good Old Days

Offline vvp

  • Posts: 887
Re: 3D Printed 3-piece 60% plate - with support fins
« Reply #13 on: Wed, 27 May 2015, 16:45:52 »
Looks pretty :)

PLA is also stiffer so if you want as stiff plate as possible then it is a better option. I mostly use ABS since I have much more experience with it and small defects are easily fixable with ABS-glue.

If it would happen that some of the Cherry MX Blue switches would not have a nice crisp click when inserted inside the plate then it is probable that the switch slot is a tiny bit smaller. In such a case, scrub its insides with a knife or use a sand paper to enlarge it a tiny bit. I built tens of testing plates for Katy and I had few cases like this. It is rare but it may happen.

Offline KHAANNN

  • Thread Starter
  • Posts: 1660
Re: 3D Printed 3-piece 60% plate - with support fins
« Reply #14 on: Wed, 15 July 2015, 03:40:45 »
105549-0

By the way I completed my first build, the plate is 5mm thick with the vvp-nudges, the switches are lubed and stickered: https://geekhack.org/index.php?topic=72624.0

I fell in love with it at first trial, I knew I could never go back, the bottom out's don't produce any pings, it's just a pure satisfying thock
I also tried the wire-bending costar improvement idea of: https://geekhack.org/index.php?topic=72076.0 - it worked too, there is no more costar clinginess, I just bent the spacebar wire a tiny bit with a plier

Special thanks to vvp for his suggestion, it really combines the best of both worlds

Going to attempt this layout next: https://geekhack.org/index.php?topic=73575
« Last Edit: Wed, 15 July 2015, 03:42:16 by KHAANNN »
Endgame | 1.25 Cmd for GMK Sets Please | Or Just 1.25 Blanks Like The Good Old Days

Offline vvp

  • Posts: 887
Re: 3D Printed 3-piece 60% plate - with support fins
« Reply #15 on: Wed, 15 July 2015, 04:10:08 »
Nice job!
Did you use PLA or ABS?

Offline KHAANNN

  • Thread Starter
  • Posts: 1660
Re: 3D Printed 3-piece 60% plate - with support fins
« Reply #16 on: Wed, 15 July 2015, 04:30:49 »
I use PLA as I have a lot of experience with it, in terms of not warping

Had extruder fan issues around the second piece, changed the fan, at the third piece I started experiencing heat-related jams, changed the fan again (returned to the original design), had to calibrate the retraction parameters a lot - the nudges require a lot of jumps - basic retraction logic is prone to fail, the grey PLA that I have isn't too easy, going to use a black PLA spool I have for future prints that extrudes better - printed the last piece maybe 5 times

I don't like the 3d printer lines and gaps, so I printed <0.1mm into the surface, the surface of the plate adopted the 3M blue painter tape's texture

I used 0.4mm hole-lines to separate the plate pieces from the main plate, It looks good but there are 1-2 minor overlaps that result in minor keycap spacing issues (like 0.2-0.3mm that are barely noticeable, not an issue with dark keycaps), I'm probably going to use 1mm gaps next to be on the safe side
Endgame | 1.25 Cmd for GMK Sets Please | Or Just 1.25 Blanks Like The Good Old Days

Offline vvp

  • Posts: 887
Re: 3D Printed 3-piece 60% plate - with support fins
« Reply #17 on: Wed, 15 July 2015, 05:37:11 »
Did you use any kind of surface treatment of the printed PLA plate?
I do not know much about work with PLA so I do not know what kind of post-processing and surface treatment people do on PLA parts.

Offline KHAANNN

  • Thread Starter
  • Posts: 1660
Re: 3D Printed 3-piece 60% plate - with support fins
« Reply #18 on: Wed, 15 July 2015, 05:51:26 »
No treatment at all, I just carved out the switch holes lightly, as printing into the plate creates a border that stresses the switch, it takes 5 minutes to remove them from a piece - normally it's not needed (it's a 0.1-2mm skirt from over-extrusion)

I considered spray coating, to prevent pores of the print becoming bacterial in the long run, but after I assessed the resulting prints, I concluded it's not needed, because the surface is pore-less

The gist is to lay this into the build plate: http://www.amazon.com/3M-Painters-Multi-Use-70-Inch-60-Yard/dp/B00004Z4BB - and then over-extrude / print into the tape so the surface adopts the texture

It works wonders for regular/flat keyboard plates, as only the top side is visible

Normally I calibrate the printer dynamics to make sure each layer is perfect and the side of the print only has lines and not over extrusions, but with the keyboard plate prints, only the surface is important
Endgame | 1.25 Cmd for GMK Sets Please | Or Just 1.25 Blanks Like The Good Old Days