Author Topic: Cherry MX plate hole shape  (Read 26064 times)

0 Members and 1 Guest are viewing this topic.

Offline snowe

  • Thread Starter
  • Posts: 31
Cherry MX plate hole shape
« on: Fri, 17 October 2014, 00:46:07 »
Is there any reason why the plate cutouts for the Cherry MX switches need to be shaped this way?


why can't it be shaped without the tab in the middle on the sides, seeing as how there isn't support on those sides anyway.

like this:


Offline Distilled

  • Posts: 111
  • Location: Aus
Re: Cherry MX plate hole shape
« Reply #1 on: Fri, 17 October 2014, 00:57:49 »
similar to this one at geekhackers.org?

http://www.geekhackers.org/products/60-keyboard-titanium-switch-plates-with-notches-for-switch-disassembly

Although I have no experience with this, so some one else would have to pipe up if there are any issues with this design.

Offline snowe

  • Thread Starter
  • Posts: 31
Re: Cherry MX plate hole shape
« Reply #2 on: Fri, 17 October 2014, 01:04:04 »
Hmm yes similar to that, except without the cutout at the top and bottom. Aren't those necessary to have the switch "latch" onto the plate? I understand the need for them on the right and left, so that the switch can be opened at a later date without desoldering.

Offline Distilled

  • Posts: 111
  • Location: Aus
Re: Cherry MX plate hole shape
« Reply #3 on: Fri, 17 October 2014, 01:24:22 »
well as I view it your not cutting out the top and bottom your simply taking out a piece of either side. The little square left is there to stop any sideways travel of the switch housing. If you dont do this there is nothing to stop the key moving sideways. Your design looks like exactly the same concept to me. Hopefully I am not missing something here.


Offline 0100010

  • Posts: 1127
  • Location: DFW, TX, US
  • Not Sure
Re: Cherry MX plate hole shape
« Reply #4 on: Fri, 17 October 2014, 09:23:32 »
  Quoting me causes a posting error that you need to ignore.

Offline snowe

  • Thread Starter
  • Posts: 31
Re: Cherry MX plate hole shape
« Reply #5 on: Fri, 17 October 2014, 11:17:33 »
well as I view it your not cutting out the top and bottom your simply taking out a piece of either side. The little square left is there to stop any sideways travel of the switch housing. If you dont do this there is nothing to stop the key moving sideways. Your design looks like exactly the same concept to me. Hopefully I am not missing something here.
Ah I didn't even look at it that way, you are absolutely correct.

http://geekhack.org/index.php?topic=59837.0

Oh man how did you find that post! I tried searching, but couldn't find anything. That is exactly the information I needed! Thank you so much!


Offline jacobolus

  • Posts: 3661
  • Location: San Francisco, CA
Re: Cherry MX plate hole shape
« Reply #6 on: Fri, 17 October 2014, 18:39:40 »
You should inspect a Cherry MX switch; you should be able to see precisely what parts of the plate contact what parts of the switch housing. There aren’t too many hard requirements when cutting plate holes, but I’d recommend:
(1) try to get at least one part of the plate reasonably tight against each side of the switch. You could probably hold the switch from just two opposite corners, or along the sides somewhere, but a tight hold at all 4 corners is the popular approach.
(2) try to get the little plastic clips to securely snap into place
(3) (optional) leave space for the top housing to be removed without needing to desolder the full switch (personally I think this is an unnecessary gimmick, but many folks seem to like that feature)

Other than that, do whatever you want, go nuts, experiment.
« Last Edit: Fri, 17 October 2014, 18:42:38 by jacobolus »

Offline snowe

  • Thread Starter
  • Posts: 31
Re: Cherry MX plate hole shape
« Reply #7 on: Sat, 18 October 2014, 02:32:59 »
You should inspect a Cherry MX switch; you should be able to see precisely what parts of the plate contact what parts of the switch housing. There aren’t too many hard requirements when cutting plate holes, but I’d recommend:
(1) try to get at least one part of the plate reasonably tight against each side of the switch. You could probably hold the switch from just two opposite corners, or along the sides somewhere, but a tight hold at all 4 corners is the popular approach.
(2) try to get the little plastic clips to securely snap into place
(3) (optional) leave space for the top housing to be removed without needing to desolder the full switch (personally I think this is an unnecessary gimmick, but many folks seem to like that feature)

Other than that, do whatever you want, go nuts, experiment.

I have been looking closely at the switch to understand the choices for some of the cutouts. That's why I got confused by #4 (the one with insets on each side and cutouts at each corner to allow rotation). We need a name for them. Or acronyms. R - Rotatable, C - Cutouts for modding, I - Insets for stability
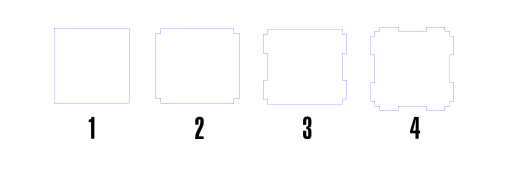

1: R
2: C
3: CI
4: RCI

So the RCI cutout confused me, because I didn't understand the need for all those cutouts. Reading that thread really helped though.
I was having the most trouble with trying to get everything to fit tightly and have the tabs snap. I created the hole with a dremel and a routing bit, and then hand filed the rest down. I tried creating the cutouts for modding, but I don't see how you are even supposed to use them while the switch is mounted. I've successfully opened a switch not mounted, but I had to pry the tabs up. I also watched Litster's video but that also didn't make any sense.
I'm most likely going to choose #2/C because I think I'd like to be able to try out modding at a later date and I want it to be as easy as possible, even though I don't know how to do it yet.

I think this is the same topic, but how do stabilizer cutouts work? I've seen several different designs, from the ones on the ergodox plate to the infinity keyboard on massdrop and they look different in several ways. I know there are plate mounted stabilizers and pcb mounted stabilizers, but I can't find any resources on how they work.

Offline Oobly

  • * Esteemed Elder
  • Posts: 3929
  • Location: Finland
Re: Cherry MX plate hole shape
« Reply #8 on: Mon, 20 October 2014, 05:05:51 »
There are "Cherry" stabilisers and "Costar" stabilisers. Both come in two types, PCB mount or Plate mount.

Cherry stabilisers have a plastic slider with the plus shaped stem on it mounted in a tower and a metal rod connecting the sliders together. The sliders stay inside the towers. With Costar, the sliders are loose and get mounted to the keycap before installing it and the metal rod needs to be inserted into the sliders when installing the keycap.

With plate mounted stabilisers, the "towers" mount to the plate, with PCB mount they mount to the PCB. Plate mounted stabilisers don't need any consideration on the PCB side, but you need to design the plate cutouts specifically for the type of stabiliser. I'm not sure if Costar PCB mount stabs exist, so there are really 3 types to consider (Cherry plate, Cherry PCB, Costar plate).

I believe the slots for Costar plate mount are 14mmx3.3mm, you can see more details of 2x stabiliser cutouts here: http://deskthority.net/keyboards-f2/costar-stabilizer-plate-measurements-t5872.html

Someone please correct me if I'm wrong, but I believe the designs in the first drawing in this post are universal and support all 3 types of stabiliser: http://geekhack.org/index.php?topic=47744.msg1019782#msg1019782

Personally I like type 3 (CI) switch slots since the switch does get a little more support from the side pieces and is held a little more securely. It is possible to make type 2 (C) cutouts able to fit both Cherry MX and Alps / Matias switches, but the plate thickness and mounting distance to the PCB should ideally be different with the different switch types.
Buying more keycaps,
it really hacks my wallet,
but I must have them.

Offline jacobolus

  • Posts: 3661
  • Location: San Francisco, CA
Re: Cherry MX plate hole shape
« Reply #9 on: Mon, 20 October 2014, 05:50:04 »
There are "Cherry" stabilisers and "Costar" stabilisers. Both come in two types, PCB mount or Plate mount.
This is wrong. Cherry stabilizers always mount to the PCB. They can be used with a plate that has a cutout to let the stabilizer poke through, but they’re still attached to the PCB in that case. “Costar” style stabilizers hold the stabilizer wire via plastic pieces which clip into the plate: the plate is not optional with this type.
« Last Edit: Mon, 20 October 2014, 05:51:49 by jacobolus »

Offline Melvang

  • Exquisite Lord of Bumfluff
  • * Maker
  • Posts: 4398
  • Location: Waterloo, IA
  • Melvang's Desktop Customs
Re: Cherry MX plate hole shape
« Reply #10 on: Mon, 20 October 2014, 08:46:42 »
There are "Cherry" stabilisers and "Costar" stabilisers. Both come in two types, PCB mount or Plate mount.
This is wrong. Cherry stabilizers always mount to the PCB. They can be used with a plate that has a cutout to let the stabilizer poke through, but they’re still attached to the PCB in that case. “Costar” style stabilizers hold the stabilizer wire via plastic pieces which clip into the plate: the plate is not optional with this type.

Cherry stabilizers do in fact come in both plate mount and PCB mount.  They are not interchangeable with the same plate hole.  While you can use plate mount if the PCB has holes for PCB mount, you are restricted to the holes in the plate if you have one.  PCB mount cherry stabs will not fit through the hole for a plate mount cherry or costar.  There is however a style of plate hole that will accept both plate mount cherry and costar though. 

I have had a couple of wyse boards with plate mount on everything but a PCB mount on the space bar.  I can post pics if needed.
OG Kishsaver, Razer Orbweaver clears and reds with blue LEDs, and Razer Naga Epic.   "Great minds crawl in the same sewer"  Uncle Rich

Offline jdcarpe

  • * Curator
  • Posts: 8852
  • Location: Odessa, TX
  • Live long, and prosper.
Re: Cherry MX plate hole shape
« Reply #11 on: Mon, 20 October 2014, 09:26:37 »
Okay, stabilizers. Here are the facts:

  • Costar stabilizers are always plate mount. The hole is a long rectangular cutout.
  • Cherry stabilizers can be either plate mount or PCB mount. They are not interchangeable, and have different housings for the inserts which attach to the key caps.
  • Cherry PCB mount stabilizers CAN use the holes designed for Cherry plate mount stabilizers.

Cherry PCB mount stabilizers attach to the PCB, and can pass through the Cherry stabilizer hole in a plate, if a plate is used. They require holes in the PCB specifically for their use. The plate may be one designed for Cherry plate mount stabilizers (i.e. has a specific design for the stabilizer hole), or may have an enlarged rectangular hole for easier clearance.

Cherry plate mount stabilizers require a mounting plate (obviously), and do not attach to the PCB in any way. They require a specific hole design in the plate in order to lock into place on the plate.
KMAC :: LZ-GH :: WASD CODE :: WASD v2 :: GH60 :: Alps64 :: JD45 :: IBM Model M :: IBM 4704 "Pingmaster"

http://jd40.info :: http://jd45.info


in memoriam

"When I was a kid, I used to take things apart and never put them back together."

Offline snowe

  • Thread Starter
  • Posts: 31
Re: Cherry MX plate hole shape
« Reply #12 on: Mon, 20 October 2014, 11:57:53 »
Whew, so many conflicting things. Thank you Oobly for linking to the CAD resources thread. I didn't realize you could actually click on the pictures for the dwg's and I was too lazy to download them and open them all or I would have seen that first file weeks ago. I did not realize that there was a nice template for all of the cutouts. Thanks again!

So I understand plate mounted stabilizers, but I don't really understand how PCB mounted ones work. I understand that there are cutouts on the pcb, just like for the plates, but is the wire just longer to come up out of the case? Or do they not have wires? I can't find any pictures of a Cherry pcb stabilizer with plates over them. I also can't figure out what the horizontal slits (for spacebars) are for. Are those for PCB mounted stabilizers?

Offline jacobolus

  • Posts: 3661
  • Location: San Francisco, CA
Re: Cherry MX plate hole shape
« Reply #13 on: Mon, 20 October 2014, 19:11:26 »
Cherry plate mount stabilizers require a mounting plate (obviously), and do not attach to the PCB in any way. They require a specific hole design in the plate in order to lock into place on the plate.
Oh interesting, I’ve never seen these. I thought Cherry mostly made PCB-mount keyboards.

Offline 0100010

  • Posts: 1127
  • Location: DFW, TX, US
  • Not Sure
Re: Cherry MX plate hole shape
« Reply #14 on: Mon, 20 October 2014, 19:12:22 »
  Quoting me causes a posting error that you need to ignore.

Offline dorkvader

  • Posts: 6288
  • Location: Boston area
  • all about the "hack" in "geekhack"
Re: Cherry MX plate hole shape
« Reply #15 on: Mon, 20 October 2014, 21:10:34 »
Cherry plate mount stabilizers require a mounting plate (obviously), and do not attach to the PCB in any way. They require a specific hole design in the plate in order to lock into place on the plate.
Oh interesting, I’ve never seen these. I thought Cherry mostly made PCB-mount keyboards.

They do, mostly.

It's the few plate mount cherry keyboards that required these stabilizers. I think some WYSE keyboards have them as well, but I could be mistaken.

The "third" type of cherry stabilzier are the screw-down PCB mount instead of clip-on PCB mount.

Offline Oobly

  • * Esteemed Elder
  • Posts: 3929
  • Location: Finland
Re: Cherry MX plate hole shape
« Reply #16 on: Tue, 21 October 2014, 06:28:47 »
A couple of pics from my KBT Pure with added plate. PCB stabs with a plate mounted over.

80361-0

80363-1

As you can see, the wire runs under the plate. The horizontal hole is for inserting the wire, but you have to remove the spacebar switch in order to do so.
Buying more keycaps,
it really hacks my wallet,
but I must have them.

Offline snowe

  • Thread Starter
  • Posts: 31
Re: Cherry MX plate hole shape
« Reply #17 on: Tue, 21 October 2014, 12:12:15 »
A couple of pics from my KBT Pure with added plate. PCB stabs with a plate mounted over.

(Attachment Link)

(Attachment Link)

As you can see, the wire runs under the plate. The horizontal hole is for inserting the wire, but you have to remove the spacebar switch in order to do so.

Ah holy crap, this was the most useful picture I've seen yet. It makes a lot more sense now. And it mounts to the PCB by clipping on or by screws right?

Offline jdcarpe

  • * Curator
  • Posts: 8852
  • Location: Odessa, TX
  • Live long, and prosper.
Re: Cherry MX plate hole shape
« Reply #18 on: Tue, 21 October 2014, 12:36:41 »
A couple of pics from my KBT Pure with added plate. PCB stabs with a plate mounted over.

(Attachment Link)

(Attachment Link)

As you can see, the wire runs under the plate. The horizontal hole is for inserting the wire, but you have to remove the spacebar switch in order to do so.

Ah holy crap, this was the most useful picture I've seen yet. It makes a lot more sense now. And it mounts to the PCB by clipping on or by screws right?

Yes, it mounts to the PCB with clips. The screw on stabilizer design is obsolete, really, and commonly only seen used for the spacebars of old WYSE keyboards.
KMAC :: LZ-GH :: WASD CODE :: WASD v2 :: GH60 :: Alps64 :: JD45 :: IBM Model M :: IBM 4704 "Pingmaster"

http://jd40.info :: http://jd45.info


in memoriam

"When I was a kid, I used to take things apart and never put them back together."

Offline snowe

  • Thread Starter
  • Posts: 31
Cherry MX plate hole shape
« Reply #19 on: Tue, 21 October 2014, 12:41:26 »
A couple of pics from my KBT Pure with added plate. PCB stabs with a plate mounted over.

(Attachment Link)

(Attachment Link)

As you can see, the wire runs under the plate. The horizontal hole is for inserting the wire, but you have to remove the spacebar switch in order to do so.


Ah holy crap, this was the most useful picture I've seen yet. It makes a lot more sense now. And it mounts to the PCB by clipping on or by screws right?

Yes, it mounts to the PCB with clips. The screw on stabilizer design is obsolete, really, and commonly only seen used for the spacebars of old WYSE keyboards.

Great! Thanks for all the help guys, this was really useful information :D
« Last Edit: Tue, 21 October 2014, 13:27:52 by snowe »

Offline Oobly

  • * Esteemed Elder
  • Posts: 3929
  • Location: Finland
Re: Cherry MX plate hole shape
« Reply #20 on: Tue, 21 October 2014, 14:00:56 »
A couple of pics from my KBT Pure with added plate. PCB stabs with a plate mounted over.

(Attachment Link)

(Attachment Link)

As you can see, the wire runs under the plate. The horizontal hole is for inserting the wire, but you have to remove the spacebar switch in order to do so.

Ah holy crap, this was the most useful picture I've seen yet. It makes a lot more sense now. And it mounts to the PCB by clipping on or by screws right?

Yup, these ones clip into the PCB. Here is a picture of some that have screws seen from underneath:


The clip on ones just have clips where the screws are. You insert the round plastic piece first, then push the clip in / screw in the screw.

Some nice pics of both PCB and Plate mount Cherry stabilisers in this thread: https://forum.lowyat.net/topic/3310246/all
Buying more keycaps,
it really hacks my wallet,
but I must have them.

Offline dorkvader

  • Posts: 6288
  • Location: Boston area
  • all about the "hack" in "geekhack"
Re: Cherry MX plate hole shape
« Reply #21 on: Tue, 21 October 2014, 14:10:38 »
Yes, it mounts to the PCB with clips. The screw on stabilizer design is obsolete, really, and commonly only seen used for the spacebars of old WYSE keyboards.
So I used to think the screw down was obsolete as well, but then I found 4 pairs of them in my WEY keyboard, produced in 2006.

Offline Oobly

  • * Esteemed Elder
  • Posts: 3929
  • Location: Finland
Re: Cherry MX plate hole shape
« Reply #22 on: Wed, 22 October 2014, 01:45:38 »
Also, the recent GB Ivan ran for stabilisers was for the screw type ones... Not obsolete, just not used as often by commercial board makers nowadays.
Buying more keycaps,
it really hacks my wallet,
but I must have them.

Offline snowe

  • Thread Starter
  • Posts: 31
Re: Cherry MX plate hole shape
« Reply #23 on: Wed, 22 October 2014, 18:01:32 »
So what's with the little inserts on the sides of certain stabilizer cutouts then? The ones on the ergodox are just straight rectangles, but the ones on the Phantom board are all jagged shaped.

Offline Melvang

  • Exquisite Lord of Bumfluff
  • * Maker
  • Posts: 4398
  • Location: Waterloo, IA
  • Melvang's Desktop Customs
Re: Cherry MX plate hole shape
« Reply #24 on: Wed, 22 October 2014, 18:07:03 »
Rectangle are for either PCB mount cherry or costar.
OG Kishsaver, Razer Orbweaver clears and reds with blue LEDs, and Razer Naga Epic.   "Great minds crawl in the same sewer"  Uncle Rich