Author Topic: KeyForge - The Forge Casting Thread  (Read 72552 times)

0 Members and 1 Guest are viewing this topic.

Offline Sneaky Potato

  • * Maker
  • Thread Starter
  • Posts: 328
  • Location: Midworld
  • Gunslinger
Re: Sneaky Potato's KeyForge (plus Bar & Grill)
« Reply #50 on: Wed, 23 March 2016, 11:54:52 »
That Saber cap is so nice.

Subd for progress

Hey I really appreciate that! I was starting to get the feeling that people on this site aren't too interested in my work, but it's awesome to hear some positive feedback. I'm going to keep refining the Saber, and there will be a new design coming soon as well. Thanks for the support!

Offline tigersharkdude

  • * Destiny Supporter
  • Posts: 1488
  • Location: At the gym
Re: Sneaky Potato's KeyForge (plus Bar & Grill)
« Reply #51 on: Wed, 23 March 2016, 12:24:46 »
That Saber cap is so nice.

Subd for progress

Hey I really appreciate that! I was starting to get the feeling that people on this site aren't too interested in my work, but it's awesome to hear some positive feedback. I'm going to keep refining the Saber, and there will be a new design coming soon as well. Thanks for the support!

It seems not too many people come to this sub, I'm pretty bad about it too. I so often look at 'new replies to your posts' instead of 'unread topics'.

Your work is really nice though, I'm interested in picking a few up once you get some in MX

Offline Sneaky Potato

  • * Maker
  • Thread Starter
  • Posts: 328
  • Location: Midworld
  • Gunslinger
Re: Sneaky Potato's KeyForge (plus Bar & Grill)
« Reply #52 on: Wed, 23 March 2016, 13:44:32 »
Quick question for everybody (especially the artisans)...

Can anybody give me some tips on the cleanest way to mount my master key to the bottom of the mold box? Right now I'm just using modeling clay, but I'm unhappy with the results and the parting line. I want to mount it to the bottom so I can get cleaner parting lines, but I'm having a hard time figuring out a good way to do it. It has to prevent silicone from entering in from the bottom of the cap. Any ideas would be really helpful.

Offline Binge

  • Island of Sandy Beaches
  • * Maker
  • Posts: 3269
  • Location: Binge Haüs
  • With Gentle Time. I Feel Very Nice.
    • Hunger Work Studio
Re: Sneaky Potato's KeyForge (plus Bar & Grill)
« Reply #53 on: Wed, 23 March 2016, 14:40:58 »
DO NOT EVER RECOMMEND A HARBOR FREIGHT PRESSURE POT.

This is something mentioned in thread after thread after thread.  It is never worth cheaping out on a pot.   Even if it doesn't maim or kill you, if it goes, it can cause substantial property damage.  The risk to yourself is not worth the cost savings.  If you can't afford a proper pot, explore other options.


+1

Yeah, you guys are right. I've retired the pot and won't be using it again, but I'm looking forward to my CA Tech pot. It's going to be a great feeling not constantly worrying about explosions. Thanks for the advice guys!

I would suggest a Binks pot.  CA-tech is a decent company, but I would rather see people go for maximum safety instead of cost effectiveness.
60% keyboards, 100% of the time.

"What the hell Jimmy?!  It was ruined before you even put it up there with your decrepit fingers."

Offline Zorberema

  • * Maker
  • Posts: 175
  • Location: Sweden
  • IG: @ZorbCaps
Re: Sneaky Potato's KeyForge (plus Bar & Grill)
« Reply #54 on: Wed, 23 March 2016, 16:29:38 »
Quick question for everybody (especially the artisans)...

Can anybody give me some tips on the cleanest way to mount my master key to the bottom of the mold box? Right now I'm just using modeling clay, but I'm unhappy with the results and the parting line. I want to mount it to the bottom so I can get cleaner parting lines, but I'm having a hard time figuring out a good way to do it. It has to prevent silicone from entering in from the bottom of the cap. Any ideas would be really helpful.

I'd recomment not placing the cap directly down onto a surface; place something under to make it go up a little. Placing it in the same level as the "cut" in the silicone makes the air go out on the sides instead of the dedicated air holes; this can result in more bubbles if you press too hard. I've experimented with 3d printed mold-boxes recently, but I've used lego with just the small blank legos as a little jump upwards.

I'm using adhesive(if that's what it called; here's what I mean
More
) to get it to stick. Find out what works for yourself, these are just some tips that works for me! :)

Offline Sneaky Potato

  • * Maker
  • Thread Starter
  • Posts: 328
  • Location: Midworld
  • Gunslinger
Re: Sneaky Potato's KeyForge (plus Bar & Grill)
« Reply #55 on: Thu, 24 March 2016, 10:35:50 »
DO NOT EVER RECOMMEND A HARBOR FREIGHT PRESSURE POT.

This is something mentioned in thread after thread after thread.  It is never worth cheaping out on a pot.   Even if it doesn't maim or kill you, if it goes, it can cause substantial property damage.  The risk to yourself is not worth the cost savings.  If you can't afford a proper pot, explore other options.


+1

Yeah, you guys are right. I've retired the pot and won't be using it again, but I'm looking forward to my CA Tech pot. It's going to be a great feeling not constantly worrying about explosions. Thanks for the advice guys!

I would suggest a Binks pot.  CA-tech is a decent company, but I would rather see people go for maximum safety instead of cost effectiveness.

Great suggestion. I actually got to see a Binks setup in person, and the pot is really high-quality. If I have need of a second pot in the future, I will definitely go with one of those for the higher pressure rating.

Quick question for everybody (especially the artisans)...

Can anybody give me some tips on the cleanest way to mount my master key to the bottom of the mold box? Right now I'm just using modeling clay, but I'm unhappy with the results and the parting line. I want to mount it to the bottom so I can get cleaner parting lines, but I'm having a hard time figuring out a good way to do it. It has to prevent silicone from entering in from the bottom of the cap. Any ideas would be really helpful.

I'd recomment not placing the cap directly down onto a surface; place something under to make it go up a little. Placing it in the same level as the "cut" in the silicone makes the air go out on the sides instead of the dedicated air holes; this can result in more bubbles if you press too hard. I've experimented with 3d printed mold-boxes recently, but I've used lego with just the small blank legos as a little jump upwards.

I'm using adhesive(if that's what it called; here's what I mean
More
Show Image
) to get it to stick. Find out what works for yourself, these are just some tips that works for me! :)

That makes perfect sense. Thanks so much for the ideas!

Offline Sneaky Potato

  • * Maker
  • Thread Starter
  • Posts: 328
  • Location: Midworld
  • Gunslinger
Re: Sneaky Potato's KeyForge (plus Bar & Grill)
« Reply #56 on: Thu, 07 April 2016, 10:47:20 »

133640-0


133642-1


133644-2


133646-3


133648-4

Offline Diokhan

  • Posts: 287
  • Location: The Netherlands

Offline romevi

  • Formerly romevi
  • * Exalted Elder
  • Posts: 8942
  • Location: The Windy City

Offline Sneaky Potato

  • * Maker
  • Thread Starter
  • Posts: 328
  • Location: Midworld
  • Gunslinger
Re: Sneaky Potato's KeyForge (plus Bar & Grill)
« Reply #59 on: Thu, 07 April 2016, 10:55:42 »

(Attachment Link)


(Attachment Link)


(Attachment Link)


(Attachment Link)


(Attachment Link)

Holy mole! Those are so clean!

Sent from my computah using gh website

Thanks! There's still some work to be done, but I feel like I've made some real progress in the past couple of weeks.

Offline -musubi

  • Posts: 579
  • Location: West Coast Best Coast (US)
  • Spam rice 'n eggs
Re: Sneaky Potato's KeyForge (plus Bar & Grill)
« Reply #60 on: Thu, 07 April 2016, 11:02:02 »

(Attachment Link)


(Attachment Link)


(Attachment Link)


(Attachment Link)


(Attachment Link)

Holy mole! Those are so clean!

Sent from my computah using gh website

Thanks! There's still some work to be done, but I feel like I've made some real progress in the past couple of weeks.
That's some amazing progress, keep up the great work

Offline Sneaky Potato

  • * Maker
  • Thread Starter
  • Posts: 328
  • Location: Midworld
  • Gunslinger
Re: Sneaky Potato's KeyForge (plus Bar & Grill)
« Reply #61 on: Thu, 07 April 2016, 11:03:51 »

(Attachment Link)


(Attachment Link)


(Attachment Link)


(Attachment Link)


(Attachment Link)

Holy mole! Those are so clean!

Sent from my computah using gh website

Thanks! There's still some work to be done, but I feel like I've made some real progress in the past couple of weeks.
That's some amazing progress, keep up the great work

Thanks! :)

Offline icyskyz

  • Posts: 305
Re: Sneaky Potato's KeyForge (plus Bar & Grill)
« Reply #62 on: Thu, 07 April 2016, 12:22:23 »
Love those Saber caps! They look so niceee!

Looking forward to the final work!  :thumb:
My collections - flickr | HWS Keyng Collector |

Offline Sneaky Potato

  • * Maker
  • Thread Starter
  • Posts: 328
  • Location: Midworld
  • Gunslinger
Re: Sneaky Potato's KeyForge (plus Bar & Grill)
« Reply #63 on: Thu, 07 April 2016, 12:38:26 »
Love those Saber caps! They look so niceee!

Looking forward to the final work!  :thumb:

Thanks for the encouragement! Things are coming along nicely!

Offline Waateva

  • * Esteemed Elder
  • Posts: 1782
  • Location: Michigan, USA
Duck Blackbird - Gaterstotles /// O'Mira - V Blacks /// LZ GH v2 - V Clears /// Leopold FC980C /// TGR Jane CE v2 (unbuilt) /// Lin Dolphin 2021 (unbuilt)

Offline QuickDelat

  • Posts: 110
  • Location: Belgium
Re: Sneaky Potato's KeyForge (plus Bar & Grill)
« Reply #65 on: Thu, 07 April 2016, 13:44:12 »
(Attachment Link)

nice to see mulder in the background  :D I think he might be the only skull design artisan I really like.

Did not expect I would ever say this but thos pink sabers look really nice (and I don't like pink at all!)
They work really well in bright (solid) colours, it shows of the details better than the transparant red one (and I really like red)

Did you make any new notes? Really loved seeing your notebook & drawings last time.

Offline dgneo

  • Supervillain
  • * Curator
  • Posts: 2182
Re: Sneaky Potato's KeyForge (plus Bar & Grill)
« Reply #66 on: Thu, 07 April 2016, 14:29:55 »

Offline Sneaky Potato

  • * Maker
  • Thread Starter
  • Posts: 328
  • Location: Midworld
  • Gunslinger
Re: Sneaky Potato's KeyForge (plus Bar & Grill)
« Reply #67 on: Thu, 07 April 2016, 15:23:47 »


Need one of the black ones plz.

Blood Cabernet, to be specific ;)

(Attachment Link)

nice to see mulder in the background  :D I think he might be the only skull design artisan I really like.

Did not expect I would ever say this but thos pink sabers look really nice (and I don't like pink at all!)
They work really well in bright (solid) colours, it shows of the details better than the transparant red one (and I really like red)

Did you make any new notes? Really loved seeing your notebook & drawings last time.

Despite the mixed reception, Mulder has been a ton of fun to play around with. It's a simple design and it's easy on the mold, while giving me a fresh take on the colors that I'm pouring for the Sabers. The Blood Cabernet color I've been experimenting with has made me want to do a short run of Mulders that would only ever be available in that color. Glad to hear that you like it, as I immediately regretted posting it in this thread due to Clacks being as popular as they are. It looks like a blood-stained ruby gem or something. The pink has been an interesting color, and I'm enjoying the color blending.

My notebook is slowly growing, and I'll release some screenshots when I get time. Mostly it's turned into a journal, and I'll try to leave out the "Dear diary, today I ruined all my keycaps and life isn't fair" type of stuff. Glad to hear you enjoyed that aspect of this project. It's been really fun to write in my notebook and keep a log of all the things that I've learned along the way.

Again, thanks for the support!


Great work! Really digging that pink/purple colorway, and the sculpt is looking fantastic.

Thank you! I'm really excited about the progress. I didn't think I would like the pink/purple, but it's really growing on me and has a galaxy type feel to it. I'll most likely add more color depth and add some swirls of color to make it interesting.


Offline Sneaky Potato

  • * Maker
  • Thread Starter
  • Posts: 328
  • Location: Midworld
  • Gunslinger
Re: Sneaky Potato's KeyForge (plus Bar & Grill)
« Reply #69 on: Mon, 11 April 2016, 17:31:56 »

Offline UTEster750

  • Posts: 187
  • Location: Central Victoria, Australia
Re: Sneaky Potato's KeyForge (plus Bar & Grill)
« Reply #70 on: Tue, 12 April 2016, 08:04:00 »
Had seen some of your keycaps around and I'm glad I stumbled upon you! Keep up the good work you are making some awesome stuff! :D

Offline Sneaky Potato

  • * Maker
  • Thread Starter
  • Posts: 328
  • Location: Midworld
  • Gunslinger
Re: Sneaky Potato's KeyForge (plus Bar & Grill)
« Reply #71 on: Tue, 12 April 2016, 11:13:16 »
Had seen some of your keycaps around and I'm glad I stumbled upon you! Keep up the good work you are making some awesome stuff! :D

I appreciate the kind words! It's an awesome feeling when people see something that you've made and love it!

Offline Sneaky Potato

  • * Maker
  • Thread Starter
  • Posts: 328
  • Location: Midworld
  • Gunslinger
Re: Sneaky Potato's KeyForge (plus Bar & Grill)
« Reply #72 on: Thu, 14 April 2016, 18:53:32 »
QUICK UPDATE!


Wanted to give you guys a quick update and show off some of the progress on the underside of the MX key. It's coming along nicely, but there's still work to be done. The bottom is a little too rough for my liking, so I'm going to tweak it and remake the mold, as this was just a test to get an idea how my new materials are working. By working with faster setting materials, I'm able to get a lot more done in a day. My "research and development" is booming, and I'm learning a ton of new things.


I've been extremely happy with the keycap results, and I was even able to figure out a simple maker's mark to put underneath my cap. Nothing too special, but to my knowledge it's not too similar to anybody else's. If I'm wrong, I'd appreciate somebody pointing it out.


134437-0


I recently starting making an Alps mold, so there will be limited edition Alps artisans available to those that are interested. More to come on that, but for now just know it's in the works.


I did some simple work on a logo for KeyForge, and I'm really happy with how it turned out. It's been a few years since I've used Illustrator, but I've got a few designs that will be shown as we start to closer to a finished product. Let me know what you think, and if you love it or hate it.


134439-1


I'm going on a much-needed vacation starting today, and I'll be back after the weekend. Time to relax by the beach and get some sun on my pasty white body. I have a really interesting new idea that I'm hoping I can share with you once I get back... so stay tuned! Have a good weekend everybody!  ;D
« Last Edit: Thu, 14 April 2016, 18:55:15 by Sneaky Potato »

Offline xtrafrood

  • formerly csmertx
  • * Elevated Elder
  • Posts: 2715
  • Location: Gainesville, FL
  • wildling
Re: Sneaky Potato's KeyForge (plus Bar & Grill)
« Reply #73 on: Thu, 14 April 2016, 19:40:11 »
That lion looks really cool. Bookmarking this thread to see what else comes out of the new pressure pot :)

Offline ccarlitos2

  • Posts: 879
  • Location: Not in the Tardis
Re: Sneaky Potato's KeyForge (plus Bar & Grill)
« Reply #74 on: Thu, 14 April 2016, 20:09:07 »
Looking good :) the lion cap reminds me rengar from league. Not a bad thing at all <3


Sent from my iPhone using Tapatalk
HHKB Pro 1| Poker 2(MX Browns)| Leopold FC200R (MX Blue)
~~~~~~~~~~~~~~~~~~~~~~~~~~~~~~~~~~~
"Yup, that tasted purple" -Lulu

Flickr: https://www.flickr.com/photos/138889771@N05/

Offline Sneaky Potato

  • * Maker
  • Thread Starter
  • Posts: 328
  • Location: Midworld
  • Gunslinger
Re: Sneaky Potato's KeyForge (plus Bar & Grill)
« Reply #75 on: Thu, 28 April 2016, 12:33:41 »
Hey guys! Things are coming along great! Thought I would drop a few pictures off:


135699-0


With the help of a colleague, I've been designing a new prototype mold box that will be used in future production. This will be an improvement over the current production boxes that I'm using for my molds. We're working on the V2 prototype, which will then be machined and branded for KeyForge.


My wish is to have an easy to use mold box that will not require any additional parts, such as legos or other systems to cast. It will not require additional walls that you have to rebuild every time you cast silicone. It will be modular with a simple locking mechanism, so I will be able to unlock and swap a single piece to change stems. The mold box is also used to pour resin. This will not be something that I plan on releasing or selling to the public, simply because Binge has a great consumer design with his Synth. This will be for KeyForge alone, and just make my existing work easier with less silicone and resin waste. Once I have a prototype, I will release some images.


135701-1


This is my bench and my CA Technologies pressure pot after a long day of casting and preparation for the upcoming sale. I realized I never showed it off to you guys, so I need to take some photos and do a quick review. I'm drawing up some plans for my future workbench, which has a hole cut in the top of the bench so I can mount my pressure pot inside. Basically, half of the pot will be inside of the workbench, which will make it sturdier and prevent it from moving while I secure the lid. Also because it will look sweet. I'm going to do another hole for the vacuum chamber, so that when you look at the bench you'll only see the lid of the pressure pot on the top of the table. I'm pretty excited for the workbench, but I'm taking my time with it. I want it to be awesome. I'm being really picky about the pieces of walnut that I'm choosing, so it could be a while.


135703-2


Here are some color tests on the non-production molds, so please excuse the flashing and imperfections. I like to use my retired molds to test colors and new ideas. The top two are the triple-shot Sabers, one light brown and the other dark. These will be available in limited numbers for MX and Topre.


Right now I am hard at work producing triple-shot Sabers for the sale, and then I will choose some final additional sale colors once I finish with those. If anybody has any preferences, speak now or forever hold your peace.


That's about it for today! I'm going out of town this weekend, so I'm going to take a break from sale production. Thanks for all your kind comments and to all of you that have been following this process from the beginning!  :thumb:


Offline romevi

  • Formerly romevi
  • * Exalted Elder
  • Posts: 8942
  • Location: The Windy City
Re: Sneaky Potato's KeyForge (plus Bar & Grill)
« Reply #76 on: Thu, 28 April 2016, 12:37:10 »
Dude, those are super detailed and colored really well!

Offline Diokhan

  • Posts: 287
  • Location: The Netherlands
Re: Sneaky Potato's KeyForge (plus Bar & Grill)
« Reply #77 on: Thu, 28 April 2016, 12:44:06 »
Hey guys! Things are coming along great! Thought I would drop a few pictures off:


(Attachment Link)


With the help of a colleague, I've been designing a new prototype mold box that will be used in future production. This will be an improvement over the current production boxes that I'm using for my molds. We're working on the V2 prototype, which will then be machined and branded for KeyForge.


My wish is to have an easy to use mold box that will not require any additional parts, such as legos or other systems to cast. It will not require additional walls that you have to rebuild every time you cast silicone. It will be modular with a simple locking mechanism, so I will be able to unlock and swap a single piece to change stems. The mold box is also used to pour resin. This will not be something that I plan on releasing or selling to the public, simply because Binge has a great consumer design with his Synth. This will be for KeyForge alone, and just make my existing work easier with less silicone and resin waste. Once I have a prototype, I will release some images.


(Attachment Link)


This is my bench and my CA Technologies pressure pot after a long day of casting and preparation for the upcoming sale. I realized I never showed it off to you guys, so I need to take some photos and do a quick review. I'm drawing up some plans for my future workbench, which has a hole cut in the top of the bench so I can mount my pressure pot inside. Basically, half of the pot will be inside of the workbench, which will make it sturdier and prevent it from moving while I secure the lid. Also because it will look sweet. I'm going to do another hole for the vacuum chamber, so that when you look at the bench you'll only see the lid of the pressure pot on the top of the table. I'm pretty excited for the workbench, but I'm taking my time with it. I want it to be awesome. I'm being really picky about the pieces of walnut that I'm choosing, so it could be a while.


(Attachment Link)


Here are some color tests on the non-production molds, so please excuse the flashing and imperfections. I like to use my retired molds to test colors and new ideas. The top two are the triple-shot Sabers, one light brown and the other dark. These will be available in limited numbers for MX and Topre.


Right now I am hard at work producing triple-shot Sabers for the sale, and then I will choose some final additional sale colors once I finish with those. If anybody has any preferences, speak now or forever hold your peace.


That's about it for today! I'm going out of town this weekend, so I'm going to take a break from sale production. Thanks for all your kind comments and to all of you that have been following this process from the beginning!  :thumb:
Nice work man! Looking forward to your sale!

Sent from my Nexus 6P using Tapatalk


Offline xtrafrood

  • formerly csmertx
  • * Elevated Elder
  • Posts: 2715
  • Location: Gainesville, FL
  • wildling
Re: Sneaky Potato's KeyForge (plus Bar & Grill)
« Reply #78 on: Thu, 28 April 2016, 13:21:15 »
Oh man those multi-shot pieces look incredible

Offline ClackityClack

  • Posts: 1
Re: Sneaky Potato's KeyForge (plus Bar & Grill)
« Reply #79 on: Thu, 28 April 2016, 13:57:37 »
I thought artisans must 3d print the keycaps from a stl or 3d design file.  I was thinking of maybe customising my own keys by going down that route

Sent from my HTC One M8s using Tapatalk


Offline Sneaky Potato

  • * Maker
  • Thread Starter
  • Posts: 328
  • Location: Midworld
  • Gunslinger
Re: Sneaky Potato's KeyForge (plus Bar & Grill)
« Reply #80 on: Thu, 28 April 2016, 14:29:33 »
Dude, those are super detailed and colored really well!

Thank you! Detail has been one of my primary focuses, as some materials don't capture detail as much as I'd like. I've tried several different silicones and resins until I found what I was looking for.

Oh man those multi-shot pieces look incredible
Show Image


Thanks!! I'm really excited that you like them. They're coming along great, and will be available soon.

I thought artisans must 3d print the keycaps from a stl or 3d design file.  I was thinking of maybe customising my own keys by going down that route


3D printing is one way to do it, but I really prefer making them by hand. It gives them a nice character and unique feeling that is harder to capture in 3d printing.

Hey guys! Things are coming along great! Thought I would drop a few pictures off:


(Attachment Link)


With the help of a colleague, I've been designing a new prototype mold box that will be used in future production. This will be an improvement over the current production boxes that I'm using for my molds. We're working on the V2 prototype, which will then be machined and branded for KeyForge.


My wish is to have an easy to use mold box that will not require any additional parts, such as legos or other systems to cast. It will not require additional walls that you have to rebuild every time you cast silicone. It will be modular with a simple locking mechanism, so I will be able to unlock and swap a single piece to change stems. The mold box is also used to pour resin. This will not be something that I plan on releasing or selling to the public, simply because Binge has a great consumer design with his Synth. This will be for KeyForge alone, and just make my existing work easier with less silicone and resin waste. Once I have a prototype, I will release some images.


(Attachment Link)


This is my bench and my CA Technologies pressure pot after a long day of casting and preparation for the upcoming sale. I realized I never showed it off to you guys, so I need to take some photos and do a quick review. I'm drawing up some plans for my future workbench, which has a hole cut in the top of the bench so I can mount my pressure pot inside. Basically, half of the pot will be inside of the workbench, which will make it sturdier and prevent it from moving while I secure the lid. Also because it will look sweet. I'm going to do another hole for the vacuum chamber, so that when you look at the bench you'll only see the lid of the pressure pot on the top of the table. I'm pretty excited for the workbench, but I'm taking my time with it. I want it to be awesome. I'm being really picky about the pieces of walnut that I'm choosing, so it could be a while.


(Attachment Link)


Here are some color tests on the non-production molds, so please excuse the flashing and imperfections. I like to use my retired molds to test colors and new ideas. The top two are the triple-shot Sabers, one light brown and the other dark. These will be available in limited numbers for MX and Topre.


Right now I am hard at work producing triple-shot Sabers for the sale, and then I will choose some final additional sale colors once I finish with those. If anybody has any preferences, speak now or forever hold your peace.


That's about it for today! I'm going out of town this weekend, so I'm going to take a break from sale production. Thanks for all your kind comments and to all of you that have been following this process from the beginning!  :thumb:
Nice work man! Looking forward to your sale!

Sent from my Nexus 6P using Tapatalk


Thanks! I'm really excited about it. I think it's going to be great. I can't wait to see Sabers on people's keyboards.

Offline QuickDelat

  • Posts: 110
  • Location: Belgium
Re: Sneaky Potato's KeyForge (plus Bar & Grill)
« Reply #81 on: Thu, 28 April 2016, 15:55:13 »
another great update from the Forge. You're making this more and more difficult to choose when you'll finally do a sale!
I really like that you show us stuff like your workbench and the moldboxes. The caps are great of course, but it's really nice to see the effort you put in this and how you try to perfect everything. Can't wait to see the new workbench, description already sounds real cool.

As for colors, I think I mentioned it before, but I'm quite partial to red. Hope I'm getting the names of the hue right as non native speaker: crimson  or scarlet.

But I have to say that the mint? green from the last update is already growing on me.
Emerald green is also growing on me as a color as it's my girlfriend's (almost fiancé, but she doesn't know that yet ;) ) favorite.

That's it for colors. Look forward to your next update, enjoy the weekend!

Offline Sneaky Potato

  • * Maker
  • Thread Starter
  • Posts: 328
  • Location: Midworld
  • Gunslinger
Re: Sneaky Potato's KeyForge (plus Bar & Grill)
« Reply #82 on: Thu, 28 April 2016, 16:27:54 »
another great update from the Forge. You're making this more and more difficult to choose when you'll finally do a sale!
I really like that you show us stuff like your workbench and the moldboxes. The caps are great of course, but it's really nice to see the effort you put in this and how you try to perfect everything. Can't wait to see the new workbench, description already sounds real cool.

As for colors, I think I mentioned it before, but I'm quite partial to red. Hope I'm getting the names of the hue right as non native speaker: crimson  or scarlet.

But I have to say that the mint? green from the last update is already growing on me.
Emerald green is also growing on me as a color as it's my girlfriend's (almost fiancé, but she doesn't know that yet ;) ) favorite.

That's it for colors. Look forward to your next update, enjoy the weekend!

I appreciate it! Honestly what drew me to this hobby was the process itself. I love figuring out all the issues and solving them, and creating new ways to do things. It's given me a lot of respect for the other keymakers, because it's a very time-consuming hobby. It requires a lot of patience and critical thinking, which is why I like it so much. More than anything, I've tried my best not to settle for mediocrity when it comes to the casting process, and I've put in a lot of time in order to set myself up correctly and not backtrack too much. If a mold produces results that are not up to my standard, it is tweaked and recast. Quality is something that I really want associated with KeyForge, because I put hours each day into everything. I want people to have a piece of those hours and know that it wasn't just an overpriced piece of plastic stamped out of a machine.

Thanks for the color suggestions. I've been working on different shades of red this past week (which is a color that is surprisingly hard to get right), and I think you'll be pretty happy with the result. I've always been partial to Mint and Charcoal, so they will also be produced (maybe not this sale). I'm going to keep the colors limited, as I don't want to spread myself too thin and I want uniformity with the colors. I'm taking a couple of days off from the office to produce a ton of final single-shot caps next week, so I think we'll be ready to roll soon. Colors are going to be finalized this weekend, and then it's full steam ahead.

There will also be a mystery key, which will only be produced once. A single person will be chosen to receive it in this sale, as there will only be one made. I'm pretty excited about it.

The sale will definitely be in May, hopefully two weeks from now (if no major production issues arise). I'll update you guys when I have a firm date, but it's definitely getting closer. Right now I'm working on graphics and I have photography scheduled so you guys can get some creamy bokeh-filled pictures to get you excited.

Prepare thy wallets :D


Offline Sneaky Potato

  • * Maker
  • Thread Starter
  • Posts: 328
  • Location: Midworld
  • Gunslinger
Re: Sneaky Potato's KeyForge (plus Bar & Grill)
« Reply #83 on: Wed, 11 May 2016, 12:40:15 »
Hey everyone!


I’m very close to a sale, but I realized that I wanted a higher-quality packaging than what I had originally planned. I refuse to cut corners with this project, and I realized that I could do better in the packaging department for you guys. I paired up with one of my design buddies and ordered some custom materials that should be pretty awesome and unique. I’m not going to rush things out of excitement, but I’m very close to being finished with keycap production and packaging assembly will begin once I get all of the materials. I want to have everything ready prior to the sale, so you guys can get your keys as fast as possible.


In the meantime, I thought I would give you guys a couple of quick updates on what's been going on in the forge!


Air Compressor


I got a new California Air Tools air compressor. I can't even tell you guys how excited I am about this new addition to the shop. I typically cast 5-6 hours a day, and sometimes 10+ on weekends. My old compressor was driving me insane, and making all my neighbors want to kill me. Before I get into that, let me give you a little history.


My first air compressor was a small Harbor Freight hotdog compressor. Words cannot express how much I hated that piece of junk. It was the worst item I've ever purchased from that store. It was ridiculously loud, had a ton of vibration, and leaked air like crazy. I returned it after a day of use. My second compressor was a little better: a small HDX pancake compressor from Home Depot. It was a definite upgrade over the HF compressor, but it was still quite loud and the tank wasn't big enough for my new CA Technologies pressure pot. Then I stumbled upon California Air Tools at a convention, and I realized that I had to have one. I ordered the 5510se model, and it's amazing. For the first time in my life, I don't mind my air compressor running. Go take a look at some videos on youtube and you'll see the sound difference. It sounds more like a refrigerator than an air compressor.


You see, I live in a condo, and my neighbors don't take kindly to extremely loud noises coming from my garage for hours every single day. I would have to shut my garage door every time I needed to pressurize my pot, which was just another loud noise that I was making. I also probably look like I'm making meth in my garage in the middle of the night when people see me wearing my mask and mixing fluids together, so I was just waiting for the police to show up with dogs or something.
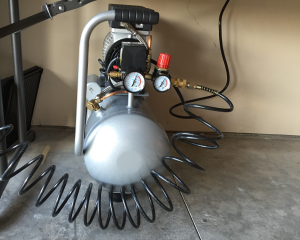

136820-0


I placed it under my work table, and it's dramatically increased my productivity by having a quiet and constant source of compressed air. It also lets me have a normal conversation with people and hear myself think when I need to. I'm casting much more now because I no longer dread the noise of pressurizing my pot.


Pressure Pot


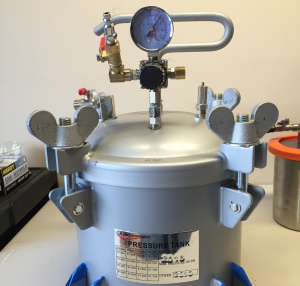
Right now I’m using the C.A. Technologies Resin Casting Pot, which I got from Finish Systems. They had resin casting in mind with this model, as the feed tube that is present on most paint pots has been removed. I recommend buying this model simply because using a paint tank for pressure casting often voids the warranty, since it’s not being used for it’s intended purpose. With this pot you don’t have that issue. Pressure gauge is included, and the only addition that I had to make was a ball valve and male connector, as well as a small cap on the other side. I'll most likely put a bigger ball valve on the intake and release, but for now it works.


So far, I’ve been extremely satisfied with this pot.The large wingnuts are easy to turn by hand, and they’re so smooth when tightening. In fact, I can spin them and they glide down the thread all the way to the bottom. The lid design means no more grinding bolts directly into the lid, which means less worrying that I'm going to blow myself up at any given moment in time.


PRO TIP: I put a square silicone mat on the inside bottom of the pressure pot. It catches any spilled resin or silicone and makes cleanup easy. I like having nice, clean, happy equipment.


After many hours of casting in this pot, I thought I would let you know that this pot is really suited best for quicker setting materials. These pots tend to have a slow air leak of 5-7 psi an hour, so you’ll need to have the pot hooked up to your air compressor in order to leave resin in there for 6+ hours. At first, I was concerned about the slow leak. I called and spoke with reps from Finish Systems and CA Tech, and they each let me know that a slow leak like that is normal, and to hook it up to the air compressor to keep a constant PSI over many hours. Leaving my air compressor hooked up kind of made me nervous, so I switched to a much faster-curing resin and silicone, and the leak doesn’t really matter anymore. Just a disclaimer for you up-and-coming casters. It’s a terrific pot, and I would still recommend it to anyone. I'll most likely replace the gasket on the lid for less air leakage in the future, but for right now it's really not a concern.


For the new guys, you pretty much NEED a pressure pot and air compressor. It’s an important piece of equipment if you want to have bubble-free casts. If you pair it with a vacuum chamber and pump, you’ll almost never see a bubble again. Without a pressure pot, your keycaps will be riddled with small holes and you’ll go to backbreaking lengths trying to get them out (like vibrating curing molds on the washing machine). Get the pressure pot, and then get a vacuum setup later if you can’t afford it up front.


136822-1


Vacuum Chamber/Pump


As a beginner, it was hard for me to understand what exactly I needed to be looking for in these two items, as I had never worked with them before. Basically you need one so you can pull as much air out of the resin or silicone as possible before pouring. If you can only afford one setup, I recommend getting a pressure pot first and then a vacuum setup later for best results.


I really saw the bubbles being pulled out when I switched to a viscous transparent silicone, where you can see loads of bubbles after mixing the two parts together. After vacuuming, they were pretty much all gone and it poured very smooth.


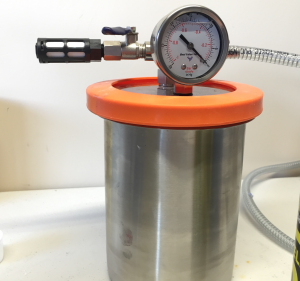
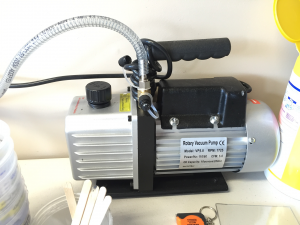
People told me that I needed a pump that pulled at least 30 inches of mercury, and that was about it. I did a ton of research, and finally stumbled upon Best Value Vacs. I was really skeptical at first, simply because of the bright orange color and ugly graphics. I mean I was looking for a vacuum system, not a toy. I ended up grabbing a small 1.5 gallon chamber and a 5cfm single-stage vacuum pump after talking with their reps to find what worked for my setup. When I opened the box, I was really surprised at the quality of the chamber and the helpful instructions. There’s a lot of ways that you can do the vacuum setup, but I have no regrets about buying a quality chamber and pump. The chamber is really small, but it’s perfect for my needs and I’m able to pull down vacuum very quickly.


PRO TIP: My vacuum chamber is stainless steel, so I poured a layer of silicone onto the inside bottom and let it cure. Like the pressure pot, it just keeps spills from getting stuck to the metal and makes cleanup easy. I can peel it out and pour more in there if it gets too dirty.


You don’t absolutely NEED a vacuum chamber, but you’ll get much more consistent results if you have one. It really helps get the initial bubbles out before putting everything under pressure. It’s worth noting that if you only have a vacuum chamber and not a pressure pot, you will still get bubbles, especially if your sculpts are rough or have jagged edges. I tested this several times and I almost always got bubbles when only using a vacuum chamber.
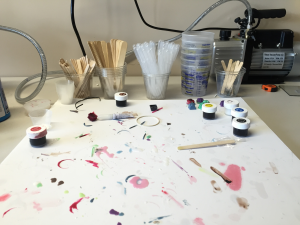
136824-2


136826-3


136828-4


Congrats to the guys that made it all the way though this boring post! I'm happy to answer any questions about the equipment, and any feedback is appreciated (as always).


I should have some more updates for you guys soon, once I get all the packaging materials together and finalize the upcoming sale details. There will be some pre-sales photos coming soon that should give you all a good idea of the colors that will be offered in this sale. Also, I'll let you guys in on a little secret: for this first sale, users will only be allowed to win a single Saber. You'll be able to enter the raffles for any of the colors and switches, but you'll only be able to win a single key. I want this to be as fun as possible for everyone, so I'm brainstorming ways to keep the sale extra-exciting. Stay tuned everyone!

Offline Waateva

  • * Esteemed Elder
  • Posts: 1782
  • Location: Michigan, USA
Re: Sneaky Potato's KeyForge (plus Bar & Grill)
« Reply #84 on: Wed, 11 May 2016, 12:45:08 »
Thanks for update, and as someone who is contemplating making some keycaps myself the information is very useful  :thumb:
Duck Blackbird - Gaterstotles /// O'Mira - V Blacks /// LZ GH v2 - V Clears /// Leopold FC980C /// TGR Jane CE v2 (unbuilt) /// Lin Dolphin 2021 (unbuilt)

Offline QuickDelat

  • Posts: 110
  • Location: Belgium
Re: Sneaky Potato's KeyForge (plus Bar & Grill)
« Reply #85 on: Wed, 11 May 2016, 14:42:28 »
boring is about the last thing that comes to mind reading your posts!
It's really insightful and now I'm curious about the packaging, always nice to get something special like the box with the gold bags from E_t_F or the little pots from Bambino.

Offline Sneaky Potato

  • * Maker
  • Thread Starter
  • Posts: 328
  • Location: Midworld
  • Gunslinger
Re: Sneaky Potato's KeyForge (plus Bar & Grill)
« Reply #86 on: Wed, 11 May 2016, 16:34:48 »
Thanks for update, and as someone who is contemplating making some keycaps myself the information is very useful  :thumb:

No problem! If you ever need info or have questions in the future, don't be afraid to ask.

boring is about the last thing that comes to mind reading your posts!
It's really insightful and now I'm curious about the packaging, always nice to get something special like the box with the gold bags from E_t_F or the little pots from Bambino.

Thanks! I'm glad you're enjoying the process! I really appreciate your feedback. As to the packaging, my original idea was to just seal them in black foil bags...but I decided that after all the time I've spent creating these keycaps, they deserve better packaging that reflects the quality that I'm aiming for. The packaging will definitely evolve and get better, especially for the special mystery keycaps. But for now, I have some rugged packaging that is definitely fitting for the KeyForge brand, and I'm excited to share it with you guys. Pics of packaging will be released prior to the sale opening, as I should have all the materials then.

Offline DAVYtm

  • #dateless
  • Posts: 289
  • Location: NY
Re: Sneaky Potato's KeyForge (plus Bar & Grill)
« Reply #87 on: Wed, 11 May 2016, 17:41:01 »
The triple-shot Saber caps are incredible. Awesome work, really love seeing so many talented makers enter the artisan scene :)

Offline Sneaky Potato

  • * Maker
  • Thread Starter
  • Posts: 328
  • Location: Midworld
  • Gunslinger
Re: Sneaky Potato's KeyForge (plus Bar & Grill)
« Reply #88 on: Wed, 11 May 2016, 18:09:34 »
The triple-shot Saber caps are incredible. Awesome work, really love seeing so many talented makers enter the artisan scene :)

Thanks for the kind words! I'm excited to let people get their hands on them!

Offline romevi

  • Formerly romevi
  • * Exalted Elder
  • Posts: 8942
  • Location: The Windy City
Re: KeyForge - SABER SALE TBA -
« Reply #89 on: Wed, 11 May 2016, 18:19:03 »
YEAH!

Offline DAVYtm

  • #dateless
  • Posts: 289
  • Location: NY
Re: Sneaky Potato's KeyForge (plus Bar & Grill)
« Reply #90 on: Wed, 11 May 2016, 18:19:57 »
The triple-shot Saber caps are incredible. Awesome work, really love seeing so many talented makers enter the artisan scene :)

Thanks for the kind words! I'm excited to let people get their hands on them!

Woo sale TBA! Do you know if you plan on raffle or FCFS? Guess it'll show up in the artisans subforum, just excited :cool:

Offline romevi

  • Formerly romevi
  • * Exalted Elder
  • Posts: 8942
  • Location: The Windy City
Re: KeyForge - SABER SALE TBA -
« Reply #91 on: Wed, 11 May 2016, 18:21:38 »
The triple-shot Saber caps are incredible. Awesome work, really love seeing so many talented makers enter the artisan scene :)

Thanks for the kind words! I'm excited to let people get their hands on them!

Woo sale TBA! Do you know if you plan on raffle or FCFS? Guess it'll show up in the artisans subforum, just excited :cool:

Pretty sure it's gonna be RCFS.

Offline Sneaky Potato

  • * Maker
  • Thread Starter
  • Posts: 328
  • Location: Midworld
  • Gunslinger
Re: KeyForge - SABER SALE TBA -
« Reply #92 on: Wed, 11 May 2016, 18:34:18 »
The triple-shot Saber caps are incredible. Awesome work, really love seeing so many talented makers enter the artisan scene :)

Thanks for the kind words! I'm excited to let people get their hands on them!

Woo sale TBA! Do you know if you plan on raffle or FCFS? Guess it'll show up in the artisans subforum, just excited :cool:

Sale is going to be raffle style, but you may only win a single key (to keep things interesting). You will be able to check any of the boxes to be entered into the raffle pools for the different keys, but you'll only be able to win once. Pools will be drawn at random until all keys have been won. There will be three color choices for MX, and three for Topre (A triple-shot and two other single-shot colors for each stem). All keys will be the same price regardless of how many shots, and as a result shipping will be free for everyone in the US (and possibly international, still looking into it). You won't know what key you've won until you receive it, so your family can watch you tear open the package and scream in delight (and then question your life choices and judge you).

There's also going to be a Mystery Key that one lucky user will win, and will come in special packaging. More on that when the sale is announced officially, should be soon.


Offline Sneaky Potato

  • * Maker
  • Thread Starter
  • Posts: 328
  • Location: Midworld
  • Gunslinger
Re: KeyForge - SABER SALE TBA -
« Reply #93 on: Wed, 11 May 2016, 18:35:10 »
The triple-shot Saber caps are incredible. Awesome work, really love seeing so many talented makers enter the artisan scene :)

Thanks for the kind words! I'm excited to let people get their hands on them!

Woo sale TBA! Do you know if you plan on raffle or FCFS? Guess it'll show up in the artisans subforum, just excited :cool:

Pretty sure it's gonna be RCFS.

It's official, sale format is Romevi Come First Serve.

Offline suicidal_orange

  • * Global Moderator
  • Posts: 4771
  • Location: England
Re: KeyForge - SABER SALE TBA -
« Reply #94 on: Wed, 11 May 2016, 18:43:00 »
You've come a long way since I last checked this thread, very impressive!

Probably too late but if you're still looking for colours orange is always popular ;)
120/100g linear Zealio R1  
GMK Hyperfuse
'Split everything' perfection  
MX Clear
SA Hack'd by Geeks     
EasyAVR mod

Offline Sneaky Potato

  • * Maker
  • Thread Starter
  • Posts: 328
  • Location: Midworld
  • Gunslinger
Re: KeyForge - SABER SALE TBA -
« Reply #95 on: Wed, 11 May 2016, 21:44:24 »
You've come a long way since I last checked this thread, very impressive!

Probably too late but if you're still looking for colours orange is always popular ;)

Thank you! That means a lot. Orange IS the new black...

Offline romevi

  • Formerly romevi
  • * Exalted Elder
  • Posts: 8942
  • Location: The Windy City
Re: KeyForge - SABER SALE TBA -
« Reply #96 on: Wed, 11 May 2016, 22:50:07 »
It's official, sale format is Romevi Come First Serve.

Aww, yeah!

Offline Sneaky Potato

  • * Maker
  • Thread Starter
  • Posts: 328
  • Location: Midworld
  • Gunslinger
Re: KeyForge - SABER SALE TBA -
« Reply #97 on: Thu, 12 May 2016, 16:06:34 »
Just wanted to show you guys something interesting. I dug up some of my old Saber test keys so I could show you the difference between using only a vacuum, and using a vacuum and pressure together.


136942-0


This is what happens when you only use a vacuum chamber. There are ways to get better results than this, but this is pretty standard if you aren't using pressure. A vacuum chamber can be a decent investment, so you'd probably expect better results.


136944-1


This second photo is using vacuum AND pressure. This is why I highly recommend beginners getting a pressure system.


Anyway, back to production for the sale  ;D

Offline xtrafrood

  • formerly csmertx
  • * Elevated Elder
  • Posts: 2715
  • Location: Gainesville, FL
  • wildling
Re: KeyForge - SABER SALE TBA -
« Reply #98 on: Thu, 12 May 2016, 16:15:10 »
Just wanted to show you guys something interesting. I dug up some of my old Saber test keys so I could show you the difference between using only a vacuum, and using a vacuum and pressure together.


(Attachment Link)


This is what happens when you only use a vacuum chamber. There are ways to get better results than this, but this is pretty standard if you aren't using pressure. A vacuum chamber can be a decent investment, so you'd probably expect better results.


(Attachment Link)


This second photo is using vacuum AND pressure. This is why I highly recommend beginners getting a pressure system.


Anyway, back to production for the sale  ;D

I really appreciate the write-up of your process. It pains me to no end that I can't have one of those Sabers but Smilodon rarities are worth the wait :)

Offline Mattc777

  • Posts: 56
  • Location: Maryland
  • Lost Keys
Re: KeyForge - SABER SALE TBA -
« Reply #99 on: Thu, 12 May 2016, 19:00:31 »
Really excited for a chance at these sabers! Keep up the good work!  :thumb: