Author Topic: mnml83 - WIP Design Log  (Read 4895 times)

0 Members and 1 Guest are viewing this topic.

Offline Spor

  • Thread Starter
  • Posts: 14
mnml83 - WIP Design Log
« on: Sun, 02 August 2020, 11:27:23 »
Hey all,

I have been eager to design a keyboard for some time now, and figured now would be as good of a time as any to dive in.  I have been looking for a wood tkl board, so figured I would just make my own!

I will work to update this as i go, and would love feedback along the way.

Small preview!

248566-0


« Last Edit: Fri, 07 August 2020, 01:13:30 by Spor »

Offline pixelpusher

  • * Elevated Elder
  • Posts: 4179
  • Location: Tennessee - USA
Re: mnml83 - WIP Design Log
« Reply #1 on: Sun, 02 August 2020, 11:54:06 »
Pretty cool!  I love wood cases and would love to see a wooden tkl.  I don’t know how you could create a TKL that wouldn’t warp over time though. Composite material maybe?

Offline Spor

  • Thread Starter
  • Posts: 14
Re: mnml83 - WIP Design Log
« Reply #2 on: Sun, 02 August 2020, 12:04:11 »
Definitely a valid concern.  My hope is to custom design a pcb with as many through hole connections as possible to the base to keep the top as rigid as i can.  maybe a furniture grade plywood as well?  would definitely be less likely to warp.

Ill def follow up with some schematics to see how valid it could be.

Offline coarse

  • * Maker
  • Posts: 37
    • Coarse Keys
Re: mnml83 - WIP Design Log
« Reply #3 on: Sun, 02 August 2020, 21:20:30 »
the mysterium is a tkl with a pcb with all through hole components but shows off the components over the f keys row. im sure you can put them all on the underside if you dont plan on showing them off, and you could move them in between the switches to keep the pcb compact. so an all through hole pcb for your keyboard is definitely possible

Offline nevin

  • Posts: 1646
  • Location: US
Re: mnml83 - WIP Design Log
« Reply #4 on: Mon, 03 August 2020, 07:56:22 »
as long as it's good DRY hardwood & well sealed it shouldn't be a problem.

the minimalist/modern look is nice. but i also see this with some laser cut filigree, could back the cutouts with a fabric (like an antique speaker) if you didn't want to see the pcb/inside.
Keeb.io Viterbi, Apple m0110, Apple m0120, Apple m0110a, Apple 658-4081, Apple M1242, Apple AEK II, MK96, GH60/Pure, Cherry g84-4100, Adesso AKP-220B, Magicforce 68

Offline pixelpusher

  • * Elevated Elder
  • Posts: 4179
  • Location: Tennessee - USA
Re: mnml83 - WIP Design Log
« Reply #5 on: Mon, 03 August 2020, 08:23:05 »
I’m alaways amazed by how much wood moves over time. I watch Frank Howarth on YouTube.  He dries out pieces for years before turning them on a lathe.  Then they still warp or crack.  Crazy. 

I have one of the cheaper wooden cases and matching wrist wrests from AliExpress.   The case has slightly warped over the 5 years I’ve owned it, but it is still functional.  The wrist rest is still perfect.

I purchased two 65% cases that were cncd from a person who sells on Reddit.  They both wobble now to some degree.

The worst was the two 60% boards I bought in a group buy a few years back.  They looked great and worked well when I first got them.  A season went buy and I could no longer fit a pcb inside either case and the wobbled a lot.   I have a feeling they didn’t dry the wood nearly enough.  I have no wood working tools to fix them.


Offline Leslieann

  • * Elevated Elder
  • Posts: 4518
Re: mnml83 - WIP Design Log
« Reply #6 on: Mon, 03 August 2020, 08:41:46 »
I’m alaways amazed by how much wood moves over time. I watch Frank Howarth on YouTube.  He dries out pieces for years before turning them on a lathe.  Then they still warp or crack.  Crazy. 

It's biological, you just never know what lies underneath.
My first 3d printer used wood, never again. Anything that requires actual precision, forget it. It looks great, feels great, but if you look at it wrong it warps, splits or stains.


Spor
My advice, find a really solid aluminum keyboard that has a well mounted plate and only make a top cover from some nice wood, Cocobolo, Indian Ebony, something exotic. This way the aluminum (and or stainless) will help maintain the shape of it. This has a side benefit of making it a lot easier and cheaper to make allowing for nicer wood and (hopefully) longer lifespan. I would advise keeping it thin as well to give the frame as much ability to resist any warping, even if it means hollowing out the back side or two thin parts (one just a perimeter, the other a thin top) glued together to make a thicker part.
Novelkeys NK65AE w/62g Zilents/39g springs
More
62g Zilents/lubed/Novelkeys 39g springs, HK Gaming Thick PBT caps, Netdot Gen10 magnetic cable, pic
| Filco MJ2 L.E. Vortex Case, Jailhouse Blues, heavily customized
More
Vortex case squared up/blasted finish removed/custom feet/paint/winkey blockoff plate, HID Liberator, stainless steel universal plate, 3d printed adapters, Type C, Netdot Gen10 magnetic cable, foam sound dampened, HK Gaming Thick PBT caps (o-ringed), Cherry Jailhouse Blues w/lubed/clipped Cherry light springs, 40g actuation
| GMMK TKL
More
w/ Kailh Purple Pros/lubed/Novelkeys 39g springs, HK Gaming Thick PBT caps, Netdot Gen10 Magnetic cable
| PF65 3d printed 65% w/LCD and hot swap
More
Box Jades, Interchangeable trim, mini lcd, QMK, underglow, HK Gaming Thick PBT caps, O-rings, Netdot Gen10 magnetic cable, in progress link
| Magicforce 68
More
MF68 pcb, Outemu Blues, in progress
| YMDK75 Jail Housed Gateron Blues
More
J-spacers, YMDK Thick PBT, O-rings, SIP sockets
| KBT Race S L.E.
More
Ergo Clears, custom WASD caps
| Das Pro
More
Costar model with browns
| GH60
More
Cherry Blacks, custom 3d printed case
| Logitech Illumininated | IBM Model M (x2)
Definitive Omron Guide. | 3d printed Keyboard FAQ/Discussion

Offline Gorbon

  • Posts: 42
  • Location: Greece
Re: mnml83 - WIP Design Log
« Reply #7 on: Mon, 03 August 2020, 16:07:04 »
I’m alaways amazed by how much wood moves over time. I watch Frank Howarth on YouTube.  He dries out pieces for years before turning them on a lathe.  Then they still warp or crack.  Crazy. 

Wood can be stabilized by completely drying it (in an oven), infusing it with impregnation resin under vacuum and then oven curing it. That should make it not only stronger, but also dimensionally stable.

I don't know if you'll be able to find a shop to do that for you, but I wouldn't say that it's impossible for a determined enthusiast to set something like that up for a small production run.

Offline Spor

  • Thread Starter
  • Posts: 14
Re: mnml83 - WIP Design Log
« Reply #8 on: Mon, 03 August 2020, 23:04:12 »
Appreciate the thoughts so far.

Definitely think it will be worth going through some testing at the very least to see how thick, and how many anchor points along the f keys and beside the arrow keys, to begin to offer some design constraints.  On a conceptual level, definitely hoping for solid wood on the top at least.  At the moment I have a place holder of about .5 u or ~9mm.

I am hoping to approach the base with a fairly hefty weight as well, which could potentially assist in this as well.

Concept sketching below!

248697-0

Also, thoughts on losing "print screen" "scroll lock" and "page break" for a tkl?  Are there any unspoken rules? :)
« Last Edit: Mon, 03 August 2020, 23:24:23 by Spor »

Offline pixelpusher

  • * Elevated Elder
  • Posts: 4179
  • Location: Tennessee - USA
Re: mnml83 - WIP Design Log
« Reply #9 on: Mon, 03 August 2020, 23:48:29 »
Sketch looks interesting to me.  I have no issues with removing those keys. 

Offline nevin

  • Posts: 1646
  • Location: US
Re: mnml83 - WIP Design Log
« Reply #10 on: Tue, 04 August 2020, 07:30:28 »
Love the side profile of it, very organic.
Keeb.io Viterbi, Apple m0110, Apple m0120, Apple m0110a, Apple 658-4081, Apple M1242, Apple AEK II, MK96, GH60/Pure, Cherry g84-4100, Adesso AKP-220B, Magicforce 68

Offline Spor

  • Thread Starter
  • Posts: 14
Re: mnml83 - WIP Design Log
« Reply #11 on: Fri, 07 August 2020, 01:14:25 »
Design Progress

248867-0

248869-1

248871-2
« Last Edit: Fri, 07 August 2020, 01:20:11 by Spor »

Offline -Jerry-

  • Posts: 336
  • Location: Bath, UK
  • OR '1'='1'
    • Jerry Talks Tech
Re: mnml83 - WIP Design Log
« Reply #12 on: Fri, 07 August 2020, 02:36:44 »
Is that back weight in the render engraved marble? It looks astounding!
"Romeo"     "Split75"   "Melody96"     "KBD8X MKII"     "Womier K87"

Offline Spor

  • Thread Starter
  • Posts: 14
Re: mnml83 - WIP Design Log
« Reply #13 on: Fri, 07 August 2020, 06:37:38 »
Swinging for the fences a bit, but yes! That is the goal.
« Last Edit: Fri, 07 August 2020, 06:40:29 by Spor »

Offline Spor

  • Thread Starter
  • Posts: 14
Re: mnml83 - WIP Design Log
« Reply #14 on: Fri, 07 August 2020, 10:46:36 »
Some additional views.  :-X

248885-0

248887-1

248889-2

Offline Spor

  • Thread Starter
  • Posts: 14
Re: mnml83 - WIP Design Log
« Reply #15 on: Sat, 15 August 2020, 23:05:28 »
After working through some assembly connections for the case, I tweaked the base and profile some.

Been working towards a gasket mount for the case, and will follow up with some imagery once I figure out the best was to share the assembly and intent.

Love to hear thoughts.

249624-0

249626-1

Offline Spor

  • Thread Starter
  • Posts: 14
Re: mnml83 - WIP Design Log
« Reply #16 on: Sun, 16 August 2020, 09:26:54 »
Assembly image.

249650-0

Gasket mount design.  The mid portion of the case is dovetailed to combat any sheer on the top.  This is fastened directly to the top case, suspending the plate on rubber strips.  The cutouts along the border of the plate assist with alignment, allowing you to rest the plate on the rubber strips in the top case during assembly.  Mid portion of the case also serves as the mounting point for the base, preventing any fasteners being shown on the outer bevel of the design.

Appreciate any feedback on the intent.  Any blaring flaws jump out?


Offline CustomerSupport

  • Posts: 277
  • Location: USA 🇺🇸
  • 🕸 developer
    • Discord
Re: mnml83 - WIP Design Log
« Reply #17 on: Sun, 16 August 2020, 11:10:47 »
Beautiful looking case! Always interested in a custom TKL

Offline art3mis

  • Posts: 10
Re: mnml83 - WIP Design Log
« Reply #18 on: Sun, 16 August 2020, 11:36:50 »
Looks so good :cool:
But why no PrintScreen Scrolllock Pause keys?
Not that I use them for their intended purpose regularly but those three keys are perfect for using with custom qmk macros

Offline Spor

  • Thread Starter
  • Posts: 14
Re: mnml83 - WIP Design Log
« Reply #19 on: Sun, 16 August 2020, 11:54:23 »
Looks so good :cool:
But why no PrintScreen Scrolllock Pause keys?
Not that I use them for their intended purpose regularly but those three keys are perfect for using with custom qmk macros

This has actually been added back in this design iteration!  I was feeling like that layout was a bit more unbalanced aesthetically than I originally thought.  Glad to hear it will be a welcome return.

249662-0

Offline KaosJ

  • Posts: 1054
Re: mnml83 - WIP Design Log
« Reply #20 on: Sun, 16 August 2020, 16:12:00 »
I’m alaways amazed by how much wood moves over time. I watch Frank Howarth on YouTube.  He dries out pieces for years before turning them on a lathe.  Then they still warp or crack.  Crazy. 

Depends usually on the quality of the wood and yeah how much time dried and umidity.
Apart that, if the wood part will be screwed (joined) with a material that doesn't bend on many points (which seems the case) it will most likely not bend over time, unless it's a brand new not-dried wood.

The warpage of the wood shocked me too, I made a full desk made of wood and since it wasn't dried enough, the day after buying every single piece was bent af (30mm thickness sheet). Once i joined the pieces straight togheter and did some work on them (coat/other) the pieces are totally straight now, there isn't any sign of bending now. While the other sheets not joined togheter keeps warping like hell.

In this case, i think by adding the marble bottom  (which should be straight) and once joined the 2 parts, the top part will not warp with time (of course the wood must be dried and post-processed)


At this point i'm just wondering, what would be the cost of all this? I'm scared about the marble part
« Last Edit: Sun, 16 August 2020, 16:14:45 by KaosJ »


Offline Spor

  • Thread Starter
  • Posts: 14
Re: mnml83 - WIP Design Log
« Reply #21 on: Sun, 16 August 2020, 16:47:14 »
I’m alaways amazed by how much wood moves over time. I watch Frank Howarth on YouTube.  He dries out pieces for years before turning them on a lathe.  Then they still warp or crack.  Crazy. 

Depends usually on the quality of the wood and yeah how much time dried and umidity.
Apart that, if the wood part will be screwed (joined) with a material that doesn't bend on many points (which seems the case) it will most likely not bend over time, unless it's a brand new not-dried wood.

The warpage of the wood shocked me too, I made a full desk made of wood and since it wasn't dried enough, the day after buying every single piece was bent af (30mm thickness sheet). Once i joined the pieces straight togheter and did some work on them (coat/other) the pieces are totally straight now, there isn't any sign of bending now. While the other sheets not joined togheter keeps warping like hell.

In this case, i think by adding the marble bottom  (which should be straight) and once joined the 2 parts, the top part will not warp with time (of course the wood must be dried and post-processed)


At this point i'm just wondering, what would be the cost of all this? I'm scared about the marble part

I appreciate your thoughts.  I agree, after working through and refining a lot of the connections, I feel much less concerned about warping.  One thing I am unsure about is whether or not I will need support on the thin spaces between the key clusters.  But I think I will have a better sense as I progress through the prototype.

Regarding the marble, surprisingly, the cost per linear foot of marble is pretty reasonable given the thickness, particularly depending on the marble that you use.  Makrana marble, for example, looks to be ~15 USD a square foot.  I am in the process of figuring out the machining aspect of it, which seems to be the biggest "?".


Once I am able to put together a better estimate regarding price, I will be sure to update.

I am very happy to pivot material choices as the reality of it comes together.


This is definitely the aspiration though!  Gotta aim high!

Offline KaosJ

  • Posts: 1054
Re: mnml83 - WIP Design Log
« Reply #22 on: Sun, 16 August 2020, 17:17:31 »
I’m alaways amazed by how much wood moves over time. I watch Frank Howarth on YouTube.  He dries out pieces for years before turning them on a lathe.  Then they still warp or crack.  Crazy. 

Depends usually on the quality of the wood and yeah how much time dried and umidity.
Apart that, if the wood part will be screwed (joined) with a material that doesn't bend on many points (which seems the case) it will most likely not bend over time, unless it's a brand new not-dried wood.

The warpage of the wood shocked me too, I made a full desk made of wood and since it wasn't dried enough, the day after buying every single piece was bent af (30mm thickness sheet). Once i joined the pieces straight togheter and did some work on them (coat/other) the pieces are totally straight now, there isn't any sign of bending now. While the other sheets not joined togheter keeps warping like hell.

In this case, i think by adding the marble bottom  (which should be straight) and once joined the 2 parts, the top part will not warp with time (of course the wood must be dried and post-processed)


At this point i'm just wondering, what would be the cost of all this? I'm scared about the marble part

I appreciate your thoughts.  I agree, after working through and refining a lot of the connections, I feel much less concerned about warping.  One thing I am unsure about is whether or not I will need support on the thin spaces between the key clusters.  But I think I will have a better sense as I progress through the prototype.

Regarding the marble, surprisingly, the cost per linear foot of marble is pretty reasonable given the thickness, particularly depending on the marble that you use.  Makrana marble, for example, looks to be ~15 USD a square foot.  I am in the process of figuring out the machining aspect of it, which seems to be the biggest "?".


Once I am able to put together a better estimate regarding price, I will be sure to update.

I am very happy to pivot material choices as the reality of it comes together.


This is definitely the aspiration though!  Gotta aim high!

Well in case wood will become a problem for real, i wouldn't mind a full marble board lol.


Offline Leslieann

  • * Elevated Elder
  • Posts: 4518
Re: mnml83 - WIP Design Log
« Reply #23 on: Mon, 17 August 2020, 00:47:26 »
Appreciate any feedback on the intent.  Any blaring flaws jump out?
The dovetail to combat sheer...
There's nothing that will do that the bolts and clamping pressure won't. It's more likely to dent or bust off the dovetail than do much of anything. Besides where is it going to go, the only time it would ever have a sheer force is when tipped on it's side. It just adds complexity and cost, each cut adds to the price.

As for alignment, again, trust the screws. It's nice in theory, but if anything is off in the slightest, you have no room to adjust and with this having wood and needing to be down to fractions of a mm, you might need that slight bit of wiggle.


Gasket mount..
It's being compressed by wood, it may be hard or soft wood, but a bit redundant unless you run the screws loose (that's not the purpose of gasket mount). Wood has very different harmonics than metal and all of this is based on ideas we use for metal. Depending on material, the gasket could also suck moisture from or leach into the wood and since it's inconsistent around the perimeter this could lead to issues later. I assume silicone or rubber, but not all silicone and rubber is created equal. And have you given thought to where these are coming from?

Then there is the actual clamping, unequal clamping force will lead to warping the wood making it impossible to balance out again later. You're better off tightly clamping this whole thing together using a torque wrench and head bolt pattern to do so.


The Marble,
You cannot simply mill it into any shape you like on a typical mill like aluminum, it can be done, but it's specialized. It would be FAR more efficient to use a single flat square (or as close as possible) and recess that into the wood to give it an angular look.


Just a heads up.
If you're outsourcing all of this, even if you start with Oak, I won't be surprised if you're well on your way to $1000 by the time you add modest switches and caps.  Making a few of these changes could knock a couple hundred off and reduce the risk and number of potential problems. Also, start with the marble and plate then re-adjust the wood if something is off rather than having them redone.
Novelkeys NK65AE w/62g Zilents/39g springs
More
62g Zilents/lubed/Novelkeys 39g springs, HK Gaming Thick PBT caps, Netdot Gen10 magnetic cable, pic
| Filco MJ2 L.E. Vortex Case, Jailhouse Blues, heavily customized
More
Vortex case squared up/blasted finish removed/custom feet/paint/winkey blockoff plate, HID Liberator, stainless steel universal plate, 3d printed adapters, Type C, Netdot Gen10 magnetic cable, foam sound dampened, HK Gaming Thick PBT caps (o-ringed), Cherry Jailhouse Blues w/lubed/clipped Cherry light springs, 40g actuation
| GMMK TKL
More
w/ Kailh Purple Pros/lubed/Novelkeys 39g springs, HK Gaming Thick PBT caps, Netdot Gen10 Magnetic cable
| PF65 3d printed 65% w/LCD and hot swap
More
Box Jades, Interchangeable trim, mini lcd, QMK, underglow, HK Gaming Thick PBT caps, O-rings, Netdot Gen10 magnetic cable, in progress link
| Magicforce 68
More
MF68 pcb, Outemu Blues, in progress
| YMDK75 Jail Housed Gateron Blues
More
J-spacers, YMDK Thick PBT, O-rings, SIP sockets
| KBT Race S L.E.
More
Ergo Clears, custom WASD caps
| Das Pro
More
Costar model with browns
| GH60
More
Cherry Blacks, custom 3d printed case
| Logitech Illumininated | IBM Model M (x2)
Definitive Omron Guide. | 3d printed Keyboard FAQ/Discussion

Offline Spor

  • Thread Starter
  • Posts: 14
Re: mnml83 - WIP Design Log
« Reply #24 on: Mon, 17 August 2020, 10:15:08 »
First off, A massive thank you for taking the time to form such a thorough and detailed response.  My background is design and architecture, and though I have done some rapid prototyping, this is well out of my knowledge base.  This is the exact type of critique I was hoping for.  I knew this was ambitious, so I appreciate the thoughts on feasibility.

The dovetail to combat sheer...
There's nothing that will do that the bolts and clamping pressure won't. It's more likely to dent or bust off the dovetail than do much of anything. Besides where is it going to go, the only time it would ever have a sheer force is when tipped on it's side. It just adds complexity and cost, each cut adds to the price.


In hindsight, I believe sheer is 100% the wrong term.  I was hoping to combat "splay" (unsure if there is a more accurate force description).  But perhaps I can walk through the logic to see if there is any validity.

Primary goal was to prevent any fasteners to be countersunk into the bezel.   (Both for the wood and base)  So my thought for this was to top mount the plate and then have a mid portion of the case in order to receive the fasteners of the base.

249723-0

In order to avoid breaking the profile of the top, my thought was to fasten the mid where the case met the plate (which is why a gasket mounting style developed, though I 100% agree with your later points).

My fear with this fastening location, though it did achieve a seamless exterior of the case, was that it may introduce rattle.  I was imagining that there was a potential for the top to splay slight as the wood "gave" with typing force.

249725-1

To your point, this could very well be an irrelevant concern.  I very much appreciate the feedback, this is just the reasoning behind the addition of the dovetail; a means to prevent that splay, while maintaining a seamless exterior.


Gasket mount..


100% agree with your point, of this most likely being a redundant unnecessary over complication.  Thank you for the input!  If the mid portion of the case was to remain attaching at the plate; would you suggest just sandwiching the plate tightly between the wood?  Or fasten the plate directly to the top?


The Marble,
You cannot simply mill it into any shape you like on a typical mill like aluminum, it can be done, but it's specialized. It would be FAR more efficient to use a single flat square (or as close as possible) and recess that into the wood to give it an angular look.


And yes, I agree this is the most ambitious aspect by far.  I am in contact with a couple of manufacturers right now, some small, and some large in hopes of putting a number on this.  I will certainly look into a VE effort in the event it is prohibitively expensive.  This has certainly been a learning experience so I very much appreciate the feedback.  My goal is to perfect a prototype prior to anything else.

Again, I really appreciate your thoughts, and would love to continue the dialogue.


Offline Leslieann

  • * Elevated Elder
  • Posts: 4518
Re: mnml83 - WIP Design Log
« Reply #25 on: Mon, 17 August 2020, 23:56:25 »
You're welcome.
Keep in mind, I'm being overly critical, this can work as you had it. I'm sure a few are going, "wow that's overkill", it is, but I prefer to look at it from a best case/long term perspective.

You have a brass plate and a marble plate, in a wood case and neither is being used structurally. You built your whole case to be supported by the thinnest bit of wood in the case using glued in inserts. It's backwards.

First off..
Bolt the top to the plate, use brass inserts, small screws or simply epoxy it. I would recommend lots of small screws. Yes, this makes the top decorative (as most are), but also less likely to warp.  Splay shouldn't be an issue, the wood isn't under any stress besides holding itself in place.


Second,
Tap threads into the plate, epoxy some nuts, use nutserts or use Chicago bolts, one way or another bolt the plate all the way through the lower wood and through the marble. Effectively clamping the wood between each and using the heavy, strong marble as your foundation, not simply a bolt on weight. This will make for a much more solid case. This also allows for a much simpler center part as you will see.

Third
Remove the wood in the bottom, if we use the marble as a structural part, this is no longer necessary, allowing for a much lower profile base. This part can now be water jetted, lasered, jig sawed out of ABS, cast epoxy, plex, polycarb, wood, plywood, whatever. It's simply a ring with a few holes. You could even just buy a bunch of appropriately sized spacers and use those (don't do this, it's just to emphasize how little it matters).


Fourth
On the rear, that sharp edge is a disaster waiting to happen.
Instead of wedging down into the marble, I know it's to fight splay but you are counting on some seriously tight tolerances from stone and wood to make that work without bind (stressing the inserts) or having an unsightly gap.  Instead of an inward downward slope, go with a flat or outward slight down slope. You won't see any gap unless you get down below the horizon of the keyboard. If it warps it warps, your attempt to fight it with tolerances is a valiant one, but not one you will likely win. Making the changes above reduces the stress on it anyhow so it's less likely to warp in the first place.

Here's a down and dirty image to give an idea of the changes. You will have to excuse the quality and sort of figure out the top bolts but I think that part is the easiest to explain.
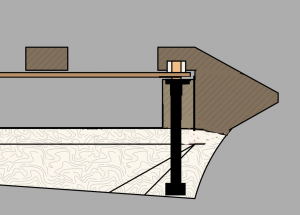
249785-0
Novelkeys NK65AE w/62g Zilents/39g springs
More
62g Zilents/lubed/Novelkeys 39g springs, HK Gaming Thick PBT caps, Netdot Gen10 magnetic cable, pic
| Filco MJ2 L.E. Vortex Case, Jailhouse Blues, heavily customized
More
Vortex case squared up/blasted finish removed/custom feet/paint/winkey blockoff plate, HID Liberator, stainless steel universal plate, 3d printed adapters, Type C, Netdot Gen10 magnetic cable, foam sound dampened, HK Gaming Thick PBT caps (o-ringed), Cherry Jailhouse Blues w/lubed/clipped Cherry light springs, 40g actuation
| GMMK TKL
More
w/ Kailh Purple Pros/lubed/Novelkeys 39g springs, HK Gaming Thick PBT caps, Netdot Gen10 Magnetic cable
| PF65 3d printed 65% w/LCD and hot swap
More
Box Jades, Interchangeable trim, mini lcd, QMK, underglow, HK Gaming Thick PBT caps, O-rings, Netdot Gen10 magnetic cable, in progress link
| Magicforce 68
More
MF68 pcb, Outemu Blues, in progress
| YMDK75 Jail Housed Gateron Blues
More
J-spacers, YMDK Thick PBT, O-rings, SIP sockets
| KBT Race S L.E.
More
Ergo Clears, custom WASD caps
| Das Pro
More
Costar model with browns
| GH60
More
Cherry Blacks, custom 3d printed case
| Logitech Illumininated | IBM Model M (x2)
Definitive Omron Guide. | 3d printed Keyboard FAQ/Discussion

Offline Spor

  • Thread Starter
  • Posts: 14
Re: mnml83 - WIP Design Log
« Reply #26 on: Tue, 18 August 2020, 13:04:34 »

Here's a down and dirty image to give an idea of the changes. You will have to excuse the quality and sort of figure out the top bolts but I think that part is the easiest to explain.
(Attachment Link)


Thanks again for your feedback.  The section I quickly threw together, is unfortunately misleading.  I will attach a sequence that hopefully better illustrates my current intention.  I agree and a lot of your points make sense.  The whole intention of the mid portion was a means to xfer the connection of the plate to the marble more central to the board to avoid any fasteners being attached within the bevel of the case.  Strictly an aesthetic goal, but 100% agree that connecting the marble directly through to the plate along the perimeter would be a much simpler solution. 

The top wood shell is intended to hover around the marble base to allow for some tolerance between these two pieces.  I do agree that in my current design, there are opportunities to bolt straight through the marble to the plate near the center of the board, the the current offset I have was simply assuming I would most likely want to keep fasteners a safe distance from the edge of the marble.

I'm curious if these more accurate images are different than what you were imagining.  Please note that inserts and bolt length were just thrown in there, and are still somewhat remnant of the gasket idea we already discussed; but is at least a bit closer to my intention.

249839-0

249841-1

249843-2

249845-3

249847-4


Offline Leslieann

  • * Elevated Elder
  • Posts: 4518
Re: mnml83 - WIP Design Log
« Reply #27 on: Tue, 18 August 2020, 20:41:52 »
I have never heard anyone complain about a front edge being too low, but many times heard of them complain it was toot tall (this is a complaint with the Keychron).
This design makes it too tall, not just tall, REALLY tall. You really need to lose the wood bottom, it's HORRIBLE for the ergonomics. Companies fight really hard to make the front edge as low as possible, a few have even gone too low (I think the first ID80 had this issue) and the Vortex cases couldn't fit the Phantom pcb because it wasn't deep enough.

You can use a wrist wrest to help, but most are not made for such a tall keyboard, and you're still putting a bandage on the problem.
Novelkeys NK65AE w/62g Zilents/39g springs
More
62g Zilents/lubed/Novelkeys 39g springs, HK Gaming Thick PBT caps, Netdot Gen10 magnetic cable, pic
| Filco MJ2 L.E. Vortex Case, Jailhouse Blues, heavily customized
More
Vortex case squared up/blasted finish removed/custom feet/paint/winkey blockoff plate, HID Liberator, stainless steel universal plate, 3d printed adapters, Type C, Netdot Gen10 magnetic cable, foam sound dampened, HK Gaming Thick PBT caps (o-ringed), Cherry Jailhouse Blues w/lubed/clipped Cherry light springs, 40g actuation
| GMMK TKL
More
w/ Kailh Purple Pros/lubed/Novelkeys 39g springs, HK Gaming Thick PBT caps, Netdot Gen10 Magnetic cable
| PF65 3d printed 65% w/LCD and hot swap
More
Box Jades, Interchangeable trim, mini lcd, QMK, underglow, HK Gaming Thick PBT caps, O-rings, Netdot Gen10 magnetic cable, in progress link
| Magicforce 68
More
MF68 pcb, Outemu Blues, in progress
| YMDK75 Jail Housed Gateron Blues
More
J-spacers, YMDK Thick PBT, O-rings, SIP sockets
| KBT Race S L.E.
More
Ergo Clears, custom WASD caps
| Das Pro
More
Costar model with browns
| GH60
More
Cherry Blacks, custom 3d printed case
| Logitech Illumininated | IBM Model M (x2)
Definitive Omron Guide. | 3d printed Keyboard FAQ/Discussion

Offline Spor

  • Thread Starter
  • Posts: 14
Re: mnml83 - WIP Design Log
« Reply #28 on: Tue, 18 August 2020, 21:27:32 »
I have never heard anyone complain about a front edge being too low, but many times heard of them complain it was toot tall (this is a complaint with the Keychron).
This design makes it too tall, not just tall, REALLY tall. You really need to lose the wood bottom, it's HORRIBLE for the ergonomics. Companies fight really hard to make the front edge as low as possible, a few have even gone too low (I think the first ID80 had this issue) and the Vortex cases couldn't fit the Phantom pcb because it wasn't deep enough.

You can use a wrist wrest to help, but most are not made for such a tall keyboard, and you're still putting a bandage on the problem.

Are there ideal dimensions to work within?


Offline kkatano

  • Posts: 61
Re: mnml83 - WIP Design Log
« Reply #29 on: Tue, 18 August 2020, 22:29:56 »
Pretty nice board :)

Please keep it for reference. JIS (Japan Industrial Standards) requires the home row height to be 35 mm or less, and recommends 30 mm or less. Home row height is the distance from the top of the desk to the top of the ASDF row keycap.

The front height depends on the structure and design of the keyboard, so I think it is better to measure Home row height  for the ergonomics. just IMO.

For compatibility with PCBs, I think it's sure to measure them height and to consider how much flex for plate and PCB.
« Last Edit: Tue, 18 August 2020, 22:43:24 by kkatano »

Offline Leslieann

  • * Elevated Elder
  • Posts: 4518
Re: mnml83 - WIP Design Log
« Reply #30 on: Wed, 19 August 2020, 00:42:37 »
Are there ideal dimensions to work within?
Kkatano seems to know the recommendations but frankly, the best answer is as low as possible for the front edge.
Novelkeys NK65AE w/62g Zilents/39g springs
More
62g Zilents/lubed/Novelkeys 39g springs, HK Gaming Thick PBT caps, Netdot Gen10 magnetic cable, pic
| Filco MJ2 L.E. Vortex Case, Jailhouse Blues, heavily customized
More
Vortex case squared up/blasted finish removed/custom feet/paint/winkey blockoff plate, HID Liberator, stainless steel universal plate, 3d printed adapters, Type C, Netdot Gen10 magnetic cable, foam sound dampened, HK Gaming Thick PBT caps (o-ringed), Cherry Jailhouse Blues w/lubed/clipped Cherry light springs, 40g actuation
| GMMK TKL
More
w/ Kailh Purple Pros/lubed/Novelkeys 39g springs, HK Gaming Thick PBT caps, Netdot Gen10 Magnetic cable
| PF65 3d printed 65% w/LCD and hot swap
More
Box Jades, Interchangeable trim, mini lcd, QMK, underglow, HK Gaming Thick PBT caps, O-rings, Netdot Gen10 magnetic cable, in progress link
| Magicforce 68
More
MF68 pcb, Outemu Blues, in progress
| YMDK75 Jail Housed Gateron Blues
More
J-spacers, YMDK Thick PBT, O-rings, SIP sockets
| KBT Race S L.E.
More
Ergo Clears, custom WASD caps
| Das Pro
More
Costar model with browns
| GH60
More
Cherry Blacks, custom 3d printed case
| Logitech Illumininated | IBM Model M (x2)
Definitive Omron Guide. | 3d printed Keyboard FAQ/Discussion