Author Topic: Hybris - A wireless 104 key keyboard from scratch  (Read 18441 times)

0 Members and 1 Guest are viewing this topic.

Offline pomk

  • Posts: 470
  • Location: Finland
Re: Hybris - A wireless 104 key keyboard from scratch
« Reply #50 on: Tue, 27 March 2018, 03:16:22 »
Just be sure to check that your printer is accurate as well. I usually add a 50% opaque ruler in such printouts to rule out scaling issues.

Offline senso

  • Posts: 47
  • Location: Portugal
Re: Hybris - A wireless 104 key keyboard from scratch
« Reply #51 on: Sun, 06 May 2018, 10:22:47 »
How the keyboard going?

Everything OK with you Richard?

Offline RichardH

  • Thread Starter
  • Posts: 37
Re: Hybris - A wireless 104 key keyboard from scratch
« Reply #52 on: Thu, 10 May 2018, 00:36:42 »
Just a quick update! I've been working on techno recently, so the keyboard design took the back seat last month. I got back into it the last few days and placed the diodes and encoder. Next step will be to place the logic components and power supply. I'll try and describe the hows and whys on that next. I went through and measured everything twice and it looks like everything should fit the first time. I placed the diodes so there was a good bit of space around the drill holes. Other than that, it's boring, methodical work.


-Rich

Offline RichardH

  • Thread Starter
  • Posts: 37
Re: Hybris - A wireless 104 key keyboard from scratch
« Reply #53 on: Mon, 03 December 2018, 01:33:08 »
Big progress! I finally got some time to finish routing and I've sent the board off to the fab!  :eek:

I'll go through some of my routing decisions.

The component side of the board (numpad on the left) board was split up like this:


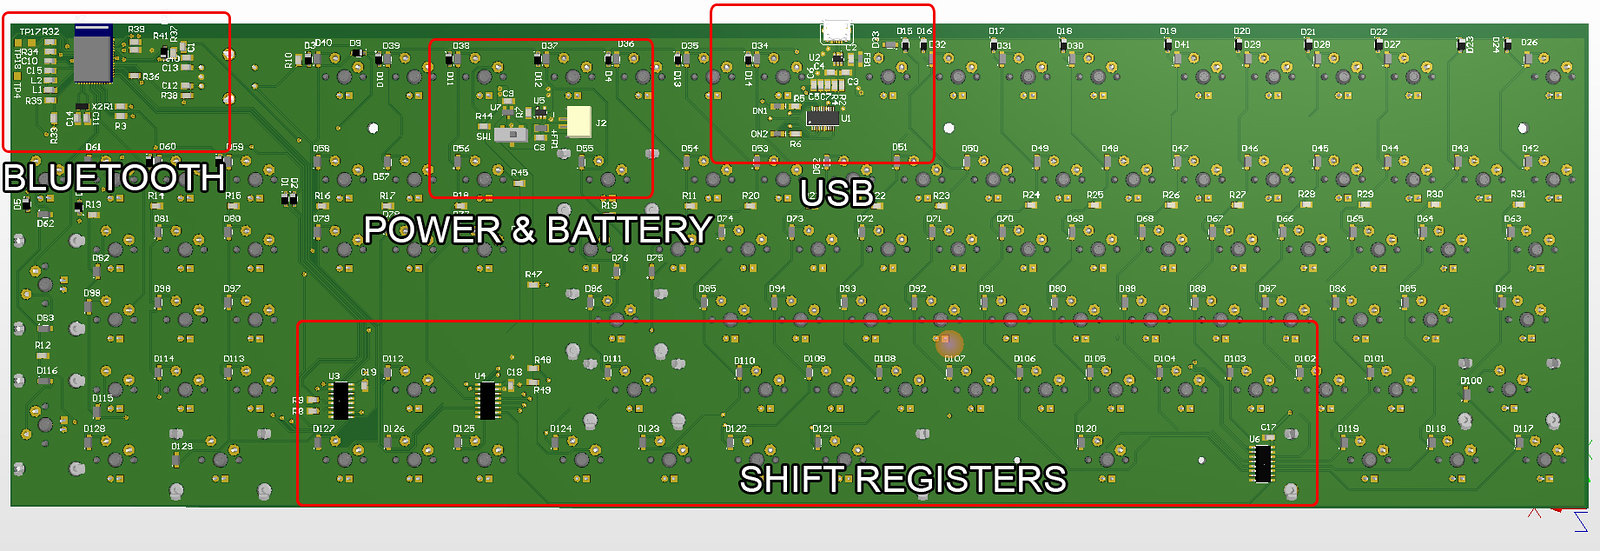
USB signals were routed first since they're really the only high speed thing on the board. I followed the chip vendor's PCB prints here https://www.ftdichip.com/Support/Documents/PCBData/NerO%20PCB%20Prints.PDF and tried to length match the differential pairs  to 5mil. This will definitely be an annoying area to hand solder due to the density of the parts. I chose fairly big footprints for the passives at 0805 packages, so I'm confident it'll come together.


Next came the Bluetooth MCU. The Bluetooth module was placed right on the edge of the board above the numpad. I kept the crystal close to the module, and as far as I could get it from the other signals. The space was pretty constrained, so I ended up killing a bunch of test points in order to make all the parts fit and still leave a ground keepout zone under the antenna. The rotary encoder is mounted just to the right and the signal lines are pretty short. Since the serial lines are really slow, I routed then wherever they fit later in the layout process


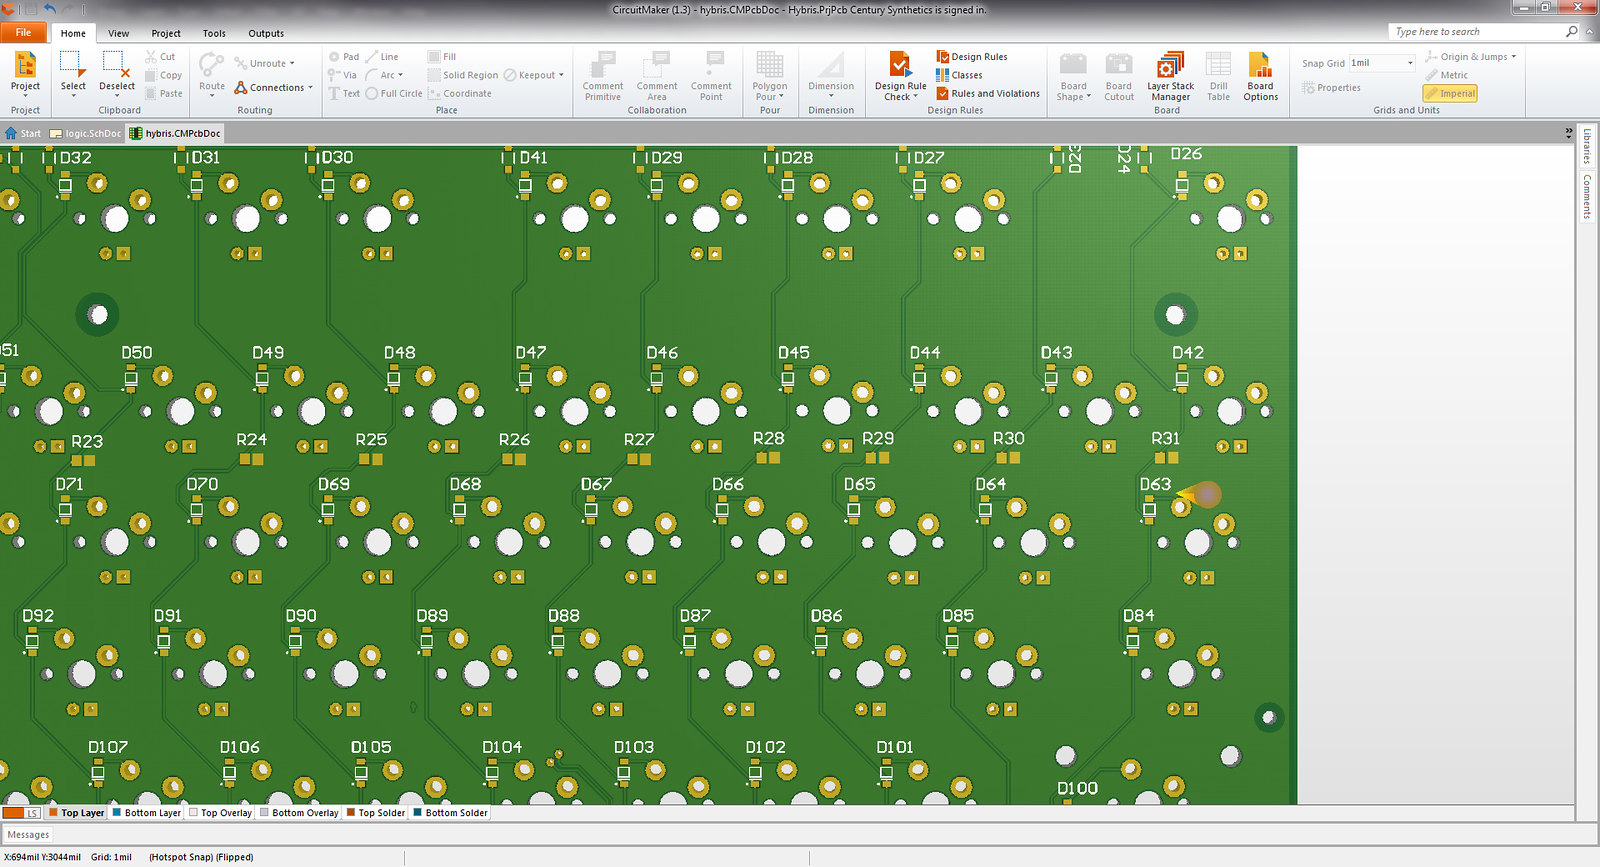
The column layout and diodes were next. I picked a spot and roughly placing the diodes in the same place for most of the 1u switches and did the 1.25/2u ones a little more custom. I'm a little disappointed in the shape of the traces, but this was a good learning experience for what to do better in Rev 2.   


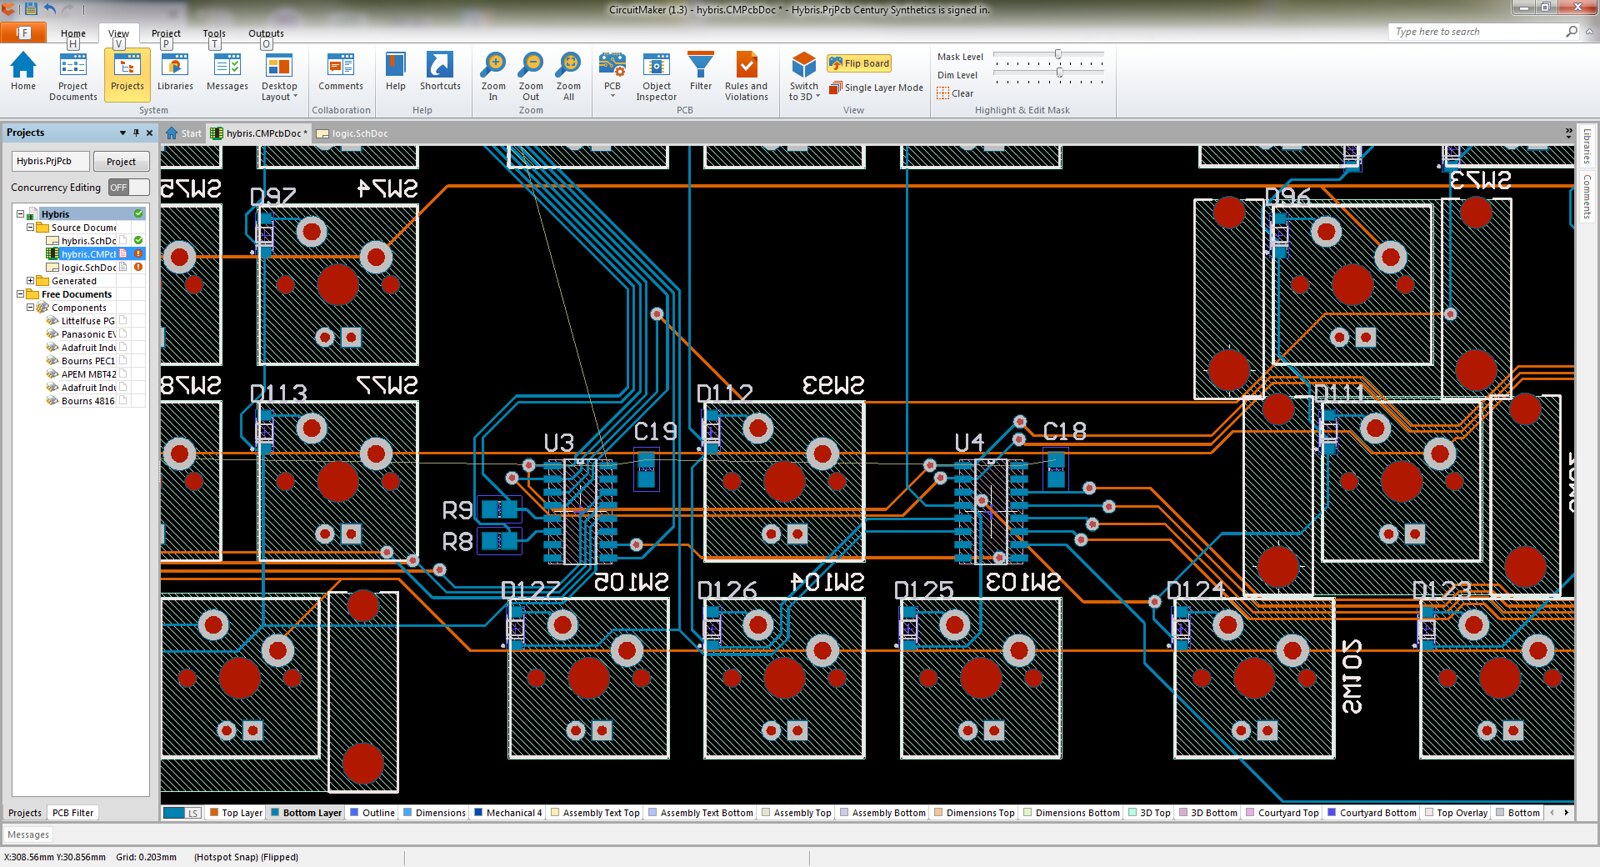
I placed the shift registers next. The data direction ended up being opposite to the breaboard mockup, which ended up making the connection go from the MCU to the register nearest the spacebar. Instead, the data line now goes from the MCU to the register nearest the numpad and daisy chains to the arrow keys then to the spacebar area. I also tried to make the traces not go directly under the stabs, just in case of wear. Any traces routed through the stabs were pulled as close to the mounting holes as possible.


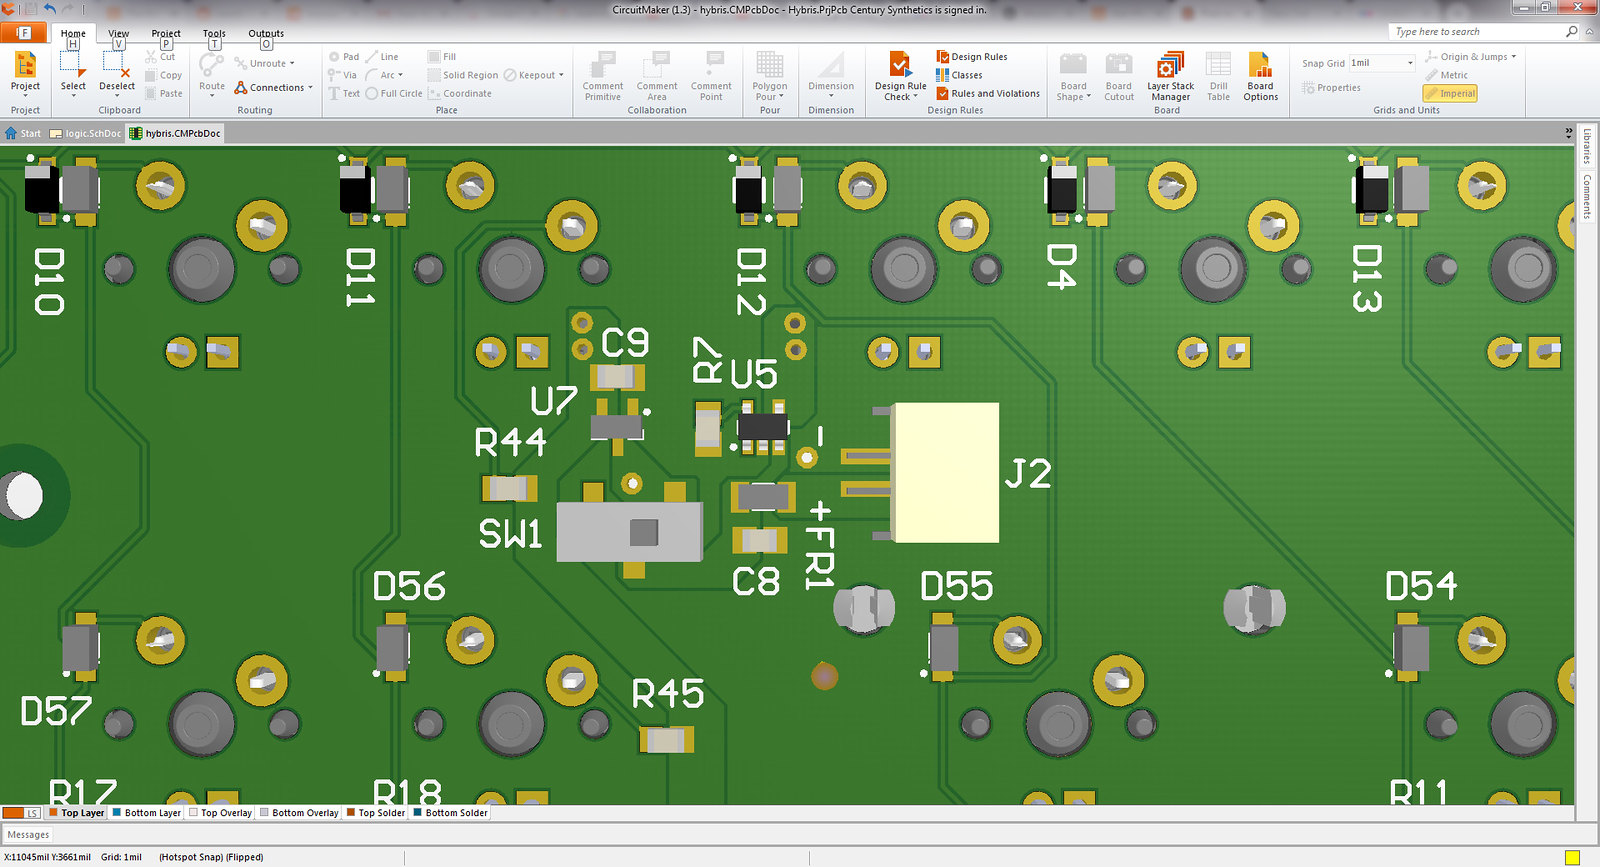
Lastly was the power supply. I was running a little short on space with all of the signal traces, so I picked a convenient spot under the F12 key. Since this will be the highest point of incline, it will let the main board to lay just above the battery inside the case. I'm going to design for a 2000mAh battery, so 60mm x 36mm x 7mm will be the allowance. I've used some fairly beefy traces on the VCC rails just because they have so damn long to go.

I added some more mounting holes to the board after routing all the signals and pulled back the ground plane from all of the holes. That concludes the PCB layout! I'm expecting the boards to arrive as early as tomorrow!

-Rich
« Last Edit: Mon, 03 December 2018, 01:50:08 by RichardH »

Offline marhalloweenvt

  • Posts: 20
  • Location: Viet Nam
Re: Hybris - A wireless 104 key keyboard from scratch
« Reply #54 on: Mon, 03 December 2018, 21:34:23 »
I just want to say that Your work is very amazing.
Would you allow me to use your design for my design?
Thanks

Offline RichardH

  • Thread Starter
  • Posts: 37
Re: Hybris - A wireless 104 key keyboard from scratch
« Reply #55 on: Mon, 03 December 2018, 22:52:19 »
@marhalloweenvt by all means. It's open source hardware. Hack away :)

The PCBs come tomorrow, so I should have some assembly stuff to show off.

-Rich

Offline marhalloweenvt

  • Posts: 20
  • Location: Viet Nam
Re: Hybris - A wireless 104 key keyboard from scratch
« Reply #56 on: Tue, 04 December 2018, 00:28:03 »
Can't wait for coming home to do some prototype with your design. I have some nrf52823 modules lying around.

Offline RichardH

  • Thread Starter
  • Posts: 37
Re: Hybris - A wireless 104 key keyboard from scratch
« Reply #57 on: Wed, 02 January 2019, 00:42:09 »
Happy new year everyone. It's been almost a year since the project started and I'm now at a fully built PCB!

Rev.1 of the PCB had a number of problems:

  • The Switch spacing ended up being 19.05mm, the printer was scaling as suggested by a previous poster - moral: never trust printers
  • The USB protection diode had too much skew and ended up fouling the signal- I've dropped it for now
  • Pull up and down resistors were not needed on the Jlink connector

So I've spun a Rev.2 and now the switches fit the plate and the minor signal issues were resolved :)

Here's some photos from the build - it was hand soldered minutes before these photos were taken, so it's a bit blobby and flux-y:


USB Section


BT module


Battery Section


The bottom side of the board


Thanks for all the help and feedback, guys! I'll follow up with a post on the progress of the case and hopefully get to building the plate and switches soon.

-Rich

Offline marhalloweenvt

  • Posts: 20
  • Location: Viet Nam
Re: Hybris - A wireless 104 key keyboard from scratch
« Reply #58 on: Wed, 02 January 2019, 03:22:07 »
You're rock.
Do you think about add some underglow RGB led? That should be nice future
« Last Edit: Wed, 02 January 2019, 03:29:55 by marhalloweenvt »

Offline iaman

  • Posts: 186
Re: Hybris - A wireless 104 key keyboard from scratch
« Reply #59 on: Wed, 02 January 2019, 08:04:04 »
This rules, Rich! Glad to see folks doing work on full-size PCBs, finally.

Offline vvp

  • Posts: 886
Re: Hybris - A wireless 104 key keyboard from scratch
« Reply #60 on: Wed, 02 January 2019, 10:23:56 »
Do you think about add some underglow RGB led?
LEDs would have quite a bad impact on the battery life when switched on.

Offline RichardH

  • Thread Starter
  • Posts: 37
Re: Hybris - A wireless 104 key keyboard from scratch
« Reply #61 on: Wed, 02 January 2019, 22:38:58 »
Hey again! So today I want to share my case design so far (been working on it during the holidays). First I'll follow up on the LED qustion above. I left the two wire interface open with solder pads on the mcu in case I decide to do that :) It would need a much bigger battery or to only run lights while on USB. I'm designing the case to support up to a 2000mAh battery, which would run bright lighting for about a day (@ 70mA or so). I guess the other issue is I wanted the base to be black.

So here we go:


My design goals here:

  • A metal case top, likely natural color anodized aluminum
  • A metal knob for media controls
  • A vinyl or silk screened decal in the top right corner
  • A plastic base - probably 3d printed to allow a large bluetooth aperture
  • A switch on the bottom to physically turn off the board when not in use
  • Room for a fairly large capacity battery just in case

I've done laser sintered nylon (SLS) through shapeways before and I liked how it came out. I'm not sure if that's the latest tech these days. The aluminum upper housing might be very expensive as designed due to the cavities on the bottom (the  plate is one level and the top right is another) and I want to cut the back of it up a bit to cause as little signal loss as possible. I'm not sure which bumpons to use, are they normally recessed? I'd love some manufacturing tips if anyone's done this before.

-Rich
« Last Edit: Wed, 02 January 2019, 22:45:08 by RichardH »

Offline hottrout

  • Posts: 1487
  • Location: Norn Iron
  • I'd Hit Dat Key
Re: Hybris - A wireless 104 key keyboard from scratch
« Reply #62 on: Thu, 03 January 2019, 07:57:35 »
I love what you are doing here and am following very closely.  Can I just say as a man the same age, I loved Hybris on my Amiga, it is one of my all time fav games from one of my all time fav systems.

Do you still game?
Do you collect Amigas/Computers?
Current Daily Driver : Virgo - Ultramarine - Standard Lube  |  WTB : Topre Realforce Hi-Pro, please PM me if you have one for sale.

Systems -
More
Work |i9-7940x@4.8ghz|32GB(3600)|STRIX-RTX3090Ti|Bespoke Water, 360m Rad|X299 Prime Deluxe|EK x299 Monoblock|Optane 900p|2x1TB 960 Pro|2x10TB Helium|Dell U3415W + Dell UP2116Q
Home |i9-13900ks|32GB(7300)|Rog RTX 4090|Asus Z790 Rog Maximus Hero|Torrent Air|2TB 990 Pro|2TB 990 Pro|Dell AW3423DW QOLED|NEC MultiSync|Drobo16TB
Mining |i5-7500|16GB(2400)|H110 Pro BTC+|8x1080Ti|2x1650Watt PSU

Plus 40 years of collecting retro computers, consoles, games, peripherals, mainframes and mini's as well as their software, keyboards, games and manuals. 100's of systems including every Amiga model made
  Keyboards -
More
IBM 3101 | IBM 3276 | IBM 5150 | IBM ModelM | Dictaphone Dual Display | Vintage Cherrys (1982 onwards, just about all of them) | Commodore (all of them) | Nixdorf | Siemens | ICL | Apple (all of them) | Filco Majistouch | KBDFans 5degree - Chocolate | Rama M6-B - Moon | CA66 Silver | ClueBoard Graphite/PC | Varmilo VA69M Silver | E7-V1 SE Yellow | Rama U-80 Space Grey | VN66 Navy | BOCC Frosted Polycarbonate | Rama M10-C Midnight | FLX Virgo Teal & Black | Rama M60-A LYN Kuro | Space65 CyberVoyager WhiteGold | Space65 CyberVoyager Terminal | Hyper 7 | Clarabelle Sandblasted Polycarbonate | Elongate Mini 1800 Blue | Petrichor 1800 Red | Vulcan Maja Ergo Green | Think6.5v2 RoboCop | Jacky Bear 65% E-White | Sakabato CB87 TKL Champagne | KCK KY-01 Aquamarine | Jae J-01 F&F E-White & Copper | S7.7 E-White | The Adélie Blue | NIX OxalyS80 LE Dark Polycarbonate | Mesa TKL E-White | Smith & Rune IRON180 Graen/Brass | Skog Reboot Desert | CU7 Black | ROTR Silver & Copper | RAMA Kara Soya | Grid 650 E-White | SIX5 LE Aluminium & Gold | OwLab Voice65 Grey | BOX 75 Black Stainless Steel | Onyx E-White | Ikki68 BT Charcoal | Smith & Rune Iron 165 Graphite & Stainless Steel | Epoch 80% Black | RAMA Thermal SEQ2 Kuro | Paper Crane Gerald65 SE PC & CF | CB1800 ZANBATO | GLiTCH | Eclipse Grey & SS | TGR Tomo Silver | Mountain Ergo Black | Keebwerk NASU Black/Red | Phase One 65 Grey | Command TKL Fire | Chalice Frosted | VIENDI 8L Shadow | | Vulcan Maja PC | Glove 80 | Matrix 8XV 3.0 Starry Night | Sagittarius Grey Lilac | AKB OGR & Numpad Dolch | Type K Black

Offline RichardH

  • Thread Starter
  • Posts: 37
Re: Hybris - A wireless 104 key keyboard from scratch
« Reply #63 on: Thu, 03 January 2019, 15:09:47 »
Heh.. I still play most of my favourites on uae - it’s close enough when using a game pad. My friend has my A1200, so I know where to find it :) waiting to see more about these vampire boards, too. There might be a little retro computing in my future if those turn out as advertised.

-Rich

Offline RichardH

  • Thread Starter
  • Posts: 37
Re: Hybris - A wireless 104 key keyboard from scratch
« Reply #64 on: Tue, 22 January 2019, 01:07:56 »
So it's time to build! All the internal parts have arrived and I now have enough to build the plate and switches.

The mechkb universal plate I'm using just needs the top tab sawed off to fit the encoder and status leds.


This plate also uses plate mount stabs, so I did a little test fit and installed all the stabilizers. I put a bunch of lube on the ends of the wires and the sides of the housings.


I originally started the project thinking I would use MX browns, but through a twist of fate I ended up with some bags of zilents :) so 62g zilents for the alphas and 65g for mods/numpad/f row/space


Lubed the side rails, the lower spring mount and a touch on the lower "pin" of the switch


After putting in the anchor switches, I populated the rest of them


Keys, encoder and aluminum knob and battery all installed. using a little cloth to keep the battery connector from hitting the table.


I'm now typing this message from my new board using Bluetooth :) So happy with how it turned out - Zilents are a dream! Plastics will come probably next month so I'll have a full prototype. If the plastic version looks good, it'll be onto the metal case top.

-Rich


Offline iaman

  • Posts: 186
Re: Hybris - A wireless 104 key keyboard from scratch
« Reply #65 on: Tue, 22 January 2019, 07:21:13 »
Rich, that looks great! So excited to see this project get here!

Offline AGmurdercore

  • Posts: 261
  • Location: Bulgaria
Re: Hybris - A wireless 104 key keyboard from scratch
« Reply #66 on: Sat, 25 July 2020, 18:09:42 »
I was searching around to gather ideas on a wireless build and I stumbled upon this thread. Any update on this, how are you liking it after some time now?
What the hell am I even doing

Offline RichardH

  • Thread Starter
  • Posts: 37
Re: Hybris - A wireless 104 key keyboard from scratch
« Reply #67 on: Tue, 17 November 2020, 14:58:58 »
Woops missed this :) It's my primary board now and it's been a workhorse. The nrf52832 version of this board is now obsolete, so I think if I were to go back to this project, I'd look at integrating the Nrf52840 version instead. Adafruit has already made an SDK avaiable. I have issues with the 840 though because the module is no longer hand solderable. It does use a lot less power and no longer needs the UART. About 2 years later I still get a week of battery life on a 500mAh battery. I was hyped about building a case for it, but the price is just too much, so I just use it as a bare board still.

-Rich