Let's do this! Some of us have already received our kits, and many are going to be working on theirs soon. This keyboard has lots of layout options, so I'm very excited to see what everyone decides on doing with their LightSaver

LightSaver is a tray-style aluminum keyboard by Duck with a TK-style PCB and LOTS of layout options! For Duck's official photo website, see here:
http://duck0113.tistory.com/66There are 5 lighting modes (mode 5 is for side LEDs). The modes are called "L1", "L2", "L3", "L4", and "L5" in the original firmware, for key programming purposes. Before you do any reprogramming, by default the modes can be activated as follows:
So the led control by default is the top right most button plus 1 through 5. The button to the top right side of backspace turns the lights on the bottom of the pcb on and off and so does the led toggle + 5.
Update! New firmware: http://duck0113.tistory.com/84 (select "Download : 02D_KeyMapper_Custom_vXXXX . exe", use the OTD Lightsaver custom profile)
- user-defined debounce values
- a dozen different reactive modes and even more with their combinations
- macros, polling rate change, 4 separately programmable layout layers, etc.
- read carefully in Google Chrome using automatic translation option, it's actually very readable in the English translation
- if you are having trouble saving a modified layout to a new file, try overwriting a copy of an existing layout file instead!
- Notes on reprogramming: More
To reprogram, look at this
KMAC programming guide for reference--it's basically the same, except that to enter bootloader, unplug your LightSaver, press and hold the Flip key while plugging the USB cable back in. The Flip key is seen here:
(it's the right-side 1x key above Backspace)
Modify existing keymap XML file in an XML editor, save it as XML, load it into TrueKeyMapper software to check that everything looks correct, generate a HEX file (you can do it from the KeyMapper), open Flip, enter bootloader mode, reprogram.
Please Note: "If your arrows or LED functions aren't working in the O2D mapper, [in Windows at least] you can change your locale through
control panel>region>administrative>change system locale... set it to
korean and now the arrow keys and LED functions will all work propperly. (credit goes to stylingreymon.)"
reference- Notes about LED modes: More
by default, they are on Function Layer #3, which means press the MFN button 3 times in a quick succession to get to the 3rd function layer, and on the third time hold it and press a number associated with the area on the keyboard you want illuminated (alternatively, if you bind FN3 to some key, press FN3 + number)
1 = Function row LEDs
2 = Modifiers + number row
3 = Alphas
4 = Numpad
5 = Side LEDs
To cycle through different lighting modes, you can press those keys repeatedly. For example holding down FN3 (or having pressed MFN 3 times and holding it), you can keep pressing "3" to cycle through lighting modes for the alphas. Here are the lighting modes, in a cycle:
- All ON
- All OFF
- Breathing with longer dark periods
- Breathing with short dark periods (basically the opposite of the other kind of breathing, if you want to have 2 sections breathing exactly out of sync)
- Reactive ON (off until you push a key, then that section turns on briefly at maximum set brightness)
- Reactive OFF (on until you push a key, then that section turns off briefly)
- Breathing mode where speed varies based on typing speed--starts off breathing quickly then slows dramatically until you begin typing
- Breathing mode where speed varies based on typing speed--reverse of the above (breathing out of sync)
- OFF until you begin typing, then the section turns on gradually the faster you type. Fades back to off once you stop typing.
LED brightness level can be varied with LED D[ow]N and LED UP keys, on the same function layer #3 by default
- Command Mode (C/M) key allows you to enter into the programming mode, where you can set stuff like debounce values
- Note about the top right LED blinking every 2 seconds - it's on purpose, read here:
More
The blinking LED shows you which layer you are in. It's called "Layer Status." There are 4 layers on the keyboard, so if the light blinks once every 2 seconds, it means Layer 1 is activated. 3 quick blinks means that you're in Layer 3, etc.
There are 2 modes in which that LED can be: either blinking every 2 seconds to let you know which layer you are in at all times or you can change it to only show you the layer number when changing into that layer, and then that LED will remain off until the next layer change. To switch between these two modes:
LLB: default LED Blink mode (every 2 seconds)
LLN: "Normal" LED mode (off until changing layers)
- Enter Control Mode (press the C/M button); the Layer Status LED should be lit now without blinking
- type LLN (or LLB) and press Enter
- Exit Control Mode by pressing Esc
.
Older LightSaver Firmware: http://duck0113.tistory.com/71Older LightSaver Keymapper Software: http://duck0113.tistory.com/75Alternative TMK firmware by xauser, now merged into the official TMK Keyboard package: https://github.com/tmk/tmk_keyboardV1 was sold through Sherryton/Originative. V2 group buy thread is located here:
http://geekhack.org/index.php?topic=56877.0Screws: the 10 little screws you need to attach the plate to the case are size M2 in Torx T6 with a 0.4mm pitch (called "coarse" or "normal") and 5mm length. If your set is missing screws, please see
this post by dorkvader--he ordered a large batch for himself that seem to fit well.
Stabilizers: it appears that you need PCB-mounted Cherry stabilizers for this keyboard. You can source them from mouser.com and newark.com and such.
Simple Questions Simple Answers thread has some notes about them in the first post.
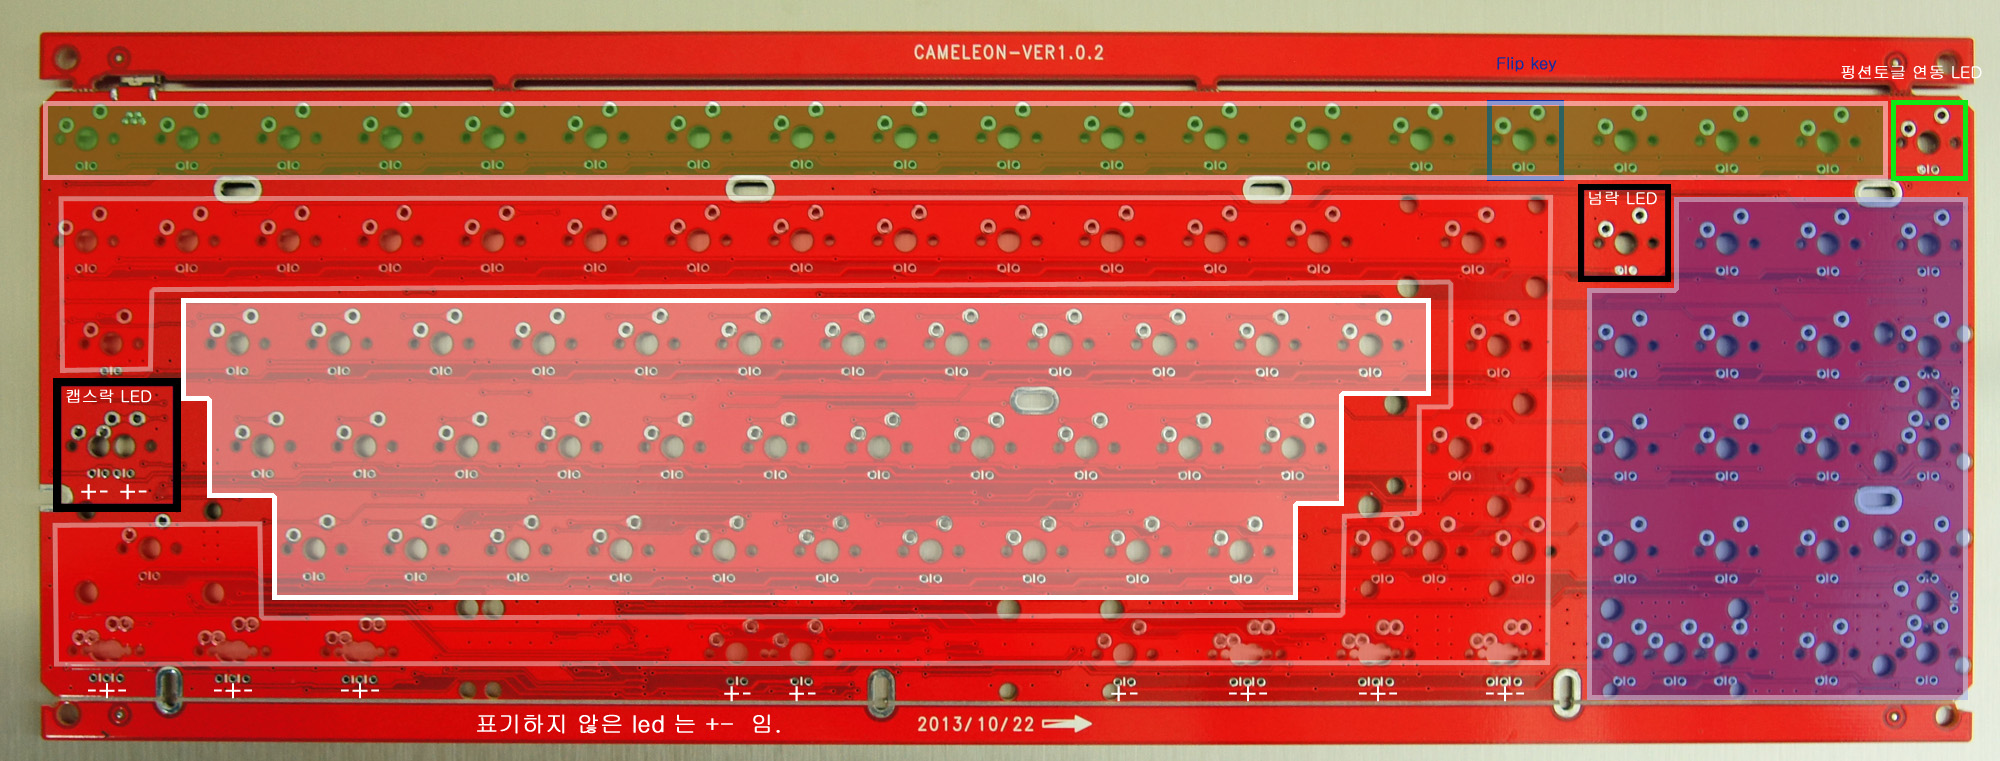
The Side LEDs are 3.5mm x 2.8mm in size (3528 or 1411 package size). If you are changing the side LEDs, please note the orientation of the original LEDs before removing them: it's not symmetric!
All LED resistors appear to be 470 Ohm variety.
Please note, this was true for Lightsaver V1. Later versions might be different--please double-check.PLEASE NOTE when installing LEDs, polarity is not indicated on the PCB, but it's the standard + on the right, - on the left, when looking at the PCB from the top (not from the bottom). BUT, if you're doing a 1.5x modifier layout on the bottom row, note that the LEDs for the right-side Alt/GUI/Ctrl should be reversed in orientation to - / +. If in doubt, check the bottom row LED orientation without soldering first with the board plugged in. Layout options for Lightsaver V2
 -
more options for the bottom row:
(options a) and d) along with short 1.75x right Shift allow for the arrow cluster, G80-1800-style :
More
Photo by Jokrik
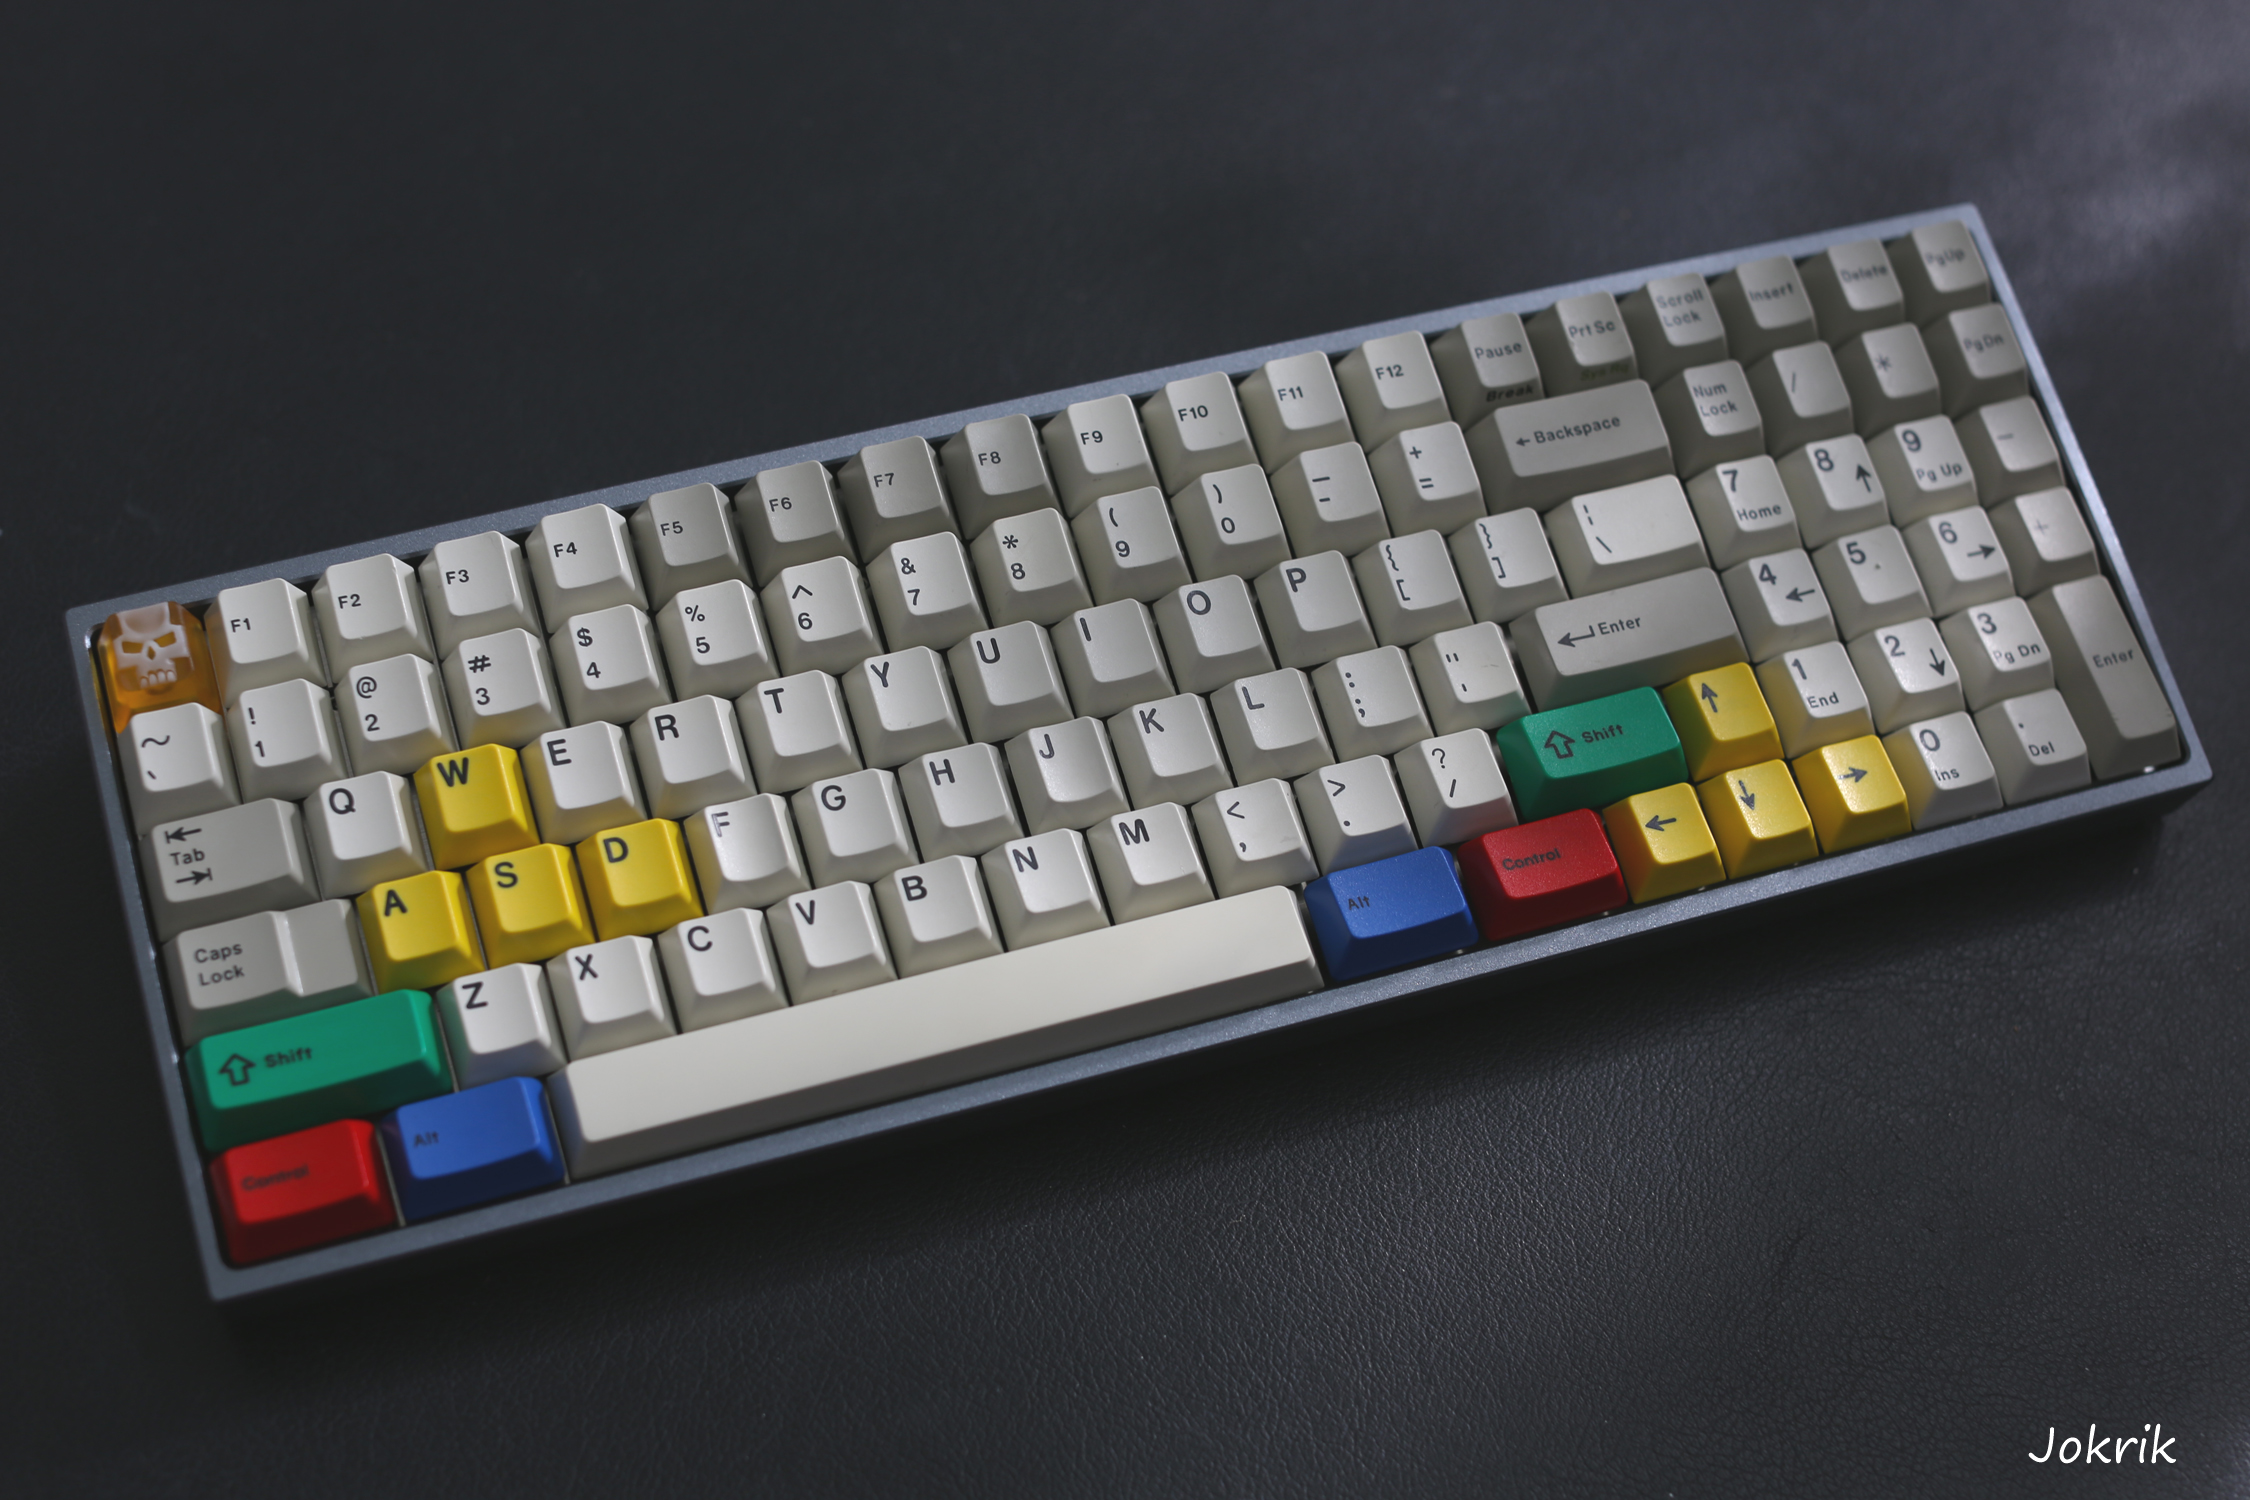 Lightsaver v2 + Caps
 by
hansen_oe, on Flickr
)


