Author Topic: Sculpting Keycaps - :~$ynth & Green Stuff  (Read 10201 times)

0 Members and 1 Guest are viewing this topic.

Offline kenji

  • Thread Starter
  • Posts: 18
  • one day at a time
Sculpting Keycaps - :~$ynth & Green Stuff
« on: Fri, 17 November 2017, 01:24:27 »
Hey All,

I have been really grateful to receive help from community posts, so I want to journal my progress learning to make key caps and hopefully help others along the way too. This post is going to be on what I’ve learned sculpting a key cap with Kneadatite "Green Stuff" using a ~:$ynth as a base as well as my attempts to cast them into functional key caps.

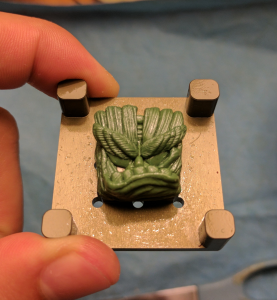
Without further ado, I am proud to share my first cap! Introducing,

The Tiki
182383-0


Here’s a list of the materials I used to make The Tiki:
(I am still learning what works best, so this list will continue to update.)


Materials:


Sculpting Medium
  • Kneadatite (“Green Stuff”)
182964-1

Tools
  • X-ACTO Knife
       -My go-to tool hands down. Great for making small details and cutting the Green Stuff
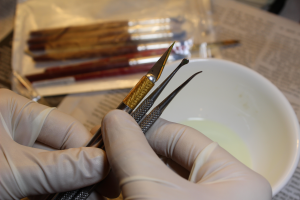
  • Dental Wax Carving Set
       -Really good place to start to see what tools work for making details. The most useful I find are the needle tip and small rounded spoon tools
  • Rubber Smoothing Tools
       -Not 100% necessary since Green Stuff is already smooth and holds its form very well, but still useful
182962-2

Base
  • Blank keycap or ~:$ynth ($ynth)   
       -Really anything will do - a plank of wood, a sheet of metal, whatever forms a flat platform

Miscellaneous
  • Impermeable gloves
       -Per the manufacturer’s recommendations, use impermeable gloves when handling the uncured material to protect your skin from damage
  • Water/Cooking Oil
       -Lubricant to prevent Green Stuff from sticking
  • Brush/Paper towel to apply water/oil


Green Stuff - General Overview.

Green Stuff comes separated into two strips, one blue and one yellow. Green Stuff is pre-measured to a 50-50 mix ratio, which worked just fine for my purposes. However, varying the amount of blue:yellow parts affects the consistency, working life, and ultimate hardness of the material. In short, a blue-dominant mix is harder, faster curing, and is stronger once cured. On the other hand, a yellow-dominant mix is stickier, longer curing, and is more flexible once cured. See The Battleforge’s guide (http://www.thebattleforge.co.uk/green-stuff-12-w.asp) with much more info on the Green Stuff. The guide dives into more specifics and gives great tips like the cooking oil trick!)

Once mixed, Green Stuff becomes very sticky and has a firm feel similar to putty or “chewed bubble gum” as The Battleforge states. This consistency means Green Stuff holds its form well and still allows for shaping and molding. As a result, it can create smooth finishes and more intricate details. However, its malleable texture makes it difficult to form sharp 90 degree edges, which may limit design options.

I can’t emphasize enough how sticky Green Stuff is In fact, its stickiness alone may be the hardest part about working with this material. Because of this, keep materials, tools, and hands wet or oiled. I initially used water, but found it annoying to constantly dip my fingers and tools in the water and would sometimes not have my Green Stuff wet enough, causing it to stick and deform. I switched to canola oil and did not a problem of sticking. However, it makes it difficult to add additional layers of Green Stuff on top of an oiled layer, so it is necessary to completely wash or clean off the oil before adding more.

Green Stuff has a rough working life of 1.5 - 2 hours. Thus, it maintains its sticky consistency until it hardens after 4 - 5 hours and finally reaches its ultimate hardness around 20 - 24 hours.


When it comes to sculpting caps with Green Stuff, the process can be broken down to 3 steps:

1.   Mixing
2.   Making the Base
3.   Adding Detail


1.   Mixing

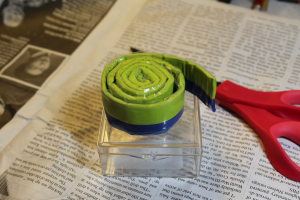
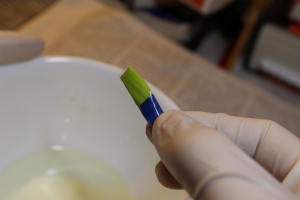
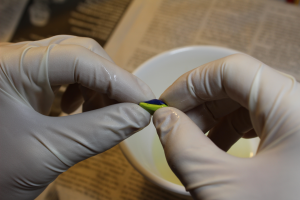
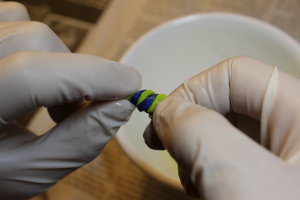
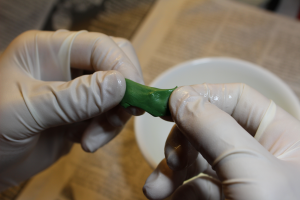
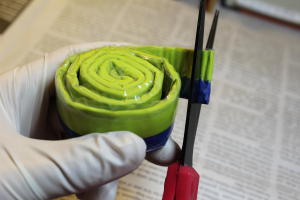
First, mix the green stuff. This is as simple as cutting off a portion of the roll and twisting the two parts together until you get a uniform green color. I found the pre-measured 50:50 ratio worked for this cap. Two things to note when mixing:

  • Stay lubricated! - Use enough water/oil to prevent sticking, but be careful not to add too much.
     Excess can keep the Green Stuff from mixing.
  • A little at a time - Once mixed, the countdown starts. Green Stuff begins to harden, so avoid mixing more than needed.
182966-3     182968-4

182972-5     182970-6     182974-7


2. Making the Base

The first time I tried sculpting a key cap, I began adding Green Stuff directly to a blank key cap. Though it worked (with mixed results), it was a huge pain. My hand cramped from holding the small key, which caused me to drop it several times while I was sculpting, more often than not messing up my sculpt… It was also hard to keep the Green Stuff in place when I sculpted on the front of blanks, since it would not be anchored to the key and would slide around. I did manage to make a few drafts, but it was annoying having to struggle with the blank.

I was ecstatic when my brother gifted me a synth. It was game changing!

The $ynth has many advantages. It provides me with something bigger to hold and also has grooves to anchor the base of your sculpture. A huge benefit of working with Green Stuff on a $ynth is the design of the $ynth allows one to create sculpts that can be removed and reused in the future. This feature is amazing, since you can then sculpt multiple designs and cast with only one $ynth!

Since I am using a $ynth as a base, I began exactly a Binge describes in his comprehensive guide on working with a $ynth (https://geekhack.org/index.php?topic=78551.0).

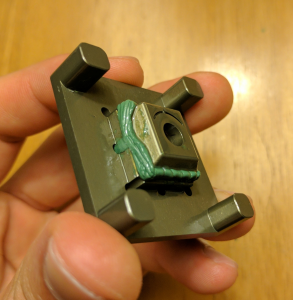
Binge is very clear and covers exactly what to do. Unfortunately, I don't know how to follow directions... I'd love to say I purposely demonstrated what NOT to do for the benefit of others... but that's not the case. Below are a few examples of what to avoid when sculpting on a $ynth:
182379-8

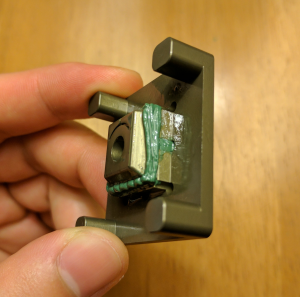
•   After oiling the $ynth, I rolled up some Green Stuff into a thin cylinder and used my tools to shape the base. I was quick to add detail; however, this was a mistake. Well, maybe more of a waste of time because I ended up adding more green stuff over the base. I made a second mistake in adding green stuff past the outer edge of the $ynth’s boundaries. It is CRUCIAL that the sculpt stays within the limits of the $ynth because it allows your key caps to fit snugly next to each other. (HINT: Binge explicitly says to avoid doing both of these…)


182381-9

•   Notice I added extra green stuff down the sprue holes to anchor the sculpt to the $ynth. ALERT ALERT!!! Make sure to NOT do this. Per Binge’s guide, my sculpt’s base shouldn’t fill the entire sprue hole. Doing so would’ve allowed me to cleanly remove and save my sculpture. Instead, I’ll have to force my sculpt off and pray it doesn’t break...

If only I had read the user manual...


3. Adding Detail

Now that I made my base, I began adding detail to rest of my key cap. As I added new layers, I washed off any oil on the Green Stuff, all the while keeping my base lubricated to prevent sticking.

For each detail I waited for the material to harden to a point where I could then add another layer without deforming the initial sculpture. This tested my patience. Since green stuff has a 1.5 - 2 hour working life, it proved enough time to sculpt but it required me to wait for the material to cure.

I began by sculpting from the bottom-most detail and ended with the topmost.
Looking back on this sculpt, I wish I had considered how the layering would affect the final key cap’s coloring. The height of each layer affects the depth of the mold, with the topmost layer forming the bottom of the mold. Deeper pockets in the mold (caused by taller details) are easier to pour resin in to. This means if I wanted to make a multicolored cap, I would have more control over the final coloring.

Finished sculpt:
182383-10


In short, here's a list of the pros and cons I found working with Kneadatite "Green Stuff"

•   Pros
  • Organic shapes and form
  • Holds details well when sculpting
  • Cures very strong
  • Removable and reusable sculpts (with a $ynth)!!!

•   Cons
  • Difficult to make sharp/clean edges
  • Very sticky consistency
  • Cannot easily alter details once cured (good and bad)


Closing Thoughts

Overall, working with green stuff was new and challenging. After several botched attempts, I can say I am mostly satisfied with my final design. Through this process, I learned which of the dental tools I liked and realized how awesome the X-ACTO blade is for creating detail. Even though I am not able to achieve hard edges with green stuff, I do like the organic aesthetic of the more rounded features on my cap. However, the fact that my final sculpt extends past the limits of the $ynth boundaries means that no two of these babies will ever be able to rest snugly next to another... Sad day. In the future, I plan on using this design to practice my mold making and casting, but I am hesitant to release it due to the excessive size. I hope I was able to provide some insight into the process of sculpting key caps with Green Stuff. I want to emphasize the importance of sculpting with whatever medium works best for you. It takes a lot of trial and error through practice to make progress. Going forward, I am eager to sculpt more with green stuff, and I am also very interested in messing around with more clay-like material such as Super Sculpey. But no matter what material you use, find one you like and get sculpting!


----------------Updates----------------

First Cast - 2017.08.27
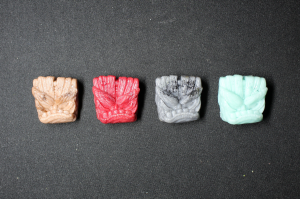
183665-11

183667-12

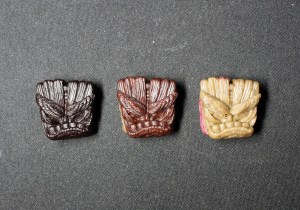
Using non degassed Oomoo 30 molds and Alumilite resin, I hand poured several caps using my synth and oil based dyes. I also spread vaseline on the synth to prevent the resin from sticking.


Second Cast - 2017.12.01
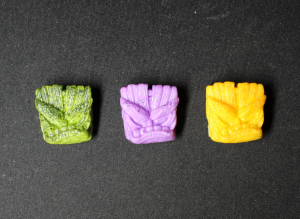
183669-13

183671-14

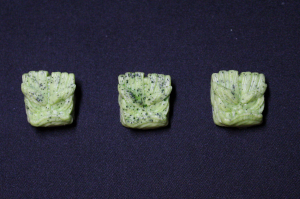
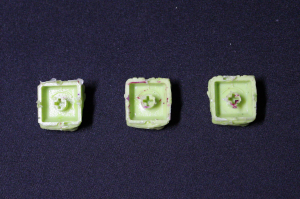
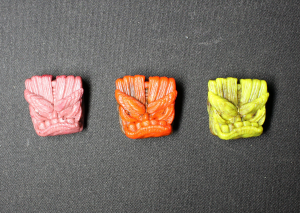
Messed around with some new powdered colors I got as well as Mann Ease Release 200 for a nonstick synth. The sickly green one mistakenly turned out looking good, with the powder not completely dissolving and leaving speckles. Some of the others were not what I expected, but overall I was satisfied with the results.

Of the total caps, only three had good stems... still dealing with those pesky bubbles... Leaning towards getting a pressure pot to try and get a perfect cap.


Third Cast - 2018.01.19-21

Burgundy:
187032-15          187034-16

Light Lime Green:
187036-17          187038-18

Neon Green:
[ Specified attachment is not available ]
« Last Edit: Sun, 28 January 2018, 15:25:43 by kenji »

Offline luismonterieart

  • Posts: 30
  • https://miluxkey.com
Re: Sculpting Keycaps - :~$ynth & Green Stuff (Under Construction)
« Reply #1 on: Fri, 17 November 2017, 08:29:49 »
Nice sculpt! I can't wait to see how it turns out! :thumb:
Explore our world at

· Website: https://miluxkey.com
· Facebook: https://www.facebook.com/MiluxKey

Offline kenji

  • Thread Starter
  • Posts: 18
  • one day at a time
Re: Sculpting Keycaps - :~$ynth & Green Stuff (Under Construction)
« Reply #2 on: Sat, 18 November 2017, 15:38:38 »
Nice sculpt! I can't wait to see how it turns out! :thumb:

Thanks! I've been experimenting with different colorways and trying to cast without any bubbles. Here are a few of the first attempts

182437-0

Offline gr4v3m4n

  • Posts: 112
  • Location: kaps land
    • my store
Re: Sculpting Keycaps - :~$ynth & Green Stuff
« Reply #3 on: Sun, 19 November 2017, 22:24:11 »
great sculpt, i just started with sculpting, learning to make details is a tricky thing.

Offline kenji

  • Thread Starter
  • Posts: 18
  • one day at a time
Re: Sculpting Keycaps - :~$ynth & Green Stuff
« Reply #4 on: Mon, 20 November 2017, 01:47:02 »
great sculpt, i just started with sculpting, learning to make details is a tricky thing.

Thanks man, this was actually the fourth or fifth attempt at a tiki sculpt. It took me awhile to get a feel for green stuff and also which tools I liked/worked well.

It really helps me to draw out designs before I sculpt. Getting it on paper let's me visualize the details.

Good luck with your sculpting!

Offline luismonterieart

  • Posts: 30
  • https://miluxkey.com
Re: Sculpting Keycaps - :~$ynth & Green Stuff (Under Construction)
« Reply #5 on: Mon, 20 November 2017, 12:04:55 »
Nice sculpt! I can't wait to see how it turns out! :thumb:

Thanks! I've been experimenting with different colorways and trying to cast without any bubbles. Here are a few of the first attempts

(Attachment Link)

Great colorways, dude! Keep up the good work!  ;)

Explore our world at

· Website: https://miluxkey.com
· Facebook: https://www.facebook.com/MiluxKey

Offline kenji

  • Thread Starter
  • Posts: 18
  • one day at a time
Re: Sculpting Keycaps - :~$ynth & Green Stuff (Under Construction)
« Reply #6 on: Tue, 21 November 2017, 14:53:42 »
Nice sculpt! I can't wait to see how it turns out! :thumb:

Thanks! I've been experimenting with different colorways and trying to cast without any bubbles. Here are a few of the first attempts

(Attachment Link)

Great colorways, dude! Keep up the good work!  ;)


Will do! I really appreciate the support  ;D

My next step will be to try and cast some $ynths to increase my key cap output. It took me over 8 hours to cast all of those guys one at a time...

Offline kenji

  • Thread Starter
  • Posts: 18
  • one day at a time
Re: Sculpting Keycaps - :~$ynth & Green Stuff
« Reply #7 on: Wed, 06 December 2017, 01:09:06 »
Welp, instead of pouring molds to make synths I decided to make some new caps.

Tried pouring new Tikis last week with some powdered colors getting mixed results. I like a few of the colorways, and am eager to experiment more. I added some pictures to the original post to keep a record of my progress as I try new casts.

Bubbles have still been a problem...  I must be adding them when I mix the resin and maybe even when I pour. Short term, I might try getting a syringe instead of using pipettes. And in the long term I'll haveta get a pressure pot

In addition to bubbles, I'm still having the resin stick to the synth. The next time I cast I will try layering some vaseline over the mold release.

Overall, I'm pleased with this trial and look forward to my next cast
« Last Edit: Wed, 06 December 2017, 22:16:08 by kenji »

Offline 9999hp

  • Posts: 157
  • Location: Present
Re: Sculpting Keycaps - :~$ynth & Green Stuff
« Reply #8 on: Tue, 26 December 2017, 21:46:38 »
The pressure pot makes a world of difference, unfortunately they are very pricey. Loving the sculpts and hope to see some full caps some time!

Offline kenji

  • Thread Starter
  • Posts: 18
  • one day at a time
Re: Sculpting Keycaps - :~$ynth & Green Stuff
« Reply #9 on: Sat, 30 December 2017, 11:22:31 »
The pressure pot makes a world of difference, unfortunately they are very pricey. Loving the sculpts and hope to see some full caps some time!

Thank you! Ill be sure to post soon as I get some good results.

Yeah... I'm trying to find the right pressure pot. Debating between getting an CN Technologies ASME rated one that's about $200 cheaper than a Binks.

In the meantime I've been sculpting. I tried using Fimo which is a polymer clay and made this guy:

185449-0185451-1185453-2

The Fimo was much easier to work with compared to the green stuff. I added detail by cutting small pieces of Fimo and smoothed it on the sculpt, slowly building up the features. However, the soft material tended to deform before it was cured and risked cracking if it dried out.

For this cap, I sculpted over the synth borders a bit. Realized if I start with sculpting the base first, then I can scale the cap more easily. I still like the rough design and want to see how it's casts. The next step will be to work on a cleaner sculpt and smaller cap that actually fits
« Last Edit: Wed, 10 January 2018, 23:20:21 by kenji »

Offline kenji

  • Thread Starter
  • Posts: 18
  • one day at a time
Re: Sculpting Keycaps - :~$ynth & Green Stuff
« Reply #10 on: Thu, 11 January 2018, 00:31:15 »
Alright!

I bit the bullet and bought a beautiful Binks (ok enough alliteration...) 83C-210 2.8 gallon, single regulator pressure pot! It was expensive, but with a max working PSI of 80 this pot will be great for casting resin caps.

186223-0

As I was looking around at other pressure pots, I found a much more affordable option in the C.A. Technologies 51-201C 2.5 gallon pot. The determining factor between the two was that the Binks is ASME certified. I guess if it ever explodes then I can have someone to blame? After some serious thought, I weighed the consequences of a potentially faulty pressure pot with the price difference between the Binks and CA Tech, and determined my life to be worth at least $200.


In addition to the pressure pot, I also got an air compressor:

186215-1          186217-2

Combining the Binks with the 1P1060S California Air Tools compressor I received as a gift (thanks bro!), I am one step closer to having a complete setup. Note the decibel comparisons on the chart. This compressor is relatively quiet and is great when using indoors. It is also portable, which makes for easier use in tight spaces. All's I need is a working hose and then this casting setup will be good to go!


« Last Edit: Thu, 11 January 2018, 00:37:17 by kenji »

Offline 9999hp

  • Posts: 157
  • Location: Present
Re: Sculpting Keycaps - :~$ynth & Green Stuff
« Reply #11 on: Thu, 11 January 2018, 19:45:31 »
ohhhh boy it's about to get cereal, nice haul! Looking forward to to what you're gonna do with those!

Offline aspenc4

  • Posts: 88
Re: Sculpting Keycaps - :~$ynth & Green Stuff
« Reply #12 on: Fri, 12 January 2018, 22:07:18 »
You’ve got some skill for sure, I dig those sculpts. Keep it up!


Sent from my iPhone using Tapatalk

Offline kenji

  • Thread Starter
  • Posts: 18
  • one day at a time
Re: Sculpting Keycaps - :~$ynth & Green Stuff
« Reply #13 on: Thu, 18 January 2018, 00:11:39 »
ohhhh boy it's about to get cereal, nice haul! Looking forward to to what you're gonna do with those!


thanks! it was a big investment, looks like im committed haha. i'm looking forward to casting this weekend  ;D

You’ve got some skill for sure, I dig those sculpts. Keep it up!


Sent from my iPhone using Tapatalk


i appreciate the compliment! i've been sculpting a bit on the side but now ima focus on casting with my new toys. time to say goodbye to those pesky bubbles


Offline aspenc4

  • Posts: 88
Re: Sculpting Keycaps - :~$ynth & Green Stuff
« Reply #14 on: Thu, 18 January 2018, 00:17:16 »
ohhhh boy it's about to get cereal, nice haul! Looking forward to to what you're gonna do with those!


thanks! it was a big investment, looks like im committed haha. i'm looking forward to casting this weekend  ;D

You’ve got some skill for sure, I dig those sculpts. Keep it up!


Sent from my iPhone using Tapatalk


i appreciate the compliment! i've been sculpting a bit on the side but now ima focus on casting with my new toys. time to say goodbye to those pesky bubbles


Can’t wait to watch your progress, so keep me posted for sure!


Sent from my iPhone using Tapatalk

Offline kenji

  • Thread Starter
  • Posts: 18
  • one day at a time
Re: Sculpting Keycaps - :~$ynth & Green Stuff
« Reply #15 on: Thu, 18 January 2018, 00:30:21 »
ohhhh boy it's about to get cereal, nice haul! Looking forward to to what you're gonna do with those!


thanks! it was a big investment, looks like im committed haha. i'm looking forward to casting this weekend  ;D

You’ve got some skill for sure, I dig those sculpts. Keep it up!


Sent from my iPhone using Tapatalk


i appreciate the compliment! i've been sculpting a bit on the side but now ima focus on casting with my new toys. time to say goodbye to those pesky bubbles


Can’t wait to watch your progress, so keep me posted for sure!


Sent from my iPhone using Tapatalk

will do!

just put together some parts to complete the air regulator for the pressure pot:

186737-0          186739-1


since i'm planning on casting soon, were there any colors from my first attempts you would wanna see more of? or any other colors you had in mind?

Offline aspenc4

  • Posts: 88
Re: Sculpting Keycaps - :~$ynth & Green Stuff
« Reply #16 on: Thu, 18 January 2018, 01:47:17 »
ohhhh boy it's about to get cereal, nice haul! Looking forward to to what you're gonna do with those!


thanks! it was a big investment, looks like im committed haha. i'm looking forward to casting this weekend  ;D

You’ve got some skill for sure, I dig those sculpts. Keep it up!


Sent from my iPhone using Tapatalk


i appreciate the compliment! i've been sculpting a bit on the side but now ima focus on casting with my new toys. time to say goodbye to those pesky bubbles


Can’t wait to watch your progress, so keep me posted for sure!


Sent from my iPhone using Tapatalk

will do!

just put together some parts to complete the air regulator for the pressure pot:

[ Attachment Invalid Or Does Not Exist ]           [ Attachment Invalid Or Does Not Exist ]


since i'm planning on casting soon, were there any colors from my first attempts you would wanna see more of? or any other colors you had in mind?

I think this little fella looks best in the Dark Brown from your first cast, and the Lime Green from your second cast, as well as the Olive Green from the picture posted underneath his name.  Earth like colors seem like they were made for that sculpt imo, although that Jukebox mint looks great too. 

Full Disclosure: I'm a huge Retro Burgundy fan, so anything in those colorways make me a happy boy.  i don't feel like with The Tiki it's a stretch though.  Throw in a Burgundy to go with that dark brown and lime green, and you've sold at least 3 already.  :)

Offline kenji

  • Thread Starter
  • Posts: 18
  • one day at a time
Re: Sculpting Keycaps - :~$ynth & Green Stuff
« Reply #17 on: Fri, 19 January 2018, 00:10:08 »
ohhhh boy it's about to get cereal, nice haul! Looking forward to to what you're gonna do with those!


thanks! it was a big investment, looks like im committed haha. i'm looking forward to casting this weekend  ;D

You’ve got some skill for sure, I dig those sculpts. Keep it up!


Sent from my iPhone using Tapatalk


i appreciate the compliment! i've been sculpting a bit on the side but now ima focus on casting with my new toys. time to say goodbye to those pesky bubbles


Can’t wait to watch your progress, so keep me posted for sure!


Sent from my iPhone using Tapatalk

will do!

just put together some parts to complete the air regulator for the pressure pot:

(Attachment Link)           (Attachment Link)


since i'm planning on casting soon, were there any colors from my first attempts you would wanna see more of? or any other colors you had in mind?

I think this little fella looks best in the Dark Brown from your first cast, and the Lime Green from your second cast, as well as the Olive Green from the picture posted underneath his name.  Earth like colors seem like they were made for that sculpt imo, although that Jukebox mint looks great too. 

Full Disclosure: I'm a huge Retro Burgundy fan, so anything in those colorways make me a happy boy.  i don't feel like with The Tiki it's a stretch though.  Throw in a Burgundy to go with that dark brown and lime green, and you've sold at least 3 already.  :)

Awesome! Wow thanks for all of the suggestions!!!  :thumb: I had no idea Jukebox mint was even a color... Had to look that one up haha

To be honest, I was leaning towards the earth tones too. Some of the random caps I casted were color tests with a powdered dye, but overall I'm liking the greens and browns.

I've tried mixing red in with a little brown, but it turns more pink than anything (see the cap from my first cast and first on the left in the second row)... Guess it's time to experiment a little more. Might try adding in some black and/or blue along with extra brown to get there. I'll keep you posted with the results tho

Offline kenji

  • Thread Starter
  • Posts: 18
  • one day at a time
Re: Sculpting Keycaps - :~$ynth & Green Stuff = The Tiki
« Reply #18 on: Tue, 23 January 2018, 00:49:16 »
WOooot!!!

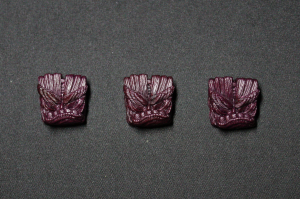
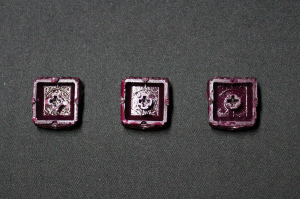
Finally got some casts with my new set up. With these first few trials, I’m already loving my pressure pot and compressor. I now have bubble-free caps that just need to be sanded down a bit on the back.

I casted three different colors and had mixed results. Here are a few pictures of the finished caps.


Burgundy:         

187022-0          187024-1

Yo aspenc4, how close is this to what you were thinking?


Light Lime Green:

187026-2          187028-3

Was going for a darker green. Next cast, I’m using more powder


Neon Green:

187030-4

Again, was expecting something a lot darker. Will need to adjust

 
Still experimenting with the liquid and powdered dyes. I’m liking the speckled effect from the powdered dyes but need to tweak how much powder I add to get darker colors.
Also, I’m finding small bubbles on the face of the cap due to the mold, so I will need to pour some new ones

Steadily making progress, one day at a time
« Last Edit: Tue, 23 January 2018, 00:51:14 by kenji »

Offline aspenc4

  • Posts: 88
Re: Sculpting Keycaps - :~$ynth & Green Stuff = The Tiki
« Reply #19 on: Wed, 24 January 2018, 12:16:38 »
WOooot!!!

Finally got some casts with my new set up. With these first few trials, I’m already loving my pressure pot and compressor. I now have bubble-free caps that just need to be sanded down a bit on the back.

I casted three different colors and had mixed results. Here are a few pictures of the finished caps.


Burgundy:         

(Attachment Link)           (Attachment Link)

Yo aspenc4, how close is this to what you were thinking?


Light Lime Green:

(Attachment Link)           (Attachment Link)

Was going for a darker green. Next cast, I’m using more powder


Neon Green:

(Attachment Link)

Again, was expecting something a lot darker. Will need to adjust

 
Still experimenting with the liquid and powdered dyes. I’m liking the speckled effect from the powdered dyes but need to tweak how much powder I add to get darker colors.
Also, I’m finding small bubbles on the face of the cap due to the mold, so I will need to pour some new ones

Steadily making progress, one day at a time


Missed your last post somehow, just randomly popped in and noticed you updated!

I dig it! looks a bit more like a black cherry than the burgundy from Retro, but it works well on its own regardless. If you’re going for the Retro Burgundy look however, a bit less violet and I think it would be spot on.

As far as the greens go, somewhere in the middle of the two you have would be a perfect match. The neon green is closest though.

If you’re trying to color match, I’ve got some spare Retro Burgundy caps outside of my actual set that I acquired in the recent SP grab bag drop. I’ll be glad to kick some over to you if you want, just let me know.

great progress; keep it up!


Sent from my iPhone using Tapatalk Pro

Offline kenji

  • Thread Starter
  • Posts: 18
  • one day at a time
Re: Sculpting Keycaps - :~$ynth & Green Stuff = The Tiki
« Reply #20 on: Fri, 26 January 2018, 00:04:57 »
WOooot!!!

Finally got some casts with my new set up. With these first few trials, I’m already loving my pressure pot and compressor. I now have bubble-free caps that just need to be sanded down a bit on the back.

I casted three different colors and had mixed results. Here are a few pictures of the finished caps.


Burgundy:         

(Attachment Link)           (Attachment Link)

Yo aspenc4, how close is this to what you were thinking?


Light Lime Green:

(Attachment Link)           (Attachment Link)

Was going for a darker green. Next cast, I’m using more powder


Neon Green:

(Attachment Link)

Again, was expecting something a lot darker. Will need to adjust

 
Still experimenting with the liquid and powdered dyes. I’m liking the speckled effect from the powdered dyes but need to tweak how much powder I add to get darker colors.
Also, I’m finding small bubbles on the face of the cap due to the mold, so I will need to pour some new ones

Steadily making progress, one day at a time


Missed your last post somehow, just randomly popped in and noticed you updated!

I dig it! looks a bit more like a black cherry than the burgundy from Retro, but it works well on its own regardless. If you’re going for the Retro Burgundy look however, a bit less violet and I think it would be spot on.

As far as the greens go, somewhere in the middle of the two you have would be a perfect match. The neon green is closest though.

If you’re trying to color match, I’ve got some spare Retro Burgundy caps outside of my actual set that I acquired in the recent SP grab bag drop. I’ll be glad to kick some over to you if you want, just let me know.

great progress; keep it up!


Sent from my iPhone using Tapatalk Pro

Hmm... Ok I'll have to try and get some more red in there then. Do you have a picture of those caps? I think I need to relearn my color wheel... lol

Yeah I agree about those greens. Guess I need to get them a bit darker. For this I might have to rely on the liquid dyes though.

Thanks for the support dude. This weekend I'm planning on remaking my molds and going for a perfect cap. I'll also need to experiment with that burgundy again!