Author Topic: My Custom Razer Blackwidow - Finished Project  (Read 3600 times)

0 Members and 1 Guest are viewing this topic.

Offline Vox

  • Thread Starter
  • Posts: 39
My Custom Razer Blackwidow - Finished Project
« on: Fri, 25 August 2017, 00:24:44 »
Hello, all!
     I just completed my latest project, customizing a Razer Blackwidow 2014 Ultimate. [btw, the pictures are at the bottom so if you don't want to read my life story, scroll down there] This keyboard was actually my very first mechanical keyboard but since then I've had a K70 with MX Blues, now a Magicforce 68 with MX Browns and soon a Sentraq S60-X with MX Clears. But one day, as I was happily typing away on my magicforce, I noticed my Blackwidow lying on the ground, forsaken. So I started the project of painting the top piece of plastic white on Friday. One turned to two and two turned to three and by Saturday I had expanded the project to painting the plate white (for consistency), switching out the LEDs for white ones (green LEDs on a white plate would probs look weird) and finally replace the Razer Green switches to Gateron Blacks (chosen because Gaterons from switchTop were way cheaper than anything else I could find and Blacks because I have never tried out a linear switch), which I thought would be the crown jewel of this project. Now before you start criticizing me on my sloppy execution and why anyone would spend $50+ more on a Razer keyboard, let me state my reasons for this project: 1. I really needed the practice as I had never touched a soldering iron before and I didn't want to break my S60-X when I build it. 2. I had some extra money from my summer job and what else am I going to do with that money? Save it? 3. It really was an impulse and for fun project. If I snapped the PCB in half on accident, I could care less as I'm never going to use it again as a daily driver. But now, after its finished, it's totally been worth it. The satisfaction of this project was well worth the resources and time I spent on it.
     So, unfortunately, I didn't take pictures of the actual process of doing all the things I did. I only have pictures of the finished product. If you guys really want some pictures, I can open it back up and take them but for the most part, I can only offer my words. I did have a couple of issues for instance: The LED for the * on the Numpad doesn't work and the switches on the . (period), and 2 on the Numpad don't work at all. I don't think this is because of the switches and LEDs I replaced them with as I tried using spares and they still didn't work. It probably has more to do with the PCB getting worn out. I ended up desoldering, soldering, desoldering, soldering, desoldering and then soldering LEDs and Switches as I changed and added things in my plan. I mostly want to find a way to fix it because that one LED not working disturbs me. But without further ado here are the final pictures as this is what most of you were looking for:


176765-0176751-1176753-2176755-3176757-4176759-5176761-6176763-7176765-8

Share your thoughts! What would you have done differently and how can I improve in this hobby? Thanks for the support!
« Last Edit: Fri, 25 August 2017, 00:27:05 by Vox »

Offline ander

  • * Esteemed Elder
  • Posts: 1186
  • Location: Vancouver, BC
  • I type, therefore I am
Re: My Custom Razer Blackwidow - Finished Project
« Reply #1 on: Sun, 27 August 2017, 04:41:51 »
Very nice work, dude! You've obviously taken a lot of trouble and care with this. It looks a lot more swank and a lot less Star-Wars-y—a big improvement, in my book.

I just hope that some of the more jaded peeps here who aren't especially big on Razer boards don't wade in and insensitively start saying snide stuff. Personally, I think many of the more mass-market MKs (Razer, Logitech, Corsair, etc.) can be entirely fine. There can just be bit of snobbery here with so much focus on custom builds, restoring vintage boards, adding artisan this-'n'-that, and of course the Cherry MX boards that cost 2–3x as much simply because they're not carried in big-box stores.

Anyway, thanks for sharing your project—looks great!
We are not chasing wildly after beauty with fear at our backs. – Natalie Goldberg

Offline ander

  • * Esteemed Elder
  • Posts: 1186
  • Location: Vancouver, BC
  • I type, therefore I am
Re: My Custom Razer Blackwidow - Finished Project
« Reply #2 on: Sun, 27 August 2017, 04:46:52 »
Hey Vox, did you include the USB C connection on this you talked about here? I wondered why you didn't post this there.
We are not chasing wildly after beauty with fear at our backs. – Natalie Goldberg

Offline InvidiousIgnoramus

  • Posts: 388
  • Location: Columbia, SC
Re: My Custom Razer Blackwidow - Finished Project
« Reply #3 on: Tue, 29 August 2017, 06:26:57 »
I guess the only improvement I'd think o  top of that would be to put some nice white keycaps on there.

Endgame is a myth

I long for the day when I find a beamspring. (At a not insane price)

Offline _haru

  • Formerly linuxfanatic
  • Posts: 390
  • Location: Perth, Western Australia
  • Back from the dead
Re: My Custom Razer Blackwidow - Finished Project
« Reply #4 on: Tue, 29 August 2017, 18:14:05 »
That looks amazing. 10/10 would own.

As for the ded switches/LEDs, try scraping the solder mask of the relevant traces and join them to the switch/LED with small jumper wires or something.
AMJ60 - 45g MX White | GH60 Rev. C - Ghost Gateron Blacks | DFK101 - Alps SKCM Cream | Filco Majestouch 2 TKL - 62g Vintage MX Ergo Clear

Offline lordgiblite

  • Posts: 138
Re: My Custom Razer Blackwidow - Finished Project
« Reply #5 on: Thu, 31 August 2017, 09:58:39 »
Don't give me ideas to mess with my K70 that's collecting dust  ;) but the project looks like tons of fun! Turned out really nice too!!!


Offline juryduty

  • Posts: 4
Re: My Custom Razer Blackwidow - Finished Project
« Reply #6 on: Fri, 01 September 2017, 19:23:21 »
Looks slick.  What kind of paint did you use?

Offline Vox

  • Thread Starter
  • Posts: 39
Re: My Custom Razer Blackwidow - Finished Project
« Reply #7 on: Fri, 01 September 2017, 22:14:56 »
Hey Vox, did you include the USB C connection on this you talked about here? I wondered why you didn't post this there.
It's not done yet. So I guess my build isn't finished quite yet. I got the USB C Breakout board yesterday. This afternoon I soldered all the wires to the breakout board. However, I couldn't figure out a way to attach the board to the case with the stuff I had on-hand so I am going out tomorrow to a hardware store and figure out the best way to do so.  Hopefully, I'll have that finished tomorrow evening but I am kind of scared that I will connect the wrong wire to the wrong connector on the PCB as I only have a reference from a Razer Blackwidow of unknown version. And one of the wires it references is 'purple' but on my model, there is a lighter purple and a darker purple so I'm just guessing at this point. I'll probs post more tomorrow about it.

I guess the only improvement I'd think o  top of that would be to put some nice white keycaps on there.

Endgame is a myth


This wasn't even supposed to be a keyboard I would want to use lol. Though I'll probs end up throwing it up on the wall and maybe even making it so that when I flip a switch, the LEDs turn on. As for the keycaps, I probably won't replace them. I kind of like the contrast the black one has and I don't want to pump any more money into this project xD. I like how you mentioned endgame while this is literally my first attempt at soldering and in the custom keyboard world. There is much more to come! Right now, I cannot wait for my S60-X to come as that will be my first dive into the keyboard enthusiast realm.

That looks amazing. 10/10 would own.

As for the ded switches/LEDs, try scraping the solder mask of the relevant traces and join them to the switch/LED with small jumper wires or something.


Ok. I'll try that tomorrow and update how that goes. Thanks for the tip. Though you might not be as big of a fan once you look at it closely. In the pictures you can't notice it but when you look at it closely you can see that I used to rough of a sandpaper and can see some of the gashes I gave it. Lesson learned to get a finer sandpaper for this job.

Don't give me ideas to mess with my K70 that's collecting dust  ;) but the project looks like tons of fun! Turned out really nice too!!!

I actually have a K70 with MX blues and red backlighting. You can already imagine what's going to happen to that hehe. Maybe I'll try gateron greens and green backlighting? The combinations are endless. I was actually looking at used blackwidows on ebay to keep experimenting but then I remembered that my wallet has a limit :(. But I probably won't get to that k70 for a bit as I have other non-keyboard related projects that I want to try out. But when and if I do, I'll make it more like a guide and have more pictures so that if you decide to mess with yours, you won't be going in blind.

Looks slick.  What kind of paint did you use?

I used this semi gloss paint+primer thing. It seemed to work pretty well but I'll see how it fares in the long run. I'm most concerned about the plate as the keycaps will be banging away at that and I'm scared that the paint won't last much when that happens.
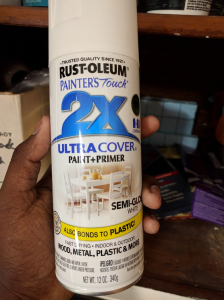
177341-0

Thanks for all of your guy's feedback, it has really encouraged me to keep on making normal mundane mechs into something greater! Anyways, I have the thing opened up right now, so if you want any more pictures I can get them. Also, a quick poll/question. What word would best describe this process? I was thinking something like remodel as in remodeling your kitchen but the word itself really doesn't fit within the context of mechanical keyboards. And a word like 'custom' doesn't do all the things that could be done justice as it could mean just replacing the keyset and painting it while so much more could be done. Totally random and off topic thought but idk. what do you think?

Offline InvidiousIgnoramus

  • Posts: 388
  • Location: Columbia, SC
Re: My Custom Razer Blackwidow - Finished Project
« Reply #8 on: Sat, 02 September 2017, 05:11:35 »
Hey Vox, did you include the USB C connection on this you talked about here? I wondered why you didn't post this there.
It's not done yet. So I guess my build isn't finished quite yet. I got the USB C Breakout board yesterday. This afternoon I soldered all the wires to the breakout board. However, I couldn't figure out a way to attach the board to the case with the stuff I had on-hand so I am going out tomorrow to a hardware store and figure out the best way to do so.  Hopefully, I'll have that finished tomorrow evening but I am kind of scared that I will connect the wrong wire to the wrong connector on the PCB as I only have a reference from a Razer Blackwidow of unknown version. And one of the wires it references is 'purple' but on my model, there is a lighter purple and a darker purple so I'm just guessing at this point. I'll probs post more tomorrow about it.

I guess the only improvement I'd think o  top of that would be to put some nice white keycaps on there.

Endgame is a myth


This wasn't even supposed to be a keyboard I would want to use lol. Though I'll probs end up throwing it up on the wall and maybe even making it so that when I flip a switch, the LEDs turn on. As for the keycaps, I probably won't replace them. I kind of like the contrast the black one has and I don't want to pump any more money into this project xD. I like how you mentioned endgame while this is literally my first attempt at soldering and in the custom keyboard world. There is much more to come! Right now, I cannot wait for my S60-X to come as that will be my first dive into the keyboard enthusiast realm.

That looks amazing. 10/10 would own.

As for the ded switches/LEDs, try scraping the solder mask of the relevant traces and join them to the switch/LED with small jumper wires or something.


Ok. I'll try that tomorrow and update how that goes. Thanks for the tip. Though you might not be as big of a fan once you look at it closely. In the pictures you can't notice it but when you look at it closely you can see that I used to rough of a sandpaper and can see some of the gashes I gave it. Lesson learned to get a finer sandpaper for this job.

Don't give me ideas to mess with my K70 that's collecting dust  ;) but the project looks like tons of fun! Turned out really nice too!!!

I actually have a K70 with MX blues and red backlighting. You can already imagine what's going to happen to that hehe. Maybe I'll try gateron greens and green backlighting? The combinations are endless. I was actually looking at used blackwidows on ebay to keep experimenting but then I remembered that my wallet has a limit :(. But I probably won't get to that k70 for a bit as I have other non-keyboard related projects that I want to try out. But when and if I do, I'll make it more like a guide and have more pictures so that if you decide to mess with yours, you won't be going in blind.

Looks slick.  What kind of paint did you use?

I used this semi gloss paint+primer thing. It seemed to work pretty well but I'll see how it fares in the long run. I'm most concerned about the plate as the keycaps will be banging away at that and I'm scared that the paint won't last much when that happens.
[ Attachment Invalid Or Does Not Exist ]

Thanks for all of your guy's feedback, it has really encouraged me to keep on making normal mundane mechs into something greater! Anyways, I have the thing opened up right now, so if you want any more pictures I can get them. Also, a quick poll/question. What word would best describe this process? I was thinking something like remodel as in remodeling your kitchen but the word itself really doesn't fit within the context of mechanical keyboards. And a word like 'custom' doesn't do all the things that could be done justice as it could mean just replacing the keyset and painting it while so much more could be done. Totally random and off topic thought but idk. what do you think?
Well, I don't think I set my signature correctly, haha. As for the keycaps, I just have an obsession with lighter colored keysets, ESPECIALLY beige and grey. :)

Endgame is a myth

I long for the day when I find a beamspring. (At a not insane price)