Author Topic: Zo64 — My Perfect 60% Layout  (Read 20431 times)

0 Members and 1 Guest are viewing this topic.

Offline Zobeid Zuma

  • Thread Starter
  • Posts: 262
  • Location: Texas
Zo64 — My Perfect 60% Layout
« on: Sat, 21 October 2017, 09:43:38 »
I haven't been in this obsession hobby very long, but I feel like I've been on an accelerated track.  I pre-ordered a WhiteFox, pre-ordered the Kishy Model F77 (both of which I'm still waiting on!), bought a Matias Mini Tactile Pro, bought a vintage IBM PC-XT keyboard off eBay, bought a Carpe JD45…  and then realized nobody was making what I really wanted, and I'd just have to build it myself.

Soon the KLE became my new favorite computer game.  And here is the result:


http://zobeid.zapto.org/image/keeb/Zo64-07.jpg

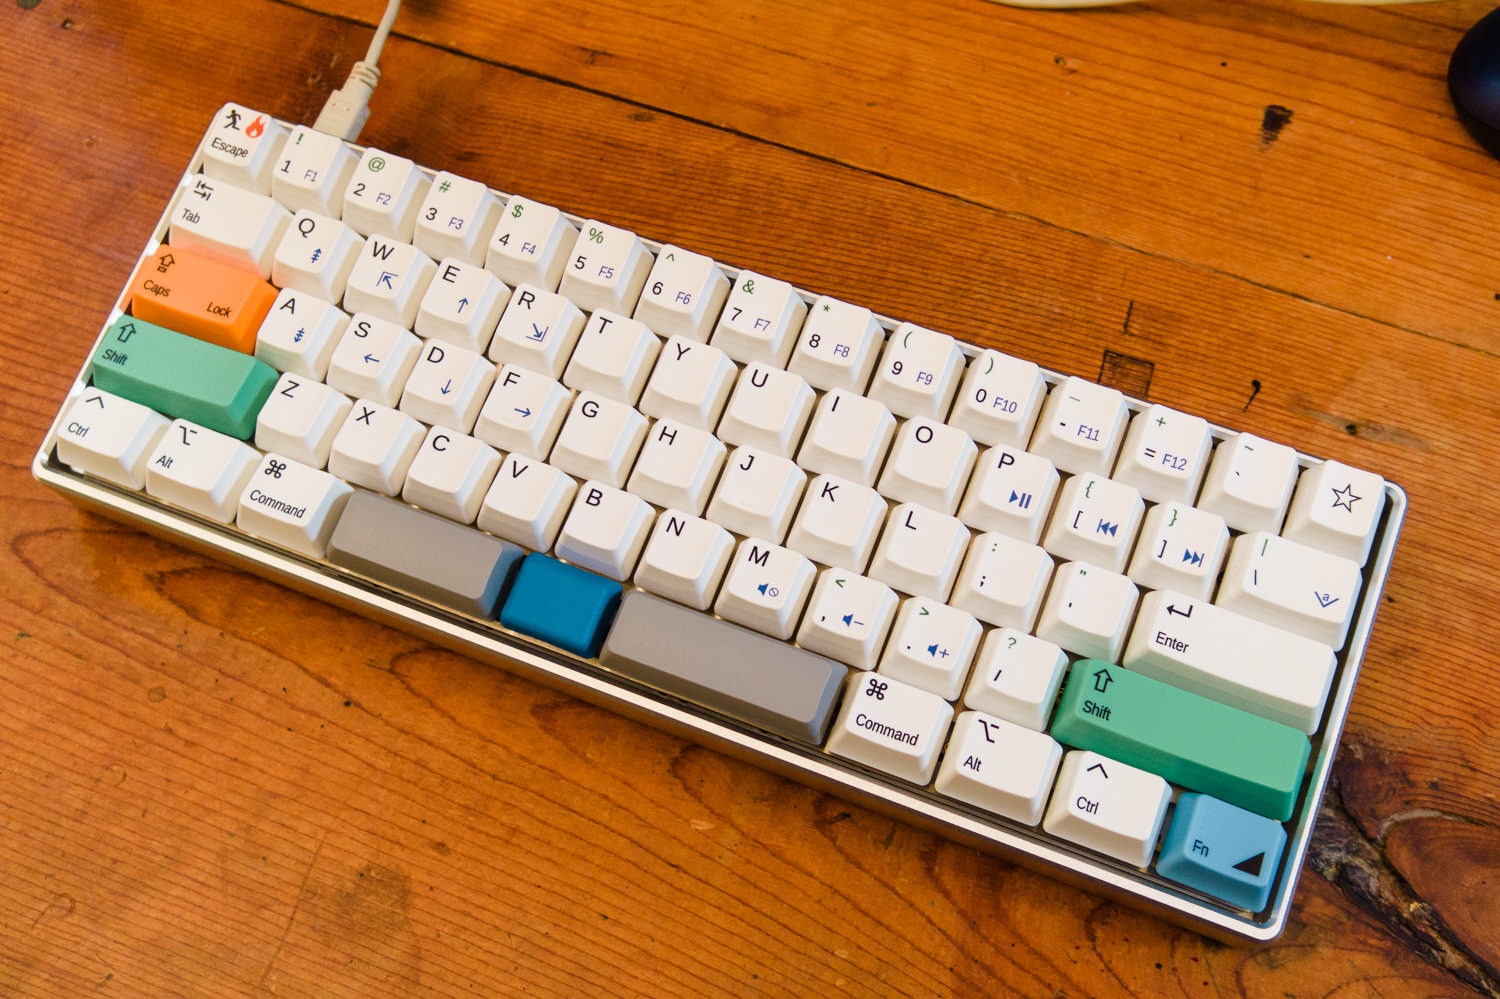
This keyboard has two salient features that I couldn't get from off-the-shelf keyboards.  The first is the split spacebar, which I have wanted for years and years.  I always felt putting the backspace key under my left thumb would make more more sense than the conventional location.

The second feature that I'm proud of here is the nav cluster.  This arose almost by accident.  When I first saw the Banana Split 60 here on geekhack, I was put off by the center key in the middle of the spacebar.  Who ordered that?  Isn't that just awkward?  Then I started thinking about what I would do with it.  Well, it could be another Fn key…  And then the light dawned.  Look at this:


http://zobeid.zapto.org/image/keeb/Zo64-08.jpg

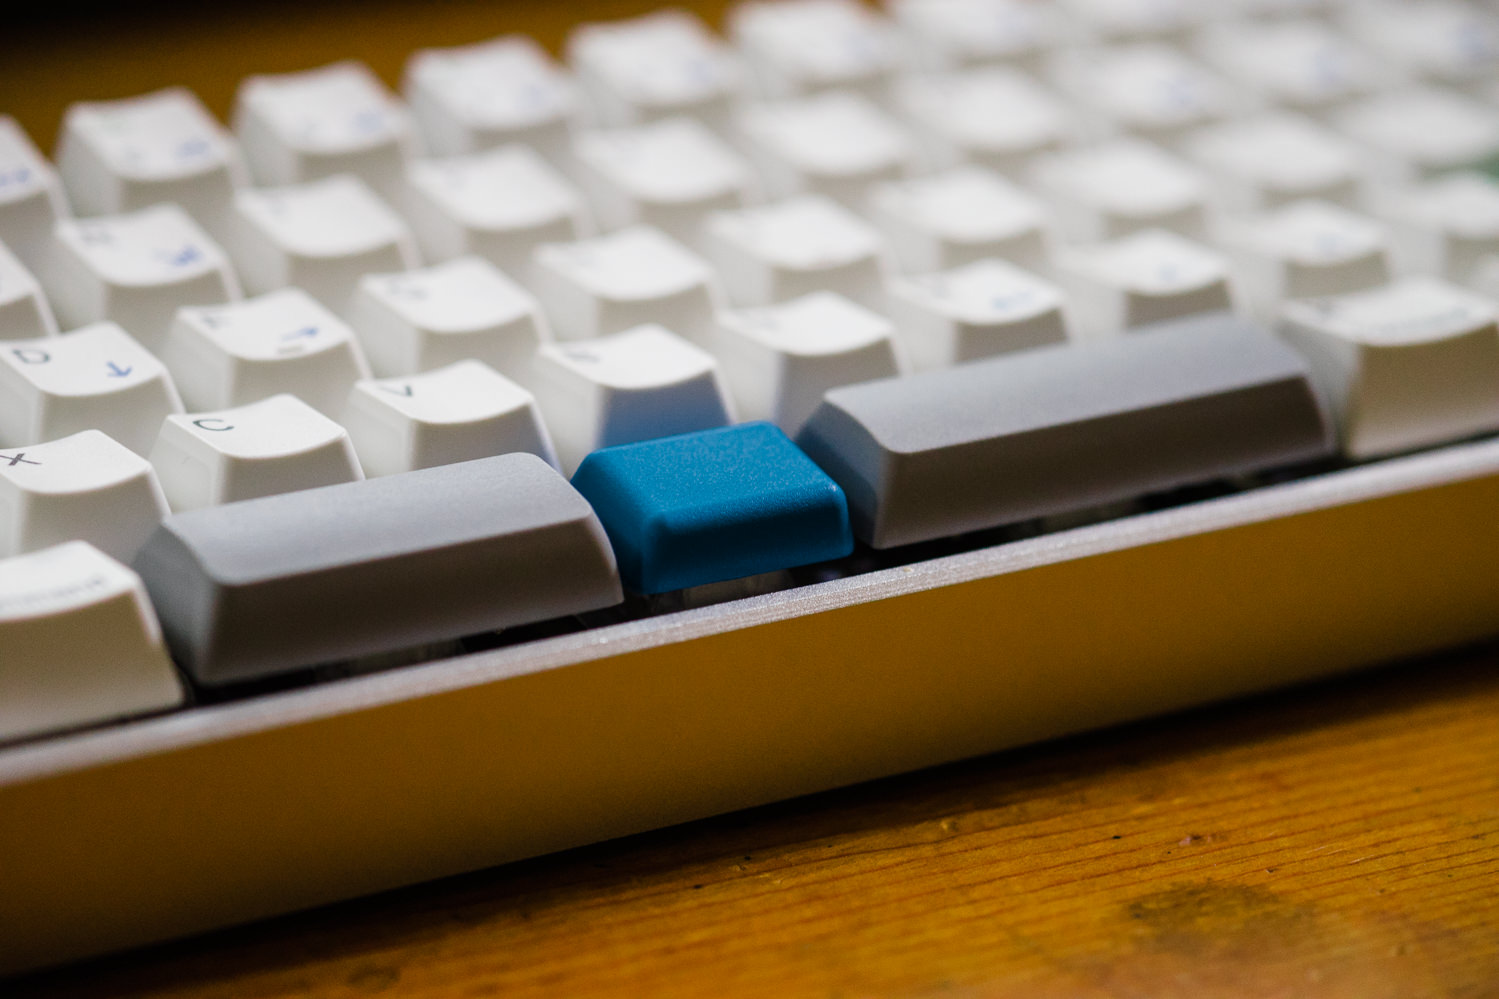
All I have to do is press down with my left thumb on that blue center key, which is already the most natural place for my thumb to rest, and then I have all the nav keys under my fingertips.  I can do all the navigating one-handed, and I don't have to shift my hand from its home row typing position at all.

Navigation keys—and especially arrow keys—have been a nagging problem with 60% layout keyboards for a while.  You can take away the number pad, and most people don't mind.  You can move the F-keys onto a layer, and most people are OK with that.  Take away their arrow keys, though, and there is a cry of pain.  So, we've seen 65% designs where some nav keys are added back and scrunched up against the right side.  We've seen 60% designs where a set of arrow keys are shoehorned into the lower-right corner, compromising the shift and modifier keys in that area.  To me, that's awkward.  I think this is going to be a better answer.  After a brief adjustment, this layout can be more convenient than dedicated nav keys.

Well, that's the pitch.  Here's the nitty-gritty details…

At first I wanted to build this on a Banana Split 60 PCB, but I had already missed the first production batch, and I faced an uncomfortable wait for round two.  (I'm still eager to see what improvements show up with that, though!)  Meanwhile, I discovered that the KBDfans DZ 60 PCB also supported the layout that I wanted to use.  So, I only had to wait on the fabled Slow Boat From China for that.  Meanwhile, I refined my plans and collected other parts.


http://zobeid.zapto.org/image/keeb/Zo64-12.jpg

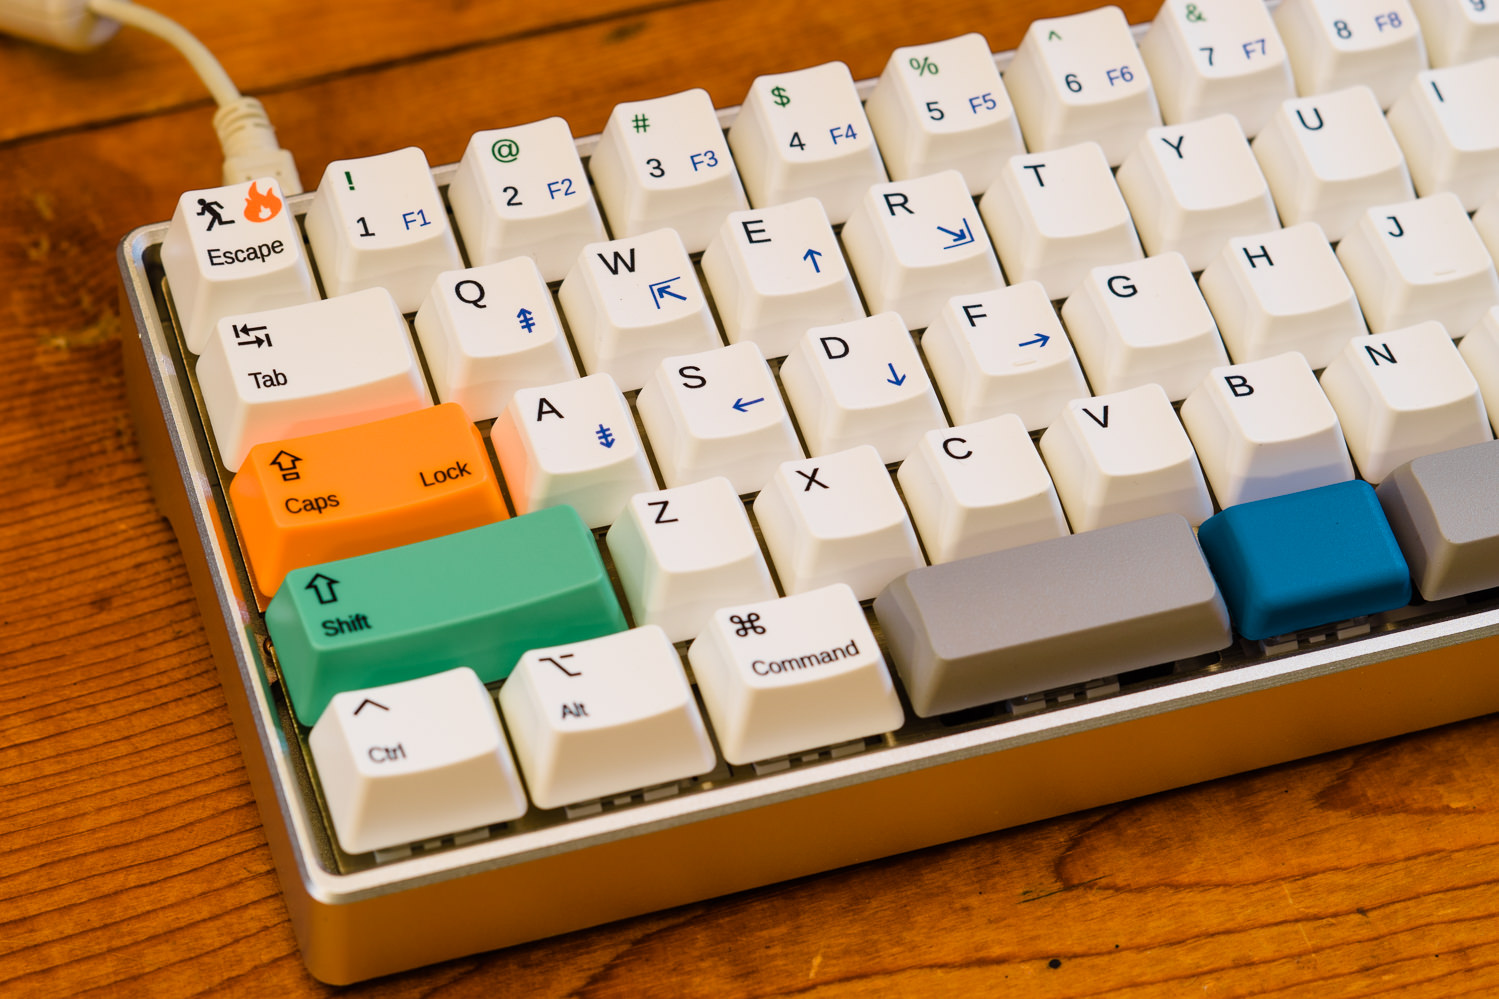
This layout with the 2.25 | 1.25 | 2.75 split was designed to work with standard keycaps, so most people have been using blank (or not!) shift keys as spacebars.  I wasn't happy with that.  I wanted real spacebars with a convex profile.  I briefly toyed with the idea of 3D printing, but then I discovered a source of XDA profile short spacebars on AliExpress.  These are PBT, they're high quality, and they are only available in gray.  I decided I could live with gray.

Incidentally, I experimented with blank G20 profile shift keys from Signature Plastics.  The G20 profile is not bad, but the keycaps I received were noticeably warped.  Tut tut, SP!  The good news is, a G20 1.25u keycap is perfect for the center Fn key.  Especially when flipped backward, it's quite comfortable to rest the side of my thumb upon.  It's also nice that it's different in shape and feeling from the spacebars, so it's easy to keep my hand and my thumb oriented by touch.

For switches I picked the new Kailh BOX White clicky switches.  These are supposed to be dust and water resistant, and they have a great feeling and double-click sound.  My only quibble is that they are sprung a bit light for my hands, and I should have got the slightly heavier BOX Pale Blue version.  There's also a super-heavy "thick click" version coming real soon now that I must try.  I also want to build a keyboard with BOX Burnt Orange tactile switches some time.


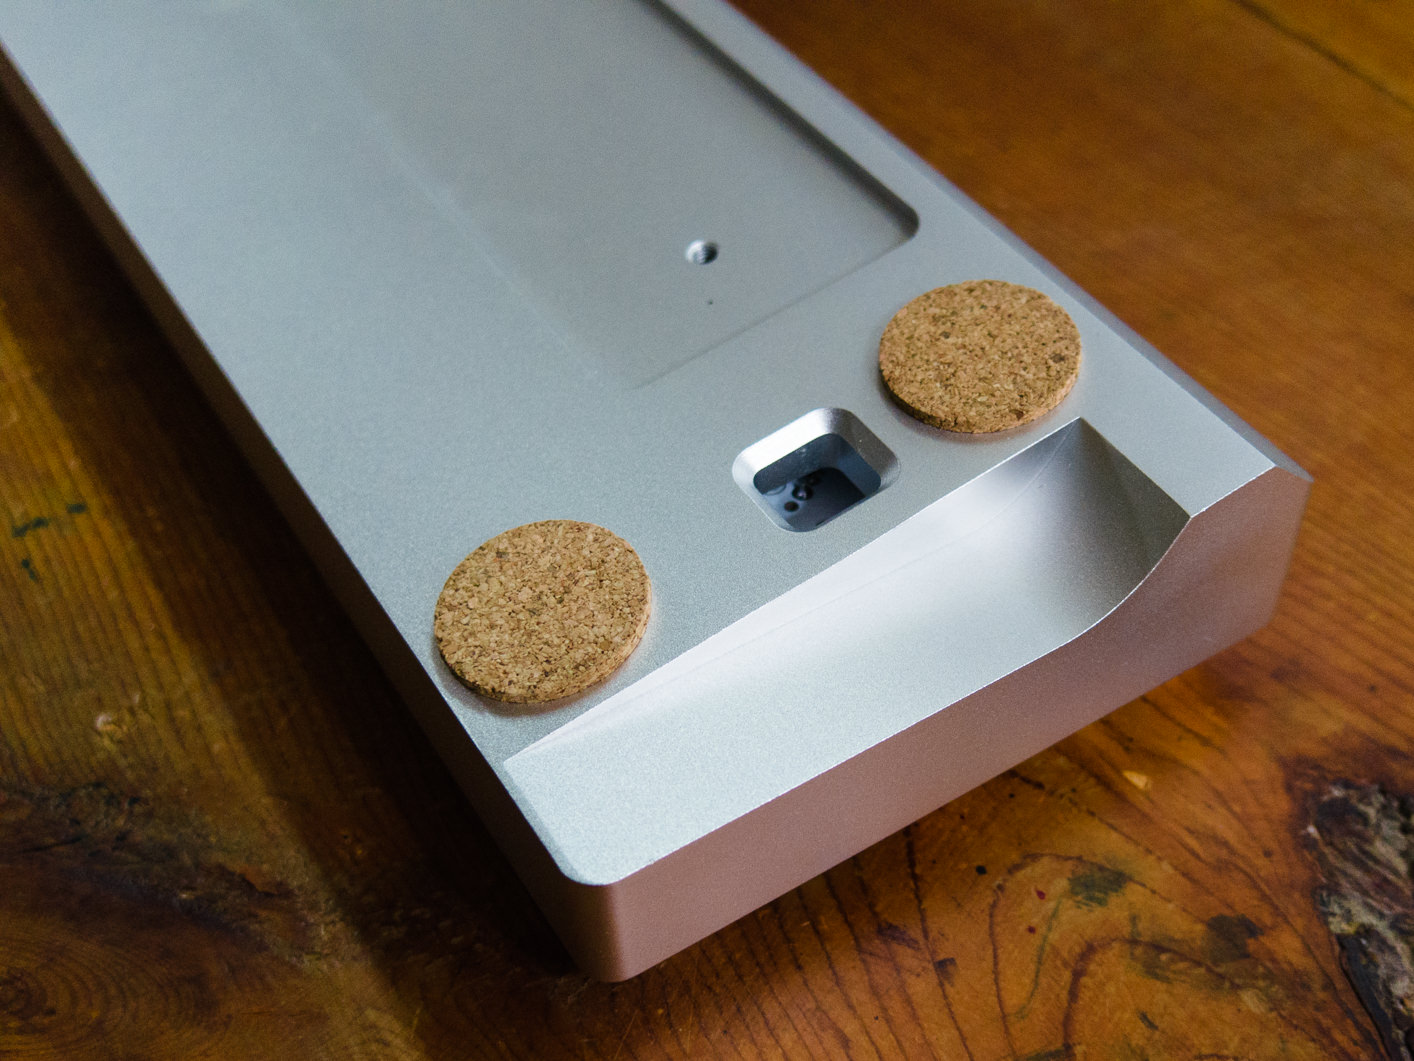
http://zobeid.zapto.org/image/keeb/Zo64-11.jpg

The case is from Team Wolf and it's super heavy duty.  That wedge-shaped base of solid aluminum makes it impossible to flex, and it feels like a brick.  You can see the cutout for the optional polished steel weight, which I have left out because this thing is plenty heavy without that!  I'm not sure whether this is truly my "end game" case, but it's definitely in the higher class.

As for the rest of the keycaps, I had those custom printed by WASD.  This is one of the few places to go for a truly custom keycap set.  I was able to design the legends in Inkscape and upload them.  I'd never used Inkscape before, but it's not that hard to pick up (especially for someone with GIMP experience), and WASD provide a template that is very helpful.  It includes instructions, templates, and all their standard legend options, so it's easy to mix them with your own additions.  To get all the keys I needed, I had to order a TKL set, but that gave me the opportunity to have a bunch of extra and novelty keys printed.

The printing is coated with a clear UV-cured resin that is supposed to be very tough.  The keycaps themselves are thin ABS material.  The colors are even, the molding is sharp and clean, and I'd say they're good quality—if you are OK with thin ABS and surface printing.  I know some guys think every keyboard must be built like an IBM XT for years and years of constant pounding on, and that's not what we're looking at here.  These keycaps just aren't heavy duty like that.  For my purposes I believe they should be Just Fine.

Odds and ends…


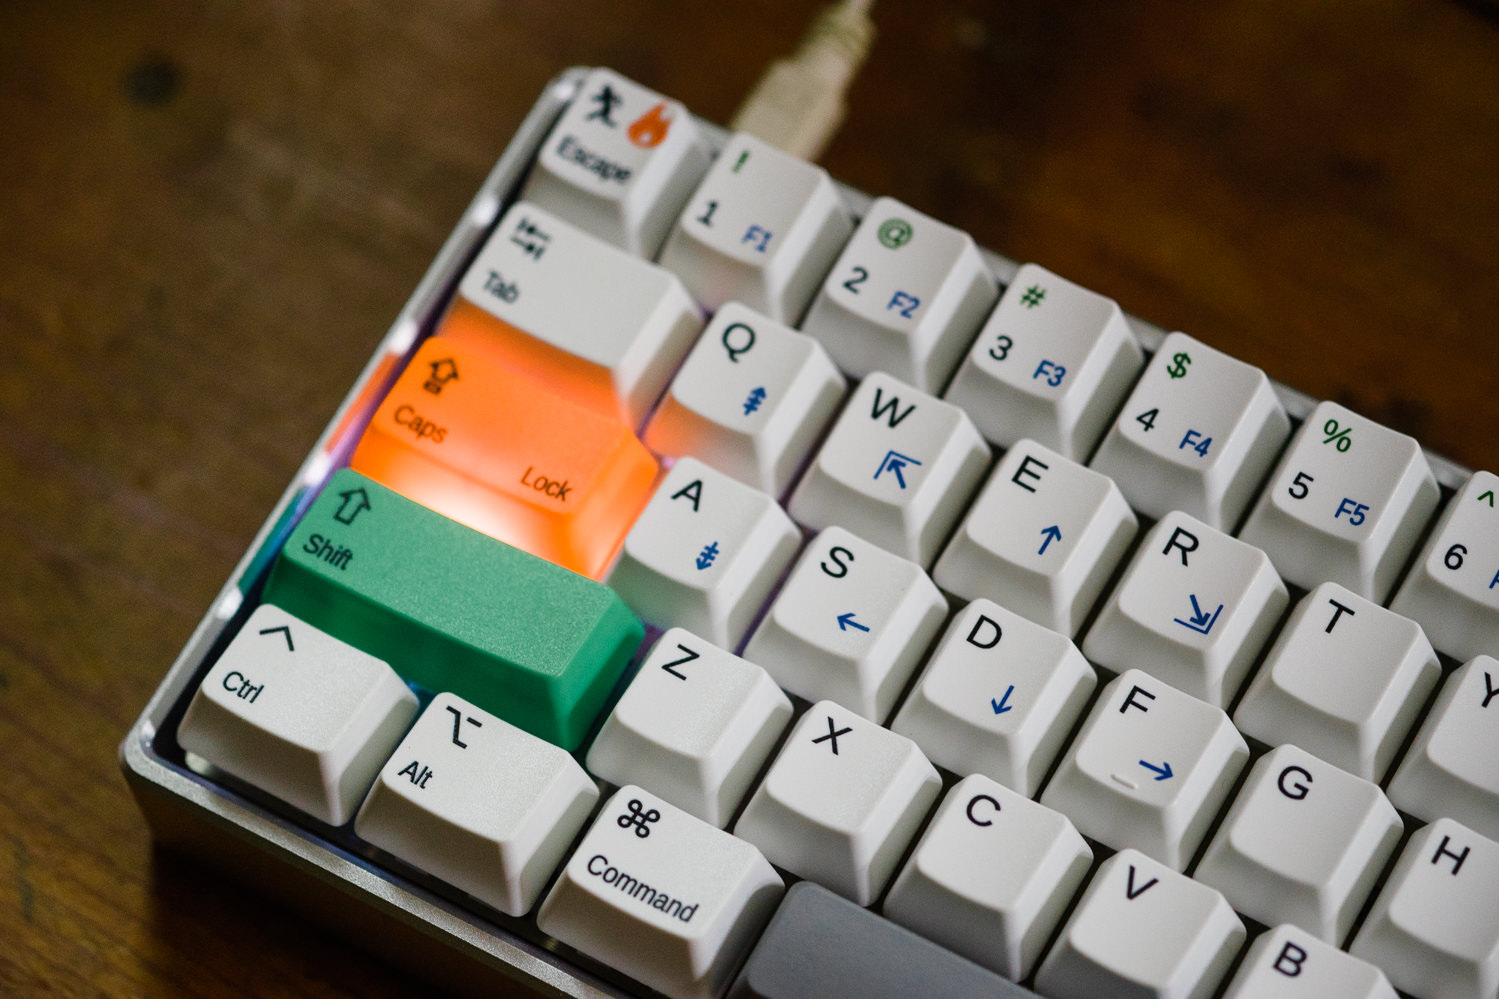
http://zobeid.zapto.org/image/keeb/Zo64-10.jpg

That Caps Lock key has a big gap between Caps and Lock because I wanted the LED indicator to show through, which in retrospect was not a serious concern.  I'll fix that next time!  Also, it's convenient to make Caps Lock work as an extra Enter key on layer 1.  That way when picking from one of those list gadgets, I can use E and D to find the item I want, and Caps Lock to select it with one hand.

I selected media keys that I thought would be easy to remember: M for Mute, P for Pause/Play, and adjacent keys for VolUp, VolDn, Prev, Next.  The backslash key also serves as Insert, which is a key unknown to the Mac, but I might need it someday (once in a blue moon!) when using Ubuntu.  I find that Mac layout keyboards work very well with Linux.

The left spacebar is, of course, Backspace, and with Fn it becomes Delete (or Forward Delete to us Mac loonies).  Right now I have the upper-right star (or "any") key serving as another backspace, though I'll probably change it sometime.  It could be anything.  (Yes, the real problem with a 60% layout is having more keys than you know what to do with!)

The DZ 60 PCB comes with RGB underglow already installed, and I also added white LEDs to all the switches (because why not?).  By default these are all controlled on layer 1, but of course I had other plans for layer 1.  I copy-and-pasted all the LED controls to layer 2, then made Fn-L (for LED) take me to layer 2, and Esc takes me back to layer 0.  This works pretty well.

For easy reference, I've decided to call this the Zo64 layout.  You can call it whatever you want.  I would be gratified if anybody else builds this layout and finds it useful too.  There's nothing proprietary, it's all off-the-shelf components and just putting 2+2 together.


« Last Edit: Fri, 27 October 2017, 07:24:34 by Zobeid Zuma »

Offline daerid

  • Posts: 4276
  • Location: Denver, CO
    • Rossipedia
Re: Zo64 — My Perfect 60% Layout
« Reply #1 on: Sat, 21 October 2017, 20:41:09 »
I love this. I love this. I want one.

Quote
There's nothing proprietary, it's all off-the-shelf components and just putting 2+2 together.

A summarized parts list would be super appreciated, I want to build one.

Offline Zobeid Zuma

  • Thread Starter
  • Posts: 262
  • Location: Texas
Re: Zo64 — My Perfect 60% Layout
« Reply #2 on: Sat, 21 October 2017, 20:55:53 »
I love this. I love this. I want one.

Quote
There's nothing proprietary, it's all off-the-shelf components and just putting 2+2 together.

A summarized parts list would be super appreciated, I want to build one.

Sure.  Here's the basic recipe...

KBDfans DZ 60 PCB and steel mounting plate
--> https://kbdfans.myshopify.com/collections/pcb/products/dz60-60-pcb

Team Wolf aluminum case
--> https://www.aliexpress.com/item/Mechanial-keyboard-Anode-aluminum-case-gh60-poker-60-mechanical-keyboard-shell/32827408436.html

Kailh BOX white switches
--> https://www.novelkeys.xyz/product/kailh-box-switches/

XDA blank convex spacebars
--> https://www.aliexpress.com/item/xda-blank-convex-spacebar-grey-1-75u-2u-2-25u-2-75u-3u-4-5u-5/32827099386.html

G20 1.25u blank keycap
--> https://pimpmykeyboard.com/g20-1-25-space-pack-of-4/

WASD custom printed 87-key (TKL) keycap set
--> http://www.wasdkeyboards.com/index.php/products/keycap-set/87-key-cherry-mx-keycap-set.html

My stabilizers, white LEDs and mini-USB cable were all generic items.

EDIT:  I almost forgot this. . .

http://zobeid.zapto.org/misc/banana-split-layout-104-bicolor-blue-and-green-V2.svg


That's a slightly updated version of the file I sent to WASD for printing.  It might be a good example for anyone who's not familar with Inkscape.  It's fully editable, so you can use it as a starting point and change anything you want.
« Last Edit: Sat, 21 October 2017, 21:07:13 by Zobeid Zuma »

Offline donkey

  • Posts: 110
Re: Zo64 — My Perfect 60% Layout
« Reply #3 on: Tue, 24 October 2017, 15:48:22 »
Thanks for sharing this. I got a DZ60 coming and am planning to build a similar layout. I already have a Pok3r with Box Brown (Burnt Orange was out of stock) but want a Box White split-spacebar build. I'll be using w/FN+IJKL for arrows because I'm used to it. Mid-FN key is also closer to left-hand so. :-)
 
BTW, which color G20 1.25u did you get? It looks gorgeous but none of the SP blue colors available for it look right.
ABS BFK looks closest and PBT BCT & BDJ look too light to me.

Thx.

Offline Zobeid Zuma

  • Thread Starter
  • Posts: 262
  • Location: Texas
Re: Zo64 — My Perfect 60% Layout
« Reply #4 on: Tue, 24 October 2017, 16:28:24 »

BTW, which color G20 1.25u did you get? It looks gorgeous but none of the SP blue colors available for it look right.
ABS BFK looks closest and PBT BCT & BDJ look too light to me.

The color code is BCT.  Keep in mind that I shot my photos under terrible light and then tried to correct the white balance as best I could, but some of the colors are still skewed.  I think my lights made anything blue look darker than it really is.

Offline Tom_Kazansky

  • Posts: 409
  • Location: Vietnam
  • Oblivion Knight
Re: Zo64 — My Perfect 60% Layout
« Reply #5 on: Tue, 24 October 2017, 21:28:53 »
looks great, man.  :thumb:
this is how 60% should be  :cool:

also, I should thank you for the link to spacebar XDA, I will get these incase I can't get 3u Cherry profile.  ;D

Offline Zobeid Zuma

  • Thread Starter
  • Posts: 262
  • Location: Texas
Re: Zo64 — My Perfect 60% Layout
« Reply #6 on: Wed, 25 October 2017, 09:22:25 »
looks great, man.  :thumb:
this is how 60% should be  :cool:

also, I should thank you for the link to spacebar XDA, I will get these incase I can't get 3u Cherry profile.  ;D

If you're making it like mine using the DZ 60, then you need 2.25 and 2.75 — same size as standard shift keys.

Offline Tom_Kazansky

  • Posts: 409
  • Location: Vietnam
  • Oblivion Knight
Re: Zo64 — My Perfect 60% Layout
« Reply #7 on: Wed, 25 October 2017, 22:11:27 »
looks great, man.  :thumb:
this is how 60% should be  :cool:

also, I should thank you for the link to spacebar XDA, I will get these incase I can't get 3u Cherry profile.  ;D

If you're making it like mine using the DZ 60, then you need 2.25 and 2.75 — same size as standard shift keys.

ah, sorry, it's just me that's going off-topic out of nowhere. (3u is for my up-coming board)

yes, I need 2.25 and 2.75, I actually have similar layout to yours.
180885-0
I was "can't wait any longer" and bought a 65% PCB... oh well... I don't need extra keys from 65% keyboard, I will later "tweak" the case, remove some switches so it will look like 60%  :))
« Last Edit: Wed, 25 October 2017, 22:27:54 by Tom_Kazansky »

Offline Zobeid Zuma

  • Thread Starter
  • Posts: 262
  • Location: Texas
Re: Zo64 — My Perfect 60% Layout
« Reply #8 on: Thu, 26 October 2017, 11:24:28 »
I was "can't wait any longer" and bought a 65% PCB... oh well... I don't need extra keys from 65% keyboard, I will later "tweak" the case, remove some switches so it will look like 60%  :))

I think those keycaps would drive me nuts!  What PCB is that?  There's a 65% that also supports this split?  I like 60%, but I'm not religiously committed to it.  I like to see more split spacebars in keyboards of any size.  A split-spacebar TKL even would be cool.  However, it's generally been the smaller form factors that support it.

Today I took another look at those warped G20 spacebars from Signature Plastics and straightened them out.  This turns out to be pretty easy.  I took a hair drier (Vidal Sassoon!) and heated them one at a time on high, then took the keycap and flexed it with my fingers until it looked straight, and then dunked it in a bowl of ice water to "freeze" it in the new shape.

I suspect I will still prefer the XDA spacebars because, as I mentioned before, it's nice being able to easily tell them apart from the center Fn key by feeling with my thumb.  Once straightened out, though, the G20 keys work Just Fine.  And you can get them more quickly and easily from SP, and you can get them in all different colors, not just GRAY.

Offline Tom_Kazansky

  • Posts: 409
  • Location: Vietnam
  • Oblivion Knight
Re: Zo64 — My Perfect 60% Layout
« Reply #9 on: Thu, 26 October 2017, 21:55:05 »
I was "can't wait any longer" and bought a 65% PCB... oh well... I don't need extra keys from 65% keyboard, I will later "tweak" the case, remove some switches so it will look like 60%  :))

I think those keycaps would drive me nuts!  What PCB is that?  There's a 65% that also supports this split?  I like 60%, but I'm not religiously committed to it.  I like to see more split spacebars in keyboards of any size.  A split-spacebar TKL even would be cool.  However, it's generally been the smaller form factors that support it.

Today I took another look at those warped G20 spacebars from Signature Plastics and straightened them out.  This turns out to be pretty easy.  I took a hair drier (Vidal Sassoon!) and heated them one at a time on high, then took the keycap and flexed it with my fingers until it looked straight, and then dunked it in a bowl of ice water to "freeze" it in the new shape.

I suspect I will still prefer the XDA spacebars because, as I mentioned before, it's nice being able to easily tell them apart from the center Fn key by feeling with my thumb.  Once straightened out, though, the G20 keys work Just Fine.  And you can get them more quickly and easily from SP, and you can get them in all different colors, not just GRAY.

the PCB is JC65, which is used in M65-A board, I believe. This PCB support only this split: 2.75-1.25-2.25.
yep, it's hard to find a TKL with split spacebar.

some of my keys are indeed warped, though they're still quite usable, but I will try straightening them out later, thanks!  :thumb:

I will try those XDA spacebars, I do need some way to tell the (real) spacebar and the center Fn, that's why I reverse the (real) spacebar.  ;D

Offline donkey

  • Posts: 110
Re: Zo64 — My Perfect 60% Layout
« Reply #10 on: Fri, 27 October 2017, 05:39:22 »
> This layout with the 2.25 | 1.75 | 2.75 split was designed to work with standard keycaps

You might want to change 1.75 above to 1.25.

I ordered the keys from PMK yesterday using those numbers but later realized numbers didn't add up to 6.25. Ha!
I'll have to reorder 1.25u separately but no biggy.

Thanks again for this post.

Best,
- Don

Offline Zobeid Zuma

  • Thread Starter
  • Posts: 262
  • Location: Texas
Re: Zo64 — My Perfect 60% Layout
« Reply #11 on: Fri, 27 October 2017, 07:23:58 »
> This layout with the 2.25 | 1.75 | 2.75 split was designed to work with standard keycaps

You might want to change 1.75 above to 1.25.

Thanks for catching that mistake, I'll fix it!

Offline Zobeid Zuma

  • Thread Starter
  • Posts: 262
  • Location: Texas
Re: Zo64 — My Perfect 60% Layout
« Reply #12 on: Fri, 24 November 2017, 11:27:14 »
Time to post an update here…


http://zobeid.zapto.org/image/keeb/Zo64-16.jpg


http://zobeid.zapto.org/image/keeb/Zo64-17.jpg

A few weeks ago I got an acrylic case from Sentraq (https://sentraq.com/collections/parts-1/products/60-acrylic-case) to show off the RGB underglow, and then I thought I needed a set of translucent keycaps to show off the backlighting.  It would be a complete light show!  Unlike most boards the backlight LEDs are on the front of the switches, so I needed some front-printed caps, which I was able to get from KBDfans.

When I got them, I was disgusted to realize that some of my backlight LEDs were not working.  There was six that didn't light up.  I still don't know why.  They were all getting power, and I checked one to make sure it wasn't in backward.  They were either defective or else I damaged them with the heat when soldering them in.  Because the LEDs are underneath the switches, to replace them would require de-soldering and pulling the switches first.

That didn't go well.  I think my soldering skills are OK, but when it comes to de-soldering I am teh sux.  To make the story short, the PCB was ruined.

Of course I was going to rebuild it.  I started ordering parts immediately.  I also salvaged the mounting plate from the original.  The only thing that had to come from China was the replacement DZ60 PCB, and I paid extra for faster shipping.  And since I was rebuilding it, I decided to make it better than it was before.  I assembled it much more methodically this time, as compared with the way I slapped it together before.  To begin, all the LEDs were tested before and after installation.

I was mostly happy with the Kailh BOX White switches, but always felt they were a bit light for me.  This time I got BOX Pale Blue switches, and they are perfect!  I love them.  However, as an experiment I removed the click bars from ten of them which went into my modifier keys: shift, ctrl, alt, cmd, fn.  My theory was, those keys don't do anything by themselves, they have to be held down, and the "effective" keystroke—that I want feedback from—happens somewhere else.  Taking out the click bar makes a Pale Blue switch feel almost linear.

And the result is, um…  OK, I guess.  It's taking some getting used to, though, having some keys with different feeling and sound from the others, and not getting the feedback from keys that I was already used to hearing clicks from.  I don't think I'll de-click any more switches.

Last time I used generic stabilizers and just slapped them in without any lube or adjustment, and the result was that they rattled, and one of them tried to come loose from the PCB.  They weren't awful, but I figured I could do better.  This time I lubed the stabilizers (with Super Lube) and secured them to the PCB with hot glue, and there is no more rattle.  However, I did not "clip" the inserts, even though everybody under the sun was telling me to.  The mushiness that I've heard about is only really noticeable on the shift keys, and I don't think it would even have bothered me if I'd left the click in the switch.  Let's count that as another lesson learned!

The fit of the Cherry stabilizer inserts into the keycaps was much too loose, and I had to add some little snips of plastic (cut from bubble packing material) to make them hold.

With the Pale Blue switches, this thing simply feels fantastic to type on.  I like the feeling of these better than my vintage IBM XT Model F.  (I still want to build a board with BOX Burnt Orange tactile switches, but there seems to be some sort of production problem with those.)

The translucent keycaps that triggered this whole episode, I am not sure I actually like that much now that I'm using them.  They do look cool as long as the backlight is kept on maximum, but when it's off they're just as ugly as sin.  I also don't have any of the custom markings from my original WASD set, which I think also felt better to type on, and I'm even stuck with "Win" marked on both the Command/Super keys.  Bleh.

BTW, I have not one but two Banana Split 60 kits pre-ordered.  I may not have quite reached perfection yet, but I'm closing in on it.

Offline ericboehs

  • Posts: 1
  • Location: Oklahoma
Re: Zo64 — My Perfect 60% Layout
« Reply #13 on: Mon, 11 December 2017, 23:37:49 »
I love this keyboard and layout. I've been looking for a QMK based keyboard that has a split space. I found the DZ60 but didn't find many people using the split space. I'm glad I found yours! I think you're the first (split-space DZ60 user) I've found that actually cared about the legends being correct.

I currently have a Let's Split and love giving my left thumb something to do but I miss the number row and other symbols. I'm currently building a Viterbi which is essentially a Let's Split but with an extra row and column (7x5 per side rather than 6x4). I'm building it because it was cheap and I'm new to the hobby so I'm experiementing before I spend a lot on my end game.

Your build is very close to my end game though. I love the arrow cluster on the left. I actually hated it at first because I think they should be under hjkl (I'm a vim user). But after I read your reasoning and how it works well for left handed navigation, I was on board.

Another thing I like about the layout is that it's so close to regular 60% keycaps (in case I find a set I like more than my legends). Only three keys are unique. Since I'm new to the hobby I didn't realize the profile of the spacebar was different (I do have my space flipped). I now I have the 3 keys you linked to on the slow boat (for the inevitable purchase of my DZ60 build around Christmas).

Unfortunately no one has really thought through a proper layout for the Viterbi. So I've adapted your layout for it. Here it is:

http://www.keyboard-layout-editor.com/##...

My parts should be in this week and I hope to complete the build this weekend. I'll post when I get the build finished.

Thanks for sharing your build! I wouldn't have came up with as good of layout without it.

Edit: By the way, the keys in my layout that have two black legends are Mod-Tap Keys.
« Last Edit: Tue, 12 December 2017, 00:24:18 by ericboehs »

Offline Tom_Kazansky

  • Posts: 409
  • Location: Vietnam
  • Oblivion Knight
Re: Zo64 — My Perfect 60% Layout
« Reply #14 on: Tue, 12 December 2017, 05:55:28 »
I made some changes to my current board:

184175-0

my solder skill is not that good so desolder is like... an ordeal to me. I'm scared that I would screw up and ruin the PCB. Oh well... I managed to pull it off.  ;D

after desolder / resolder, I apply sticker on the case, the result is as you can see above, worth the effort!  :))

Offline kb3dow

  • Posts: 2
Re: Zo64 — My Perfect 60% Layout
« Reply #15 on: Tue, 30 January 2018, 12:02:06 »
I haven't been in this obsession hobby very long, but I feel like I've been on an accelerated track.  ....

Great implementation and write-up. I am sold on this and intend to make a similar one myself.
dz60 and plate ordered and shall have the rest soon.
To OP, are you using QMK to program the board? If so could you post a copy/link to your keymap.c template that I could use as a starting point.
The closest I could see on the qmk github dz60 keymaps is this one, it needs some tinkering - but has the split spacebar.
« Last Edit: Tue, 30 January 2018, 13:28:19 by kb3dow »

Offline Zobeid Zuma

  • Thread Starter
  • Posts: 262
  • Location: Texas
Re: Zo64 — My Perfect 60% Layout
« Reply #16 on: Tue, 30 January 2018, 14:23:43 »
To OP, are you using QMK to program the board? If so could you post a copy/link to your keymap.c template that I could use as a starting point.
The closest I could see on the qmk github dz60 keymaps is this one, it needs some tinkering - but has the split spacebar.

That looks pretty complicated.  Here's my keymap:

Code: [Select]
KEYMAP(
KC_ESC , KC_1   , KC_2   , KC_3   , KC_4   , KC_5   , KC_6   , KC_7   , KC_8   , KC_9   , KC_0   , KC_MINS, KC_EQL , KC_GRV , KC_BSPC,
KC_TAB , KC_Q   , KC_W   , KC_E   , KC_R   , KC_T   , KC_Y   , KC_U   , KC_I   , KC_O   , KC_P   , KC_LBRC, KC_RBRC, KC_BSLS,
KC_CAPS, KC_A   , KC_S   , KC_D   , KC_F   , KC_G   , KC_H   , KC_J   , KC_K   , KC_L   , KC_SCLN, KC_QUOT, KC_ENT,
KC_LSFT, KC_NO  , KC_Z   , KC_X   , KC_C   , KC_V   , KC_B   , KC_N   , KC_M   , KC_COMM, KC_DOT , KC_SLSH, KC_RSFT, KC_NO  ,
KC_LCTL, KC_LALT, KC_LGUI, KC_BSPC, MO(1)  , KC_SPC , KC_RGUI, KC_LALT, KC_NO  , KC_RCTL, MO(1)  ),

KEYMAP(
_______, KC_F1  , KC_F2  , KC_F3  , KC_F4  , KC_F5  , KC_F6  , KC_F7  , KC_F8  , KC_F9  , KC_F10 , KC_F11 , KC_F12 , _______, KC_DEL,
_______, KC_PGUP, KC_HOME, KC_UP  , KC_END , _______, _______, _______, _______, _______, KC_MPLY, KC_MRWD, KC_MFFD, KC_INS ,
KC_ENT , KC_PGDN, KC_LEFT, KC_DOWN, KC_RGHT, _______, _______, _______, _______, TO(2)  , _______, _______, _______,
_______, _______, _______, _______, KC_CALC, _______, _______, _______, KC_MUTE, KC_VOLD, KC_VOLU, _______, _______, _______,
_______, _______, _______, KC_DEL , _______, _______, _______, KC_RALT, _______, _______, _______),

KEYMAP(
TO(0)  , M(1)   , M(2)   , M(3)   , M(4)   , M(5)   , M(6)   , M(7)   , M(8)   , M(9)   , M(10)  , M(11)  , M(12)  , _______, _______,
_______, RGB_TOG, RGB_MOD, RGB_HUI, RGB_HUD, RGB_SAI, RGB_SAD, RGB_VAI, RGB_VAD, _______, _______, _______, _______, RESET,
_______, _______, _______, _______, _______, _______, _______, _______, _______, KC_NO  , _______, _______, _______,
_______, _______, _______, _______, BL_DEC , BL_TOGG, BL_INC , BL_STEP, _______, _______, _______, _______, _______, _______,
_______, _______, _______, _______, _______, _______, _______, _______, _______, _______, _______),
};

Incidentally, the reason why I have KC_LALT on both left and right on layer 0, and then KC_RALT on layer 1, is so I can configure Linux to use RALT as the Compose key.  Then I hit Fn-RtAlt followed by the Compose sequence.  I know that's not the most elegant way to do it, though.

I have a couple of Banana Split 60 kits ordered, and the next one I build will be the "Zo65" with a split right-shift and a dedicated Compose key on layer 0.  I was a little hesitant to do that at first because I can't cover the split shift with a WASD keycap set, which means I can't have all those keys custom-printed the way I did before.  I believe I have found an alternative keycap set that will suit me, though.

Offline Paopawdecarabao

  • Posts: 77
Re: Zo64 — My Perfect 60% Layout
« Reply #17 on: Tue, 30 January 2018, 14:59:59 »
This is awesome. Puurrrfection indeed. +1

Offline kb3dow

  • Posts: 2
Re: Zo64 — My Perfect 60% Layout
« Reply #18 on: Tue, 13 March 2018, 09:17:15 »
This is how my version turned out. Still waiting for my case and need to solder the switch LED's.
191450-0

Offline Blaise170

  • * Esteemed Elder
  • Posts: 1332
  • Location: Boston, MA
  • ALPS キーボード
    • XYZ
Re: Zo64 — My Perfect 60% Layout
« Reply #19 on: Tue, 13 March 2018, 09:25:09 »
Not sure I could get used to having a switch right in the center of where the spacebar should be.
I proxy anything including keyboards (キーボード / 鍵盤), from both Japan (日本) and China (中國). For more information, you may visit my dedicated webpage here: https://www.keyboards.es/proxying.html

View my current and past keyboards here: https://deskthority.net/wiki/User:Blaise170

Offline bitzie

  • Posts: 33
Re: Zo64 — My Perfect 60% Layout
« Reply #20 on: Tue, 13 March 2018, 14:50:57 »
Not sure I could get used to having a switch right in the center of where the spacebar should be.

It all depends on how you actually use the spacebar. I thought the same thing before I got both my Vortex Core and my BananaSplitv2. But then I really took stock of how I used the spacebar when typing. I typically only use my right thumb to hit the spacebar. That opens up a ton of possibilities for using a split spacebar.

Offline Zobeid Zuma

  • Thread Starter
  • Posts: 262
  • Location: Texas
Re: Zo64 — My Perfect 60% Layout
« Reply #21 on: Wed, 14 March 2018, 18:22:16 »
This is how my version turned out. Still waiting for my case and need to solder the switch LED's.
(Attachment Link)

Oh this is cool!  It's gratifying to see somebody take my design and put their own spin on it.

For those who didn't catch it elsewhere, let me point out that I also have done my own further revision of the concept → http://zobeid.zapto.org/misc/zo65.html

Offline Zobeid Zuma

  • Thread Starter
  • Posts: 262
  • Location: Texas
Re: Zo64 — My Perfect 60% Layout
« Reply #22 on: Wed, 14 March 2018, 18:31:45 »
Not sure I could get used to having a switch right in the center of where the spacebar should be.

I was skeptical of that too when I first saw it.  Who ordered that extra key in the middle?  It turned out to be the best possible thing, though.  Also…  I believed that I only used my right thumb on the spacebar.  After I got my first split-spacebar keyboard built, I very quickly found out that I sometimes had been using my left thumb to space without consciously knowing.  It didn't matter, though.  I got used to backspace on the left very quickly, and now missing that is the main thing that bugs me when I have to use "normal" keyboards.

However…  I do think if the middle Fn key was missing, and I only had (for example) a 3–3 spacebar split, that I could probably get by pretty well without the center key.  I could program the left half to backspace when tapped or Fn when held down, and I suspect it would work just fine.