Hi all. When I came across the
Dactyl, I decided to try and make one, as my first mechanical keyboard, but the 3D printer I have access to is too small to print it. So I split it in pieces.
Other changes followed, and now it has most of a new case.
I've learned a lot about 3D printing, and still not enough. So, despite avoiding keycap group buys and expensive switches, my keyboard has taken months and a good deal more money than planned, and it's far from done. This sounds like other good-natured complaints I've read of here, and makes me feel at home. But it's fun, and I hope my changes might eventually make ergonomic keyboards cheaper and easier for more people to make. Well - cheaper, anyway.

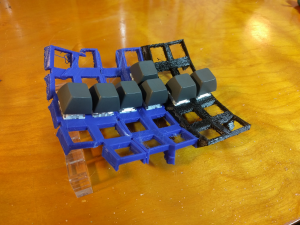
What you see in this picture is three of the five pieces of the frame of the right half of the keyboard, with a few switches and keycaps stuck in, to see how it will feel. The staggered columns feel amazing to me, especially how they are at different heights. Not printed are two pieces of the frame and the entire rest of the case. Judging just from this, I can't wait to have a whole keyboard!
Each piece took around two hours to print (a whole Dactyl half would take something like 14 hours). I found that when I clamped the pieces together with a spring clamp, applied cyanoacrylate glue generously to flow into the joint, and left it overnight, it dried and held well.
Perhaps all of this is more properly written in a build log released after finishing the project, but having something I can place my fingers on and feel the feeling of typing is so exciting that I had to say something. Still to come: the mysteries of sanding, painting, Bondo, hand-wiring (not worried), keyboard firmware on the Teensy LC (everyone else seems to buy a Teensy 2.0)... and then the
cyberdeck dreams start kicking in.