Author Topic: 122-key model F: Controller Swap  (Read 7579 times)

0 Members and 1 Guest are viewing this topic.

Offline JohnElliott

  • Thread Starter
  • Posts: 109
122-key model F: Controller Swap
« on: Mon, 27 June 2011, 18:00:06 »
[h=1]Introduction[/h]
The IBM 6110344 keyboard is moderately PC-compatible with a cable swap or a suitable adaptor. However, some things aren't terribly convenient:
    [*]When the keyboard is reset, it sends its ID; this confuses Windows' keyboard driver terribly.
    [*]By default, keys don't send key-up codes. This means the keyboard can't be used through a USB adaptor.
    [*]The keyboard uses Scancode Set 3, not Set 2.
    [/LIST]
    As it happens, the 6110344 (and presumably other 122-key Model F keyboards like the 6110668) uses the same controller circuit as the 84-key Model F, which is completely PC-compatible. So, one technique to improve compatibility, at least on the first two points, would be to use a custom firmware (based on the one in the 84-key F) in the 122-key F.

    Note that this procedure will not work with an 83-key XT model F keyboard; it has a different controller circuit and key matrix.

    [h=1]You will need[/h]
      [*]A soldering iron.
      [*]Desolder braid.
      [*]Screwdrivers.
      [*]Nutdrivers -- 9/32in for the keyboard case, 1/4in for the controller PCB.
      [*]An EPROM programmer that can write a D8748 (or a D8749, if you're feeling adventurous).
      [*]A blank D8748 (or D8749), and perhaps a spare for luck.
      [*]A 40-pin DIP socket.
      [*]Firmware images of the microcontrollers for both keyboard types: the 84-key F (part 1503099) and the 122-key F (part 1385001). I got these by desoldering the controllers from real IBM keyboards as described below, and reading the contents using an EPROM programmer.
      [*]Patience.
      [/LIST]

      [h=1]The new firmware[/h]
      The new firmware is generated by a Java program: KeyboardHost (391k ZIP).


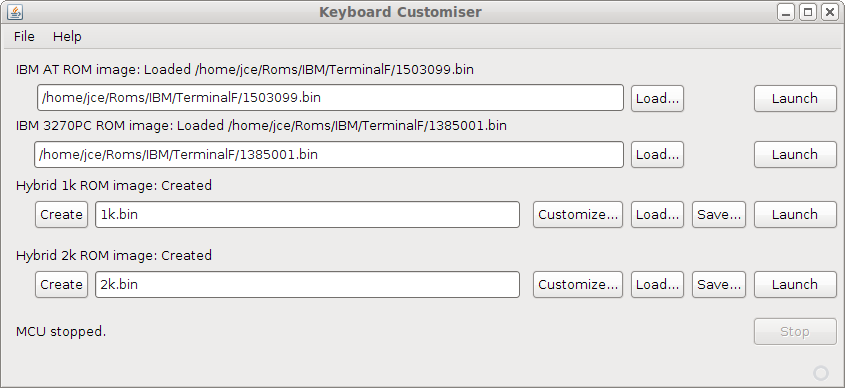
      KeyboardHost can generate two firmware types: a 1k image for a D8748, or a 2k image for a D8749. Here's a comparison of the firmwares:
      [h=2]1k firmware[/h]
        [*]Has been tested on real hardware.
        [*]Supports only one scancode set.
        [*]Keys return 1-byte scancodes.
        [*]No keyboard ID.
        [/LIST]
        [h=2]2k firmware[/h]
          [*]Has been tested only under emulation.
          [*]Supports all three scancode sets.
          [*]Keys can return 1-byte scancodes or 2-byte E0 xx scancodes.
          [*]Supports keyboard ID.
          [/LIST]
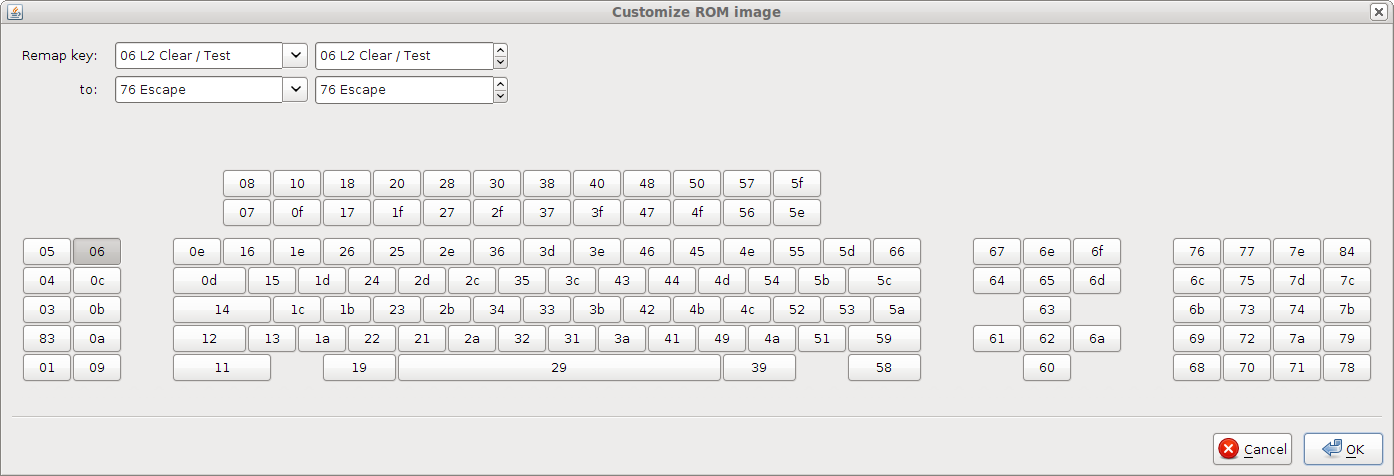
          See the README.TXT file supplied with KeyboardHost for full details of how to generate the new firmware, and how to customize the scancodes it returns.


          Once you have the new firmware, write it to a D8748 or D8749 microcontroller, as appropriate. I used a Willem programmer with external power supply, which could (just about) manage to write an 8748, but couldn't stretch to an 8749.

          [h=1]Removing the old controller[/h]
          Open the outer case. There are three screws at the back, holding the plastic front on, and four inside holding the mechanism to the metal baseplate. Once these have been released, separate the mechanism from the baseplate (as you would open a book) to reveal the controller. It is attached to the baseplate by two wires, one for the cable to the PC and one for the DIP switches. Unplug both.


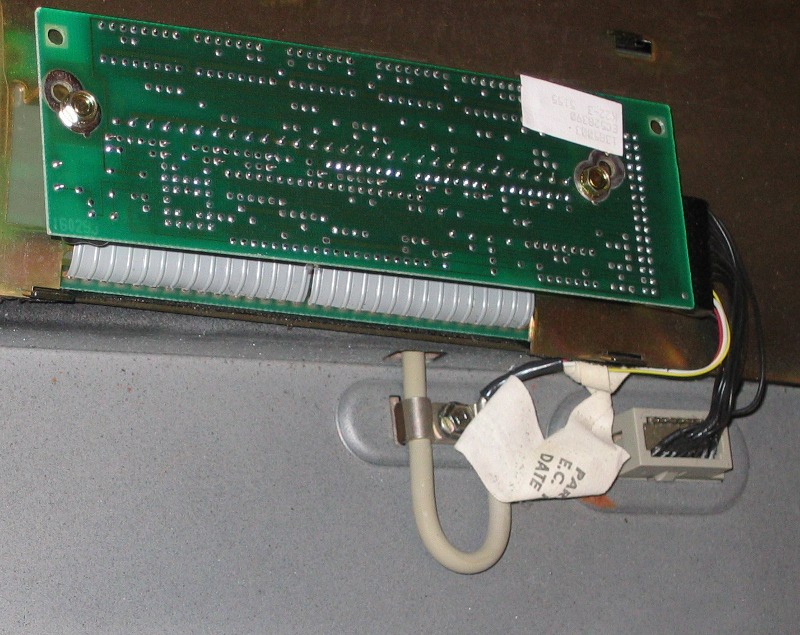
          Undo the two screws on the controller PCB and flip it over so you can get at both sides.


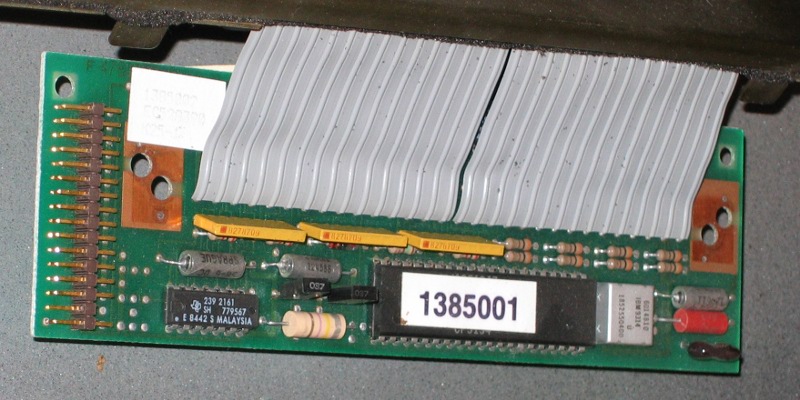
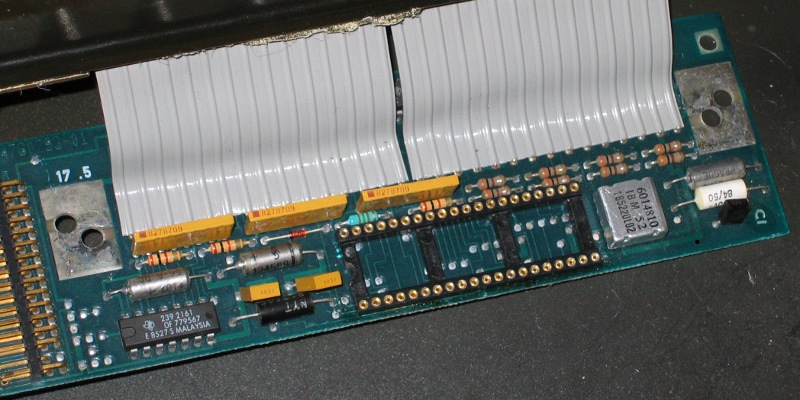
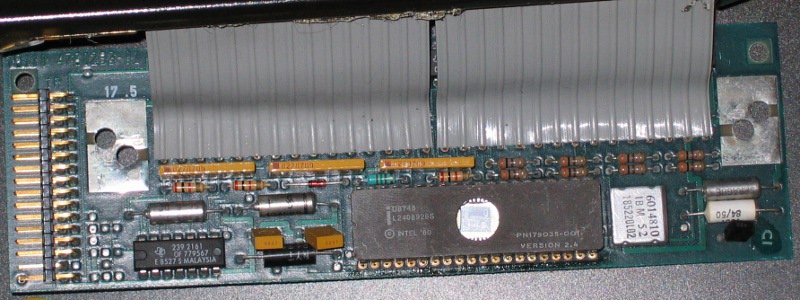
          The chip you need to remove is the large one (marked 1385001 in this picture). This is where you need the desolder braid.

          The microcontroller won't come out unless the solder has been removed from all 40 pins. When you hold the board up to the light, it should be possible to see light through all 40 of the holes. Once you've done that, insert a screwdriver under each end of the microcontroller and gently lever it out. If you can see one or more pins resisting or bending, then check that those pins are completely desoldered. It may well take several goes with the desolder braid to shift them.

          Once the microcontroller is out, clean up any leftover solder, then put the 40-pin socket in its place. The notch goes at the opposite end from the square silver IC -- the end closest to the cable connector. Make sure the socket lies flat on the circuit board, with its 40 pins all in their correct holes. Once it's in place, solder it in, taking care not to short any pins together. Shorted pins can usually be unshorted by running the hot soldering iron between them.


          When the socket is in place, I'd suggest that you plug the original microcontroller back into it, reassemble the keyboard (at least to the point where you reconnect the cables), and check that it still works as it did before.

          [h=1]Fitting the new controller[/h]

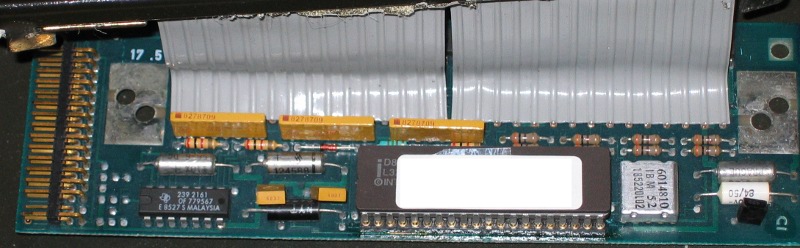
          Open up the keyboard again, and replace the original microcontroller with your programmed 8748 / 8749. Don't bother reconnecting the DIP switches, because they now have no effect. Again, the notch goes at the end opposite the silver IC.


          It's a good idea to cover the window on the microcontroller, to stop stray ultraviolet light getting in and corrupting the firmware.


          The new firmware will support the LED panel from an 84-key Model F, if you happen to have one spare. How you fit this to the case is up to you.

          Then reassemble the keyboard, plug it into a PC, and (hopefully) everything works.

          [h=1]In use[/h]

          If all went well, the keyboard should now work on Windows without any need for a custom driver. Keys will return key-up and key-down codes, and repeat as normal.

          Offline REVENGE

          • Posts: 568
          122-key model F: Controller Swap
          « Reply #1 on: Mon, 27 June 2011, 19:42:53 »
          Very impressive, excellent write up!
          ◕ ‿ ◕

          Offline kishy

          • Posts: 1576
          • Location: Windsor, ON Canada
          • Eye Bee M
            • http://kishy.ca/
          122-key model F: Controller Swap
          « Reply #2 on: Tue, 28 June 2011, 11:10:56 »
          Awesome work as always John!
          Enthusiast of springs which buckle noisily: my keyboards
          Want to learn about the Kishsaver?
          kishy.ca

          Offline JohnElliott

          • Thread Starter
          • Posts: 109
          122-key model F: Controller Swap
          « Reply #3 on: Tue, 28 June 2011, 13:28:38 »
          Quote from: acfrazier;369166
          The legendary John Elliott lives! You really need to join us on IRC. (#geekhack @ irc.freenode.net if you forgot) Awesome work man!

           
          As it happens, IRC is something I've never used. And I think I spend enough time in front of the computer as it is :-)

          Offline REVENGE

          • Posts: 568
          122-key model F: Controller Swap
          « Reply #4 on: Wed, 06 July 2011, 22:14:06 »
          Hey John, two questions:

          1. Would this theoretically work with a 104 key terminal F?
          2. Can you post copies of the stock firmware images you need to build the custom firmware?
          ◕ ‿ ◕

          Offline JohnElliott

          • Thread Starter
          • Posts: 109
          122-key model F: Controller Swap
          « Reply #5 on: Thu, 07 July 2011, 02:35:00 »
          Quote from: REVENGE;375059
          Hey John, two questions:

          1. Would this theoretically work with a 104 key terminal F?
          2. Can you post copies of the stock firmware images you need to build the custom firmware?

          1. Given kishy's pictures of the 104-key terminal F controller, I think it ought to. Ideally, you'd want to use the key sensitivity table out of the 104-key F, but as far as I know no-one's dumped the firmware from one of those.

          For that matter, it ought to work with the 84-key AT model F (again, using the 84-key sensitivity table), in case you wanted to do a big backspace mod without remapping scancodes in Windows / Linux.

          2. I'm sensitive about distributing stuff that contains IBM copyright messages, without permission from whoever owns the rights to the Model F firmware (IBM? Lenovo? Unicomp?) But I daresay there are copies out there.
          « Last Edit: Thu, 07 July 2011, 06:32:59 by JohnElliott »

          Offline REVENGE

          • Posts: 568
          122-key model F: Controller Swap
          « Reply #6 on: Thu, 07 July 2011, 22:06:14 »
          Quote from: JohnElliott;375242
          1. Given kishy's pictures of the 104-key terminal F controller, I think it ought to. Ideally, you'd want to use the key sensitivity table out of the 104-key F, but as far as I know no-one's dumped the firmware from one of those.

          For that matter, it ought to work with the 84-key AT model F (again, using the 84-key sensitivity table), in case you wanted to do a big backspace mod without remapping scancodes in Windows / Linux.

          2. I'm sensitive about distributing stuff that contains IBM copyright messages, without permission from whoever owns the rights to the Model F firmware (IBM? Lenovo? Unicomp?) But I daresay there are copies out there.

          Ok, thanks for the hint.
          ◕ ‿ ◕

          Offline JohnElliott

          • Thread Starter
          • Posts: 109
          122-key model F: Controller Swap
          « Reply #7 on: Fri, 08 July 2011, 18:47:31 »
          I've now updated KeyboardHost so that you can see and edit the key sensitivity table. This allows it to create custom firmware images for the 84-key AT keyboard and (in theory) the 104-key Space Unsaver. You can either select one of the standard layouts, or edit sensitivity by hand.

          Interesting factlet: on the 84-key AT board, hidden positions like the two below the Enter key have a sensitivity of 7, as do nonexistent keys. But on the 122-key board, hidden positions have values in the range 1-4, just like real keys. I don't know whether anyone who's done the big backspace mod on an AT model F has found their new backslash key any less sensitive than other keys on the board; but if so, a custom firmware may help. Plus you can then remap its scancode in the controller rather than on the PC.

          Offline REVENGE

          • Posts: 568
          122-key model F: Controller Swap
          « Reply #8 on: Tue, 12 July 2011, 03:20:23 »
          John, is there any chance this firmware builder could support a custom Function layer mapping?
          ◕ ‿ ◕

          Offline JohnElliott

          • Thread Starter
          • Posts: 109
          122-key model F: Controller Swap
          « Reply #9 on: Tue, 12 July 2011, 17:38:02 »
          Quote from: REVENGE;378657
          John, is there any chance this firmware builder could support a custom Function layer mapping?

          I take it you mean multi-byte macros attached to particular keys. You couldn't do it with the 1k ROM image; there's not enough space. The 2k ROM image does something similar for Pause and Break, but again space is a problem. Something could possibly be hardwired for one or two keys, but not a generic solution.

          If I were to do this, the solutions I can think of are:
          - An alternative 2k ROM image that does not support scancode sets 1 and 3. That would free up space for macros.
          - Go to a 4k ROM. That means using an 8039, 8049 or 8749 with a separate 4k ROM chip. Patching something like that into the keyboard controller PCB would be rather beyond me.

          Offline REVENGE

          • Posts: 568
          122-key model F: Controller Swap
          « Reply #10 on: Tue, 12 July 2011, 22:29:36 »
          Quote from: JohnElliott;379080
          If I were to do this, the solutions I can think of are:
          - An alternative 2k ROM image that does not support scancode sets 1 and 3. That would free up space for macros.
          - Go to a 4k ROM. That means using an 8039, 8049 or 8749 with a separate 4k ROM chip. Patching something like that into the keyboard controller PCB would be rather beyond me.
          Option 1 sounds like a good compromise for use with modern systems. I'm thinking another alternative would be to replace the Intel controller with a Teensy++ implementation.
          ◕ ‿ ◕

          Offline JohnElliott

          • Thread Starter
          • Posts: 109
          122-key model F: Controller Swap
          « Reply #11 on: Wed, 13 July 2011, 14:06:13 »
          Quote from: REVENGE;379244
          Option 1 sounds like a good compromise for use with modern systems. I'm thinking another alternative would be to replace the Intel controller with a Teensy++ implementation.

           
          At the moment, the best thing to do with a Model F and a Teensy seems to be this, rather than try to replace the original controller.

          Offline Soarer

          • * Moderator
          • Posts: 1918
          • Location: UK
          122-key model F: Controller Swap
          « Reply #12 on: Wed, 13 July 2011, 15:31:37 »
          [ shameless self promotion ] There's my adapter too, which handles the common Fs pretty well. (I will release source as soon as I've had time to do a couple more rewrites of bits of it, I promise!)

          I'm looking into replacing the CPU (with a Teensy, most likely) on a couple of IBM capacitive boards. But it's only worth it for those that don't have a usable protocol already, e.g. DisplayWriter :-)

          Offline REVENGE

          • Posts: 568
          122-key model F: Controller Swap
          « Reply #13 on: Wed, 13 July 2011, 15:33:39 »
          Quote from: JohnElliott;379636
          At the moment, the best thing to do with a Model F and a Teensy seems to be this, rather than try to replace the original controller.
          I already did that, and it was easy, but I would prefer to have control of the hardware directly.

          Correction: I used Soarer's implementation, waiting on the source so I can do my ANSI mod. :P
          « Last Edit: Wed, 13 July 2011, 15:35:45 by REVENGE »
          ◕ ‿ ◕