Author Topic: My first go at custom keycaps  (Read 9711 times)

0 Members and 1 Guest are viewing this topic.

Offline Jpecina

  • Thread Starter
  • Posts: 112
My first go at custom keycaps
« on: Sat, 30 July 2016, 22:51:43 »
Hello everyone,
 So I'm fairly new to the Geekhack community and so far  I have really been enjoying it here. Recently I caught the artisan bug and have been trying hard to get ahold of some. While I wait for sales to start popping up I decided to give making my own a try. Like others, I did most of my research here on Geekhack and other than reading a couple of posts, I have no experience sculpting or casting. Please feel free to offer any feedback or advice as I can only improve moving forward. I will continue to update this post as I go further into the process.

Material List:
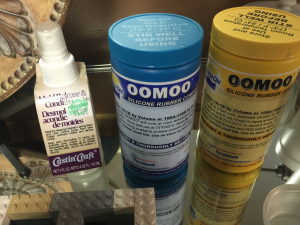
-Smooth on silicon Oomoo 30
-Polyform Super Sculpey
-Easy Cast Clear Casting Epoxy
-Red Resin Dye
-Mold Release
-Shaping tools
-Legos

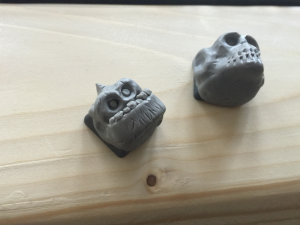
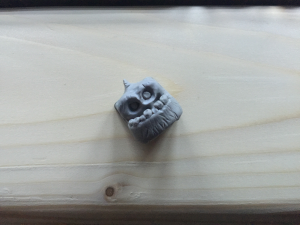
I didn't really have a vision of what I wanted in a cap, so I just started sculpting and ended with something I was happy with. Before I made a mold of the sculpture I decided to start with a blank cap for practice, and also because I really want to make a blank set for my HHKB.
143875-0143877-1
143879-2143887-3

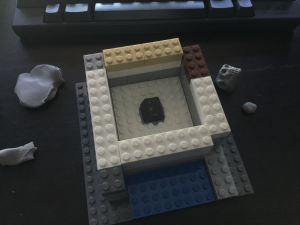
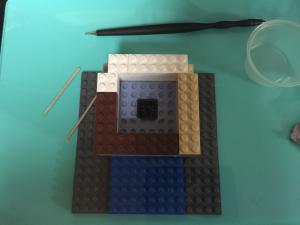
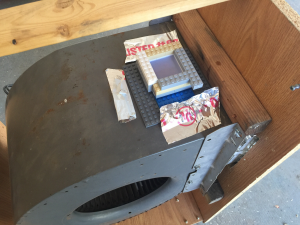
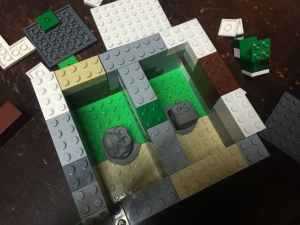
I used some Legos for a mold box since that's what I had on hand . I was worried about bubbles, so once I poured the silicon mixture into the mold box I decided to place them on top of a blower as it offered vibration and it seemed to have worked well.
143881-4143883-5

The mold held well and I'd decided to do both designs at once. I'm also gonna do the other half of the blank tomorrow, and hopefully, I can have my first custom cap by Monday as it takes 24 hrs for the epoxy to cure. As for colorway ideas I was thinking camo, but as I haven't the slightest idea how I'm going to start with transparent red.
143885-6


Offline Sifo

  • Alter
  • * Exquisite Elder
  • Posts: 7489
  • Location: #GOLDSPRINGS, #LEGITBALLIN
  • Illustrious
Re: My first go at custom keycaps
« Reply #1 on: Sat, 30 July 2016, 23:41:34 »
Your sculpting looks pretty good. Eager to see how they turn out.
I love Elzy

Offline Sneaky Potato

  • * Maker
  • Posts: 328
  • Location: Midworld
  • Gunslinger
Re: My first go at custom keycaps
« Reply #2 on: Sat, 30 July 2016, 23:57:50 »
Looks like you're on the right track. You'll learn a lot during the casting process, and each mistake will make your keys that much better quality.

Offline juahenza

  • Posts: 475
  • DoSmallThingswithGreatLove
Re: My first go at custom keycaps
« Reply #3 on: Sun, 31 July 2016, 00:01:27 »
nice work! cant wait to see more  :thumb:
456GT | TGR Jane CE | Dolphin v2 | Whale | 360c | LZ FE | LZ IRON | TX-CP | Varmilo VA87M | HHKB P2 | IBM SSK P.1397681| IBM Industrial SSK P.1395682 | VE.A | Realforce 87u | Datamancer Streamline TKL | Datamancer Mechinist TKL | TANK v1 | RAMA M-4 | Realforce 108UW-HIPRO

Offline Jpecina

  • Thread Starter
  • Posts: 112
Re: My first go at custom keycaps
« Reply #4 on: Sun, 31 July 2016, 00:37:30 »
Looks like you're on the right track. You'll learn a lot during the casting process, and each mistake will make your keys that much better quality.

Thank you, The main thing I'm worried about is the bubbles in the epoxy since I don't have a pressure pot. hope to buy one soon to start cranking out those blanks.
   

Offline Kenda

  • Posts: 108
Re: My first go at custom keycaps
« Reply #5 on: Sun, 31 July 2016, 01:15:02 »
Casting without pressure pot is tough but you still can get pretty good result if you can make it carefully


Sent from my iPhone using Tapatalk

Offline suicidal_orange

  • * Global Moderator
  • Posts: 4771
  • Location: England
Re: My first go at custom keycaps
« Reply #6 on: Sun, 31 July 2016, 04:01:11 »
Looks like you've taken to sculpting really well, good work!

I'm slightly worried about the toothy guy's chin - looks like it might hit the cap below when you put him on a board?  Pretty sure the skull will hit all round too, but that seems to be backgrounded anyway...

Looking forward to watching your progress :)
120/100g linear Zealio R1  
GMK Hyperfuse
'Split everything' perfection  
MX Clear
SA Hack'd by Geeks     
EasyAVR mod

Offline SBJ

  • Posts: 1191
  • Location: Denmark / The city.
  • Tactile pls
Re: My first go at custom keycaps
« Reply #7 on: Sun, 31 July 2016, 04:53:22 »
Wow those first sculpts look fantastic!
I can't wait to see your progress.

Offline jchan94

  • Keyclack Inc
  • * Vendor
  • Posts: 1566
  • Location: Los Angeles
  • Please email jchan@keyclack.com. PMs are disabled
    • KeyClack
Re: My first go at custom keycaps
« Reply #8 on: Sun, 31 July 2016, 05:40:40 »
Those first sculpts are fantastic! Seriously, the detail on it is amazing.
Support Email: support@keyclack.com

Did you miss something from us?
- Sign up for our Mailing List: https://eepurl.com/coAJ5r

Offline xondat

  • i'm not a star
  • * Maker
  • Posts: 5366
  • Location: United Kingdom
Re: My first go at custom keycaps
« Reply #9 on: Sun, 31 July 2016, 06:41:25 »
Sculpting looks pretty good, but it's nothing unless its cast correctly - good luck :thumb:

Offline SoftKeys

  • Posts: 100
  • Location: US - FL
Re: My first go at custom keycaps
« Reply #10 on: Sun, 31 July 2016, 09:10:59 »
The designs look great, goodluck with the rest of the casting process! Looking forward to see more progress

Offline Jpecina

  • Thread Starter
  • Posts: 112
Re: My first go at custom keycaps
« Reply #11 on: Sun, 31 July 2016, 11:36:14 »
Looks like you've taken to sculpting really well, good work!

I'm slightly worried about the toothy guy's chin - looks like it might hit the cap below when you put him on a board?  Pretty sure the skull will hit all round too, but that seems to be backgrounded anyway...

Looking forward to watching your progress :)

You called it orange haha , both designs had issues on different keyboards. I also managed to sculpt a more appropriate sized key. I'll update tonight with more photos.
   

Offline Jpecina

  • Thread Starter
  • Posts: 112
Re: My first go at custom keycaps
« Reply #12 on: Tue, 02 August 2016, 15:54:24 »
Apologies for the super late update, but apparently the epoxy takes 72hrs to cure!!

My original designs had clearing issues so I decided to scrap one, modify the other, and make a smaller sculpt. Unfortunately, the problems had just begun. For some strange reason, I could not get a reliable 2nd mold; I couldn't figure out why the stem wasn't forming. I tried multiple  things such as a thinner pour and injecting it into the stem, but could not get a good result. If anybody can offer advice I would greatly appreciate it. After 8 hrs I decided that MX wasn't gonna work, so I moved on to Topre. The results improved a little, so I went with it.

144125-0144127-1
144129-2144131-3
144133-4

The cast process itself wasn't too difficult, but the end result is rather horrid. The small details in the sculpt trapped too much air and the walls of the cap need to be thickened. This was a great learning experience and has made me appreciate the time and effort that goes into crafting artisans. I enjoy the designs I created, so I will keep at it until I can create a solid cap.

144135-5144137-6
144139-7

after a couple more tries i finally nailed something descent :D
artsy shot:
144222-8
« Last Edit: Wed, 03 August 2016, 12:29:04 by Jpecina »
   

Offline suicidal_orange

  • * Global Moderator
  • Posts: 4771
  • Location: England
Re: My first go at custom keycaps
« Reply #13 on: Wed, 03 August 2016, 15:02:05 »
I don't know what the sculpt is of but the cast looks nice and clean - congrats :)
120/100g linear Zealio R1  
GMK Hyperfuse
'Split everything' perfection  
MX Clear
SA Hack'd by Geeks     
EasyAVR mod

Offline romevi

  • Formerly romevi
  • * Exalted Elder
  • Posts: 8942
  • Location: The Windy City
Re: My first go at custom keycaps
« Reply #14 on: Wed, 03 August 2016, 15:06:54 »
That's a really cool ent-troll thing.

Offline Jpecina

  • Thread Starter
  • Posts: 112
Re: My first go at custom keycaps
« Reply #15 on: Wed, 03 August 2016, 15:10:11 »
I don't know what the sculpt is of but the cast looks nice and clean - congrats :)

Haha it's suppose to be a mythical wooden cyclops creature... But it can be anything you want it to be if you stare long enough at it.
   

Offline Jpecina

  • Thread Starter
  • Posts: 112
Re: My first go at custom keycaps
« Reply #16 on: Sat, 13 August 2016, 16:34:14 »
Small update-

I went ahead and bought a pressure pot and vacuum chamber, and started casting blanks. The pressure pot made a big difference in the casting, it's hard to tell, but the casts are nice and clean. I went ahead and made a WASD and arrow cluster for my HHKB, and I am currently working a new sculpt. I might do a giveaway if there are enough people interested in these sets.
145198-0145200-1
145202-2145204-3
   

Offline rm-rf

  • Posts: 357
  • Location: Bellingham, WA
Re: My first go at custom keycaps
« Reply #17 on: Sat, 13 August 2016, 17:07:06 »
Those blanks look pretty nice!
I'm interested!

Offline ramnes

  • Posts: 865
  • Location: France
  • T fou, mec?
Re: My first go at custom keycaps
« Reply #18 on: Sat, 13 August 2016, 17:22:34 »
Wow, the blanks look so clean, good job! Much purdy.
23h18 - photekq: hhkb with silenced realforce sliders and lubricated well is
23h18 - photekq: the best switch i've used

Offline romevi

  • Formerly romevi
  • * Exalted Elder
  • Posts: 8942
  • Location: The Windy City
Re: My first go at custom keycaps
« Reply #19 on: Sat, 13 August 2016, 18:26:59 »
Small update-

I went ahead and bought a pressure pot and vacuum chamber, and started casting blanks. The pressure pot made a big difference in the casting, it's hard to tell, but the casts are nice and clean. I went ahead and made a WASD and arrow cluster for my HHKB, and I am currently working a new sculpt. I might do a giveaway if there are enough people interested in these sets.
(Attachment Link) (Attachment Link)

Whew! Those blood ones look sweet.

Offline DALExSNAIL

  • The User Formerly Known as 'Formerly DudeSnail'
  • * Esteemed Elder
  • Posts: 1500
  • Location: Port Wentworth, GA
  • 𝖋𝖚𝖈𝖐 𝖆𝖑𝖕𝖘
Re: My first go at custom keycaps
« Reply #20 on: Sat, 13 August 2016, 19:07:49 »
Plz do a small blank run! I'd eat this up!

Offline kiwi99

  • that's a gnarly dookie
  • Posts: 748
  • Location: Vancouver, BC
  • authentic church of halverson member
Re: My first go at custom keycaps
« Reply #21 on: Sat, 13 August 2016, 19:14:13 »
these blanks in topre in a moba set... would cop  :thumb:

Offline Jpecina

  • Thread Starter
  • Posts: 112
Re: My first go at custom keycaps
« Reply #22 on: Sat, 13 August 2016, 21:35:44 »
Small update-

I went ahead and bought a pressure pot and vacuum chamber, and started casting blanks. The pressure pot made a big difference in the casting, it's hard to tell, but the casts are nice and clean. I went ahead and made a WASD and arrow cluster for my HHKB, and I am currently working a new sculpt. I might do a giveaway if there are enough people interested in these sets.
(Attachment Link) (Attachment Link)

Whew! Those blood ones look sweet.

Thanks romevi, I plan on calling them "Inkeys". Working on other color combos for a future giveaway stay tuned.
   

Offline Badwrench

  • * Destiny Supporter
  • Posts: 1986
  • Location: So. Cal.
  • ummmm.....I forgot
Re: My first go at custom keycaps
« Reply #23 on: Sat, 13 August 2016, 21:37:17 »
Very interested in an arrow set

Sent from my LG-H811 using Tapatalk

wut. i'd buy a ****ty IBM board for that green V2

Offline OfTheWild

  • * Esteemed Elder
  • Posts: 1308
  • Location: Cary, NC
  • Make things. Have fun.
    • Studios of the Wild
Re: My first go at custom keycaps
« Reply #24 on: Sun, 14 August 2016, 00:40:54 »
i love the mixed swirl in the red blanks! Very elegant.
-Dana

Offline kekman

  • Posts: 225
  • Location: Sydney, down under
  • quit life
Re: My first go at custom keycaps
« Reply #25 on: Sun, 14 August 2016, 05:59:37 »
looks really nice...

Offline Vadurr

  • Posts: 737
  • Location: CA
  • Valar Morghulis
Re: My first go at custom keycaps
« Reply #26 on: Sun, 14 August 2016, 11:21:16 »
Wow. Super clean! Will purple MX be an option?

Offline letsjigsrocks

  • Posts: 34
  • Don't you think its cute?
Re: My first go at custom keycaps
« Reply #27 on: Sun, 14 August 2016, 13:21:39 »
That cyclops thing is looks so ancient which is good. Anyways, Cyclops is ancient . Never mind the ancient-thingy.  :)) :)) You're work is great.

VA87MR

Offline xninetynine

  • Posts: 34
Re: My first go at custom keycaps
« Reply #28 on: Sun, 14 August 2016, 15:03:49 »
These look great! Hope to see them available to the public soon.  :p

Offline xondat

  • i'm not a star
  • * Maker
  • Posts: 5366
  • Location: United Kingdom
Re: My first go at custom keycaps
« Reply #29 on: Sun, 14 August 2016, 15:22:19 »
Small update-

I went ahead and bought a pressure pot and vacuum chamber, and started casting blanks. The pressure pot made a big difference in the casting, it's hard to tell, but the casts are nice and clean. I went ahead and made a WASD and arrow cluster for my HHKB, and I am currently working a new sculpt. I might do a giveaway if there are enough people interested in these sets.
(Attachment Link) (Attachment Link)
MUCH better. I hope I get those purple caps one day... They're perfect.

Offline Raenbo

  • Posts: 107
  • Location: [US-CA]
  • IG: @aero_keys
Re: My first go at custom keycaps
« Reply #30 on: Sun, 14 August 2016, 18:28:58 »
Your blanks look awesome! I'd love to see an MX WASD cluster :)

Offline Jpecina

  • Thread Starter
  • Posts: 112
Re: My first go at custom keycaps
« Reply #31 on: Sun, 14 August 2016, 18:32:19 »
Your blanks look awesome! I'd love to see an MX WASD cluster :)

Yes i plan to make some MX as well. I was thinking of making some in DSA profile but it'll take some time.
   

Offline JT_Sea

  • Posts: 250
  • Location: Seattle
  • Um hi
Re: My first go at custom keycaps
« Reply #32 on: Tue, 16 August 2016, 10:01:45 »
Blanks are looking sharp, keep up the good work.

Offline SBJ

  • Posts: 1191
  • Location: Denmark / The city.
  • Tactile pls
Re: My first go at custom keycaps
« Reply #33 on: Wed, 17 August 2016, 03:27:34 »
Blanks are looking sharp, keep up the good work.
I agree. Nice looking blanks.
Makes me wish I had a topre board.  :))

Offline Jpecina

  • Thread Starter
  • Posts: 112
Re: My first go at custom keycaps
« Reply #34 on: Wed, 17 August 2016, 15:33:55 »
Blanks are looking sharp, keep up the good work.
I agree. Nice looking blanks.
Makes me wish I had a topre board.  :))

I'll be working on MX this weekend, I still need to figure out the issues with the stems not forming. Stay tuned
   

Offline Raenbo

  • Posts: 107
  • Location: [US-CA]
  • IG: @aero_keys
Re: My first go at custom keycaps
« Reply #35 on: Wed, 17 August 2016, 15:46:43 »
How do you orient your sprues for MX? I find having a sprue on the edge of the stem to be successful.

Offline Jpecina

  • Thread Starter
  • Posts: 112
Re: My first go at custom keycaps
« Reply #36 on: Wed, 17 August 2016, 15:49:37 »
How do you orient your sprues for MX? I find having a sprue on the edge of the stem to be successful.

Last time I tried I put a Sprue on 2 opposite corners of the cap. I was considering placing a Sprue on the stem but didn't want the stem to plug. I'll give it another try and hope it works.
   

Offline Raenbo

  • Posts: 107
  • Location: [US-CA]
  • IG: @aero_keys
Re: My first go at custom keycaps
« Reply #37 on: Wed, 17 August 2016, 16:01:54 »


This is how I do MX. The sprue doesn't cover the hole, I just superglue it to the edge, even though a little of it hangs off. I get a toothpick and pre-fill the MX stem before pouring the rest of the mold.

It comes out like this, with 3 holes.


I use the middle sprue to inject the resin in until some comes out of the other two. Then I kind of shake it around to get the air loose and aim it to drain upwards toward the outer sprues. Then it goes into the pressure pot. I still get bubbles sometimes, but mostly on the edge of the caps.

Though, this is just the way I do it. Hope you can get similar results. Please don't hate me if it doesn't work D:

Offline Jpecina

  • Thread Starter
  • Posts: 112
Re: My first go at custom keycaps
« Reply #38 on: Wed, 17 August 2016, 16:05:56 »
Show Image


This is how I do MX. The sprue doesn't cover the hole, I just superglue it to the edge, even though a little of it hangs off. I get a toothpick and pre-fill the MX stem before pouring the rest of the mold.

It comes out like this, with 3 holes.
Show Image


I use the middle sprue to inject the resin in until some comes out of the other two. Then I kind of shake it around to get the air loose and aim it to drain upwards toward the outer sprues. Then it goes into the pressure pot. I still get bubbles sometimes, but mostly on the edge of the caps.

Though, this is just the way I do it. Hope you can get similar results. Please don't hate me if it doesn't work D:

Thanks I really appreciate the help. I'll definitely give this a try:)
   

Offline Raenbo

  • Posts: 107
  • Location: [US-CA]
  • IG: @aero_keys
Re: My first go at custom keycaps
« Reply #39 on: Wed, 17 August 2016, 16:10:21 »
No problem! You can message me if anything. I've studied up on a lot of other artisans' guides hehe. Looking forward to your progress!

Offline Jpecina

  • Thread Starter
  • Posts: 112
Re: My first go at custom keycaps
« Reply #40 on: Wed, 17 August 2016, 22:04:12 »

What should I call this guy? Also some more blanks, I call this typhoon blue
   

Offline romevi

  • Formerly romevi
  • * Exalted Elder
  • Posts: 8942
  • Location: The Windy City
Re: My first go at custom keycaps
« Reply #41 on: Wed, 17 August 2016, 22:23:23 »


Show Image

What should I call this guy?

Bootyhead.

Offline ryan92084

  • Posts: 126
  • Location: PA
  • Consumer ****
Re: My first go at custom keycaps
« Reply #42 on: Thu, 18 August 2016, 05:00:04 »
Show Image

What should I call this guy? ...
Show Image

Morla the Ancient One :D
« Last Edit: Thu, 18 August 2016, 05:01:48 by ryan92084 »

RiP *ucky Shine(ing)

Offline ramnes

  • Posts: 865
  • Location: France
  • T fou, mec?
Re: My first go at custom keycaps
« Reply #43 on: Thu, 18 August 2016, 05:30:11 »
You should work a bit more on it. I'm sure you can make it look even better!
23h18 - photekq: hhkb with silenced realforce sliders and lubricated well is
23h18 - photekq: the best switch i've used

Offline Sifo

  • Alter
  • * Exquisite Elder
  • Posts: 7489
  • Location: #GOLDSPRINGS, #LEGITBALLIN
  • Illustrious
Re: My first go at custom keycaps
« Reply #44 on: Thu, 18 August 2016, 05:39:20 »
I liek blue
I love Elzy

Offline Str1pez

  • Posts: 15
  • Location: Arizona
Re: My first go at custom keycaps
« Reply #45 on: Thu, 18 August 2016, 11:53:13 »
Damn man, looking really good.  Hoping to get into this myself soon.  I can't wait!

Your sculpts are freaking *****in for not having experience with it at all.

Offline Raenbo

  • Posts: 107
  • Location: [US-CA]
  • IG: @aero_keys
Re: My first go at custom keycaps
« Reply #46 on: Thu, 18 August 2016, 17:05:54 »
Crush? heh


Your sculpt is pretty good, I can never get my eyes to look good.

Offline Jpecina

  • Thread Starter
  • Posts: 112
Re: My first go at custom keycaps
« Reply #47 on: Thu, 18 August 2016, 17:09:14 »
Crush? heh

Show Image


Your sculpt is pretty good, I can never get my eyes to look good.

Lol You'd be surprised how many times I end up scrapping my sculpts. Here's another I've been working on:)


Offline SBJ

  • Posts: 1191
  • Location: Denmark / The city.
  • Tactile pls
Re: My first go at custom keycaps
« Reply #48 on: Sat, 20 August 2016, 04:43:12 »
Show Image

What should I call this guy? Also some more blanks, I call this typhoon blue
Show Image

Very nice looking blanks! :thumb:

Offline switchnollie

  • sleever supreme
  • * Exquisite Elder
  • Posts: 1631
  • Location: 白い帽子
  • greyhat co-leader
Re: My first go at custom keycaps
« Reply #49 on: Mon, 22 August 2016, 20:08:25 »
Nice :)

I'll keep a lookout for these :thumb:


Keyboards: HHKB Pro 1 & OTD 356CL Dark Greyhat Edition, baybee!