Author Topic: game controller build thread (PS Vita analog stick, Cherry Red, Leonardo, LoL)  (Read 104978 times)

0 Members and 1 Guest are viewing this topic.

Offline Camineet

  • Thread Starter
  • Posts: 287
edit: adding 3K's awesome sketch of the project so LoL friends can easily see what I'm working on ....
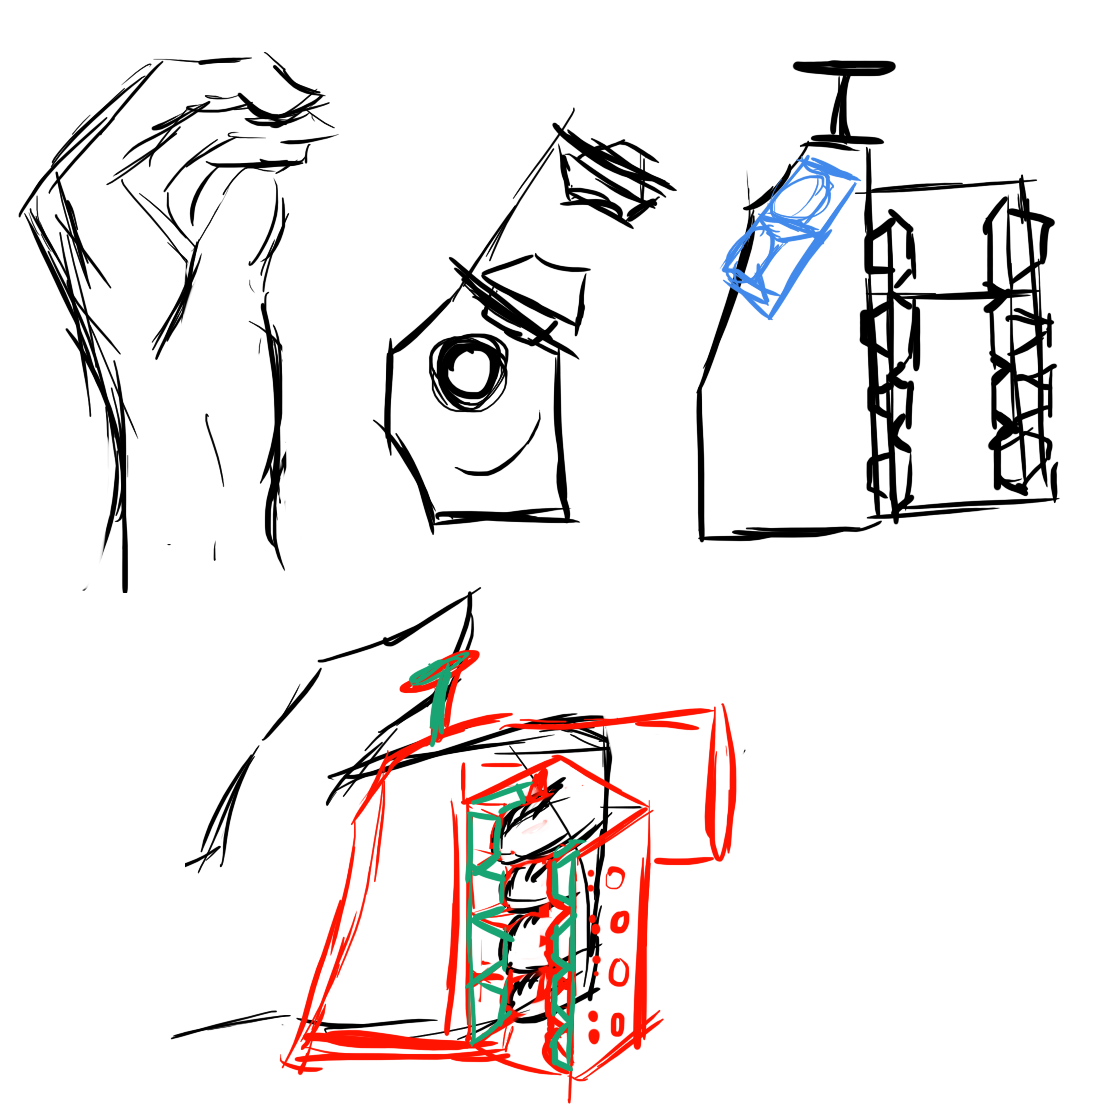
108587-0
Hi Adriano,

Thanks so much for offering to help me with this project. I've set up this post here so that you can read about my plans for this project. Hopefully this build thread will also help other aging gamers who are trying to avoid retirement or who are trying to come out of retirement from gaming.

My plan for coming out of retirement from league of legends is to use a pen tablet for pointing and clicking along with a one-handed grip style controller similar to the grip of a pistol but without the barrel.

The grip will have Eight buttons on the grip, a PS Vita analog stick on top, and three buttons surrounding the analog stick accessible to my thumb.

As you have mentioned having done in your project, I plan to use a Leonardo board along with cherry mx red switches for the buttons.

To begin with I need some help understanding which items in addition to the Leonardo board that I need in order to connect the cherry switches and analog stick to the board.

Thus far it seems that the items I need to purchase include:

The Leonardo board itself

A breadboard

Some wire

Soldering iron and solder

Something called pulldown resistors

The cherry switches

The PS Vita analog stick

A project box to put the board and other electronics into

Some wood and a dremel woodworking tool that I will use to fashion the grip first version which may possibly be done with a 3-D printer at a later time for a second version

Some of these items are a problem because I don't know which specific items to purchase. They include the wire, the breadboard, and the pulldown resistors.

I just don't know where to order these items from or what sizes I should get.

Hopefully if you can help me understand which specific items I need to order, I can at least get the parts needed for this project.

After that, I can start to try to understand how to use Arduino programming software in order to write this thing called the sketch along with learning how to wire all of the buttons and the analog stick.

Look forward to hearing from you when you return from holiday.
« Last Edit: Mon, 17 August 2015, 12:06:54 by Camineet »

Offline AdryD

  • Posts: 3
Hi Marc :)

First of all, It's a pleasure to help you, when I did my project I didn't found help online so i had to do it by my own and I know that is frustrating sometimes ;)

I will quickly answer your question and then you can reply if you don't understand something...

To make what you are speaking about you need:

Arduino Leonardo (as you said)

A breadboard 800 dots or smaller (with a bigger is easier...) OR ---> You could buy a protoshield for arduino and solder everything (http://www.amazon.com/Arduino-Proto-Shield-R3-Assembled/dp/B007QXTRNA) because breadboard is cool for prototypation but isn't for closed project, wires aren't really soldered and it requires a lot of space...
With the protoshield you can solder everything and have a compact case, cherry MX has 2 pins, you just have to connect 1 of the pins to GND of arduino (you should wire all the gnd together, is easier) and the other pin to a digital (or analog used as digital) input of arduino, to do that you can use wires or solder them at arduino...
You are speaking about Pulldown resistor, usually if you write something like that in arduino

Code: [Select]
void setup(){
  pinMode(2,INPUT);
}
void loop () {
}


And you want to connect a button (Cherry works like other buttons) at pin 2 you need to pull a resistor between the GND and the button, Pulldown resistor is an arduino fuction that can help you with this...

You just have to write this way

Code: [Select]
void setup(){
  pinMode(2,INPUT_PULLUP);
}
void loop () {
}


And TADA! you can simply connect the button to GND and arduino pin without resistors (arduino apply an internal resistor ;D)

To mount Cherry MX you need a plate of 1.5 mm that is a very tiny plate and you need to make 14x14 mm holes (14x14 are the holes but every Cherry with Key fill a 18x18 hole), don't know if you can do it with wood, best way is with 3D printing...

IF you send me some pics of the components you got I will write you a fritzing sketch to understand how to connect and I could help you a little with code...

Going to bedroom (is 6.20 AM there haha)

Best Wishes, Adriano!


Offline Camineet

  • Thread Starter
  • Posts: 287
Adriano,

Thanks so much for getting me started here. You have no idea how crazy I am about league of legends. Me and fiancé can't get enough. Grateful for this help. Will have to repay you with kiteboarding lessons or something.

Can you post some stuff about your controller? What games do you use it for?

I have just now finished work and gotten started shopping for parts.

For wire, I found two options:

Wire 1
https://www.sparkfun.com/products/11367
wire 2
https://www.sparkfun.com/products/11026

which one of these do you think I need?

For breadboard, I found these two possibilities:

breadboard 1
https://www.sparkfun.com/products/12002

breadboard 2
https://www.sparkfun.com/products/12615


Which one of these boards do you think I need?

I will definitely get that proto-shield for final assembly. That will be very cool :cool:

Offline AdryD

  • Posts: 3
First, at this link you can look for mine project... http://www.instructables.com/id/Arduino-Mechanical-Keypad/

About what to buy the second link of the wires and the second link of breadboard are okays but on sparkfun price is very high... if you don't have any problems with money do as you want ;) anyway i usually buy things on Banggood.com, prices are really low! You have to wait a bit for deliver but that's worth isn't it?

Oh i play lol too, whats your IGN ;)

Offline Camineet

  • Thread Starter
  • Posts: 287
Dawg, you play LOL too? That’s great, my IGN is Camineet.
You made a DIY Tartarus. It looks great and has those nice cherry switches instead of the rubber domed ones on the Tartarus.
Since you gave the green light on the wires and breadboard, I will go ahead and order them even though they are expensive because I don’t want to delay.

I actually just wrote a really long post here about ergonomics and the design of my controller, but I accidentally hit the back button and a three-page post disappeared. Now I’m just writing this in Word and have run out of time today. Very annoying, I wrote many things about hand architecture and game controller history going back 35 years (I even wrote many things about the razor Orbweaver I have been using for the past four or five months before that device started causing problems for me). So, now I’m just posting this much shorter update and getting ready for food shopping.

I’ll let you know when I received the parts.

By the way it looks like you’re on your way to becoming an international citizen by learning good English. I have spent some years overseas in Asia, and me and fiancé hope to travel to Europe sometime in late 2016 or 2017 for work. It would be great to say hi.

Offline Camineet

  • Thread Starter
  • Posts: 287
Okay just found something I can't figure out on my own. I found two kinds of cherry switches. One is called plate mount, and the other is called PCB mount.

Which one do you think I should get?


http://www.wasdkeyboards.com/index.php/products/keyboard-parts/cherry-mx-red-keyswitch-mx1a-l1nw-linear.html


http://www.wasdkeyboards.com/index.php/products/keyboard-parts/cherry-mx-red-keyswitch-mx1a-l1nn-linear.html

Offline Zustiur

  • Posts: 235
I had the same question building my first custom board. If you have a PCB, definitely go with PCB mount switches. If you don't have a PCB, you can really choose either and it won't make a difference. PCB mounted switches just have extra nubs for creating a firm connection with the PCB.

Offline 3K

  • Posts: 279
  • Location: Germany
I already read your guys thread yesterday and it sounds like you got an interesting project going on here!
Are there already sketches of the build to give this project a face?

                   Model M '88    | Model M SSK '87 | HHKB P2  | Zowie FK1

Offline AdryD

  • Posts: 3
I had the same question building my first custom board. If you have a PCB, definitely go with PCB mount switches. If you don't have a PCB, you can really choose either and it won't make a difference. PCB mounted switches just have extra nubs for creating a firm connection with the PCB.

Thank you mate, Camineet contacted me on a yt video 'cause we were doing similar projects :D
I completed mine, he need a little of help so i'm trying to help him :)

I had the same question building my first custom board. If you have a PCB, definitely go with PCB mount switches. If you don't have a PCB, you can really choose either and it won't make a difference. PCB mounted switches just have extra nubs for creating a firm connection with the PCB.

Okay just found something I can't figure out on my own. I found two kinds of cherry switches. One is called plate mount, and the other is called PCB mount.

Which one do you think I should get?


http://www.wasdkeyboards.com/index.php/products/keyboard-parts/cherry-mx-red-keyswitch-mx1a-l1nw-linear.html


http://www.wasdkeyboards.com/index.php/products/keyboard-parts/cherry-mx-red-keyswitch-mx1a-l1nn-linear.html

3K is right, i bought pcb mount but i didn't use the 2 extra mount :p the important is that you build a right plate to mount the cherry then everything is okay ;)


Offline Camineet

  • Thread Starter
  • Posts: 287
Hey guys,

Thanks for letting me know about the switches. I will go ahead with the PCB because it sounds like it offers more flexibility.

Okay, so obviously I am a great artistic talent. JK
http://imgsnap.com/image/g15

I don’t know Autodesk yet, so I just banged out this ugly sketch in MS paint. This is my design so far. I have put it together in my mind prior to sleep over the course of the past month or so.

An interesting point, the outer keys 5,6 I have read ,7, and eight will need to be cracked open and modded for lower than stock actuation force. I have read that this is theoretically possible. It will be necessary to have very low actuation force, such as 20 g, so that when extending a finger to activate an outer key, the user does not inadvertently depress an inner key because of the equal and opposite force.

As far as the hand rest goes, I’m not sure it’s needed. But it may help with stability for when the user needs to extend fingers to activate the outer keys. There may be additional necessary structural points for this functionality. For example there may need to be some kind of wrist strap or something to act as a mechanism for opposing force when extending fingers to hit the outer keys.

I’m thinking that I’m actually going to have to make the first prototype out of clay and popsicle sticks or something just to test the hand mechanics of this thing.

Why the pistol grip design instead of just something like the razor Orbweaver? That would take three pages of writing to explain. In summary, extensive history and understanding of my own tendinitis injuries, a pretty good understanding of the body through the practice of yoga and other fitness activities with little formal study in medicine, 35 years of gaming experience including almost 3 years of league of legends...  The list goes on

Offline 3K

  • Posts: 279
  • Location: Germany
After thinking about your design and trying out hand positions I drew something up.

More


I noticed that the hands starting position, when typing on an usual '2D' keyboard, is mostly that one that seems most comfortable to the user. Same thing applies to firearms like pistols - the grip is designed to feel comfortable, optimized for pulling the trigger. This is the point where you could change your design.
While being optimized for pulling the trigger, a pistol is not designed for pushing a trigger. This does not mean it is not possible to push a trigger/ button - with the current design one movement would just be more tiring for the hand, than the other.

That's why I changed the needed starting angle of the finger in this sketch. If you let your hand rest on the table with your muscles relaxed, the fingers will most likely take the shown position - this should be the starting position from which the fingers will travel to actuate the keys in the opposing rows.

Also I found it hard to include keys 8-10 in the sketch, so I left em out.

                   Model M '88    | Model M SSK '87 | HHKB P2  | Zowie FK1

Offline Camineet

  • Thread Starter
  • Posts: 287
Bro, you’ve got it. This is exactly what I’m trying to build :thumb: You seem to have come to the same conclusion as me about the hand’s neutral/at-rest position - the position in which the hand is most comfortable and best able to exert force on keys with the least amount of trauma unto the fingers.

Bravo on these sketches. Wish I could draw like that.

I'll be in touch with you guys when the parts start to arrive. I placed my order for the breadboard, wires, and cherry switches. And I'll place my order for the Leonardo board in the next day or two :cool:

Offline Camineet

  • Thread Starter
  • Posts: 287
See the distance between the thumb and the index finger? I intend to make that distance as short as possible. That's why I'm interested in the PSP Vita analog stick. I need to go to the electronic shop nearby and test it first.

Offline Camineet

  • Thread Starter
  • Posts: 287
reposting your sketch so it shows immediately without being hidden behind that 'more' button
108585-0

Offline Camineet

  • Thread Starter
  • Posts: 287
Just checked Amazon order of Leonardo board. The board shipped and I noticed a strange estimated delivery date of nearly one month away. Turns out the Amazon listing for the Leonardo board is for a seller in the UK. I strongly prefer buying from Amazon, and this particular purchase save me two dollars compared with the sparkfun price.But this was a pretty lame mistake that is going to cause me to be twiddling my thumbs for the next three weeks or so. :mad:

I'll be in touch when the thing finally arrives.

Offline PikKirby

  • Posts: 12
  • Location: Canada, B.C.
  • cawcaw
Hmm.. wow this looks incredibly interesting. I've also daydreamed of a potential "2D" type esque.. almost exactly identical actually. Aside from the thumbstick.

From my testing though I noticed for the "upper" keys, it seemed more natural to have the keys position in the middle phalanx of the hand.

I drew up a quick dirty image.


One would assume that the keys would/should go where 1 is, parallel to the lower keys. But like I said, (possibly personal preference) I found the keys for the upper portion to be more comfortable when placed on the "little last nub" of your fingers like in the image (I have no idea what that part of the finger is specifically called.)

I found that if the upper keys were just parallel of the bottom ones, that the contact for them would be my fingernails; which are not very optimal... nor comfortable.

An option to make the upper keys, adjustable (Both X&Y?), may be a good idea.


Try testing it out, maybe it's just me.
« Last Edit: Fri, 21 August 2015, 00:58:17 by PikKirby »

Offline Camineet

  • Thread Starter
  • Posts: 287
Bro, this is a great enhancement to the design, thanks for it.

Indeed, I also agree that the outer keys would be much more comfortably and effectively actuated with the last knuckle rather than with the very ends of the fingers which would essentially be using the fingernails as you said.

Small update: since my Leonardo board is nowhere to be seen and isn’t even scheduled to arrive for another couple of weeks at least, I’m going to start focusing on the form factor/housing aspect of the project.

So, in the next few weeks I hope to mold an initial design from sculptors Clay and try sticking the keys onto it to get a basic working design for ergonomics and physical functioning.

I have just now ordered a lump of clay from Amazon, and it should arrive middle of next week. Perhaps if I can get the basic design together, I can then move on to learning Autodesk a little bit. By the time I’m finished with that phase of the project, the Leonardo board should finally roll in from the UK sometime in the third week of next month.

I’ll be in touch with updates as I have them.

Offline 3K

  • Posts: 279
  • Location: Germany
So, in the next few weeks I hope to mold an initial design from sculptors Clay and try sticking the keys onto it to get a basic working design for ergonomics and physical functioning.

I have just now ordered a lump of clay from Amazon, and it should arrive middle of next week. Perhaps if I can get the basic design together, [...]

You could just use cardboard!

                   Model M '88    | Model M SSK '87 | HHKB P2  | Zowie FK1

Offline Camineet

  • Thread Starter
  • Posts: 287
lol

Offline Camineet

  • Thread Starter
  • Posts: 287

just ordered the PS Vita parts to do this:


http://xim4.com/community/index.php?topic=31390.0

Offline neverused

  • Posts: 572
I'm not sure if you have looked into it but the old psp analog nubs are cheap and we'll documented as well, especially in use with the arduino.

Offline Camineet

  • Thread Starter
  • Posts: 287
Thanks for the feedback. From what I've read the PS Vita sticks are much nicer than PSP.

I Gamed on a PSP for a few years, and those sticks are definitely not gonna work as a long-term solution for camera control in League because they're stiff and just kind of crappy.

Since this project is for the purpose of trying to maximize the lifespan of the joints in my hands, I will go to some significant trouble to get the nicest components working on this controller.

It certainly would be nice if the PS Vita sticks didn't have these ass hat ribbon cables that require all this modding  to repurpose them.

I'm hoping i can get the PS Vita sticks to work because they're the shortest nicest sticks I'm aware of.  Short is important for keeping the thumb as close to the neutral/at-rest position as possible.  The usual analog sticks sold for arduino projects are pretty much the same as the Dual Shock 1,2, or 3 sticks, which appear to be something like 3 or 4 times taller than the PSP Vita sticks. 


Offline hanya

  • Posts: 132
  • Location: Japan
I bought PS Vita Joystick from aliexpress at about $4.5 each. But they have not used on my project yet.
In my opinion, the connector for the joystick is AVX 046277006001883+ that can be by in mouser.

Reently Alps listed PSP joystick and PS Vita 2000 Joystick on Japanese site. PS Vita 2000 Joystick has different pinout from PS Vita 1000 Joystick.
PFU HHKB JP, Sanwa MA-TB38 trackball

Offline Camineet

  • Thread Starter
  • Posts: 287
Easier pinouts like the ones on the PSP would definitely be nice :thumb:

Offline Camineet

  • Thread Starter
  • Posts: 287
Hey Dawgs, I just received the Leonardo board ^-^

Didn't think it would arrive so soon because Amazon said it would take until the middle of next month :-[

Of course, I have no clue what to do with this thing and have to do some research on the most basic steps to get started connecting it to my PC and such.

I'll be in touch when I have made some progress :p

Offline Camineet

  • Thread Starter
  • Posts: 287
Good news, I was able to install the Leonardo on my PC and get the Blink example to work ;D

Now I will probably need some help on the next steps. I have here now the breadboard, the jumper cables, the cherry red switches, and what appears to be a working Leonardo board.

Can you guys tell me what I should do next when you have a chance?

Offline Camineet

  • Thread Starter
  • Posts: 287
During the past week I have received the Clay and made the first basic design. It seems that Clay was a good way to go because I was able to make a shape that is perfectly molded to my hand.

There’s no point in sharing pictures because it just looks stupid and ugly-just a lump of clay with keys stuck to it.

I just now ordered some sculpting tools in order to be able to better work with the material. I have a plan to make a skeleton version with the Clay and some ice cream sticks to help support the structure and form. Once the skeleton form of the controller is finished, I plan to fire it in the oven to make a permanent hard base structure. Thereafter, since I don’t have any other options I can think of that are viable, I plan to just add more clay on top of the base structure, and stick the keys onto it by embedding them into the Clay and then layering some more clay over the wires that are soldered to the switches to cover them up. Maybe later I can do something more refined, but as far as I can tell, this approach is the fastest way to get me back into the game.


I am now still in need of help getting started on how to wire up the cherry switches to the breadboard and Leonardo. Would much appreciate some help with this area of work.

Offline suicidal_orange

  • * Global Moderator
  • Posts: 4771
  • Location: England
Interesting project, not sure why you went with the Leonardo though - it's rather large for a handheld!

If you want another options for the body you might like to look into Polymorph ('Friendly Plastic' if you're in the US) - it's not the easiest stuff to use as it only sticks to itself when both parts are hot, but would be great once you got it right and you could adjust the spacing between the two parts once it's made.

Also worth a mention is Sugru - if you have lots of money to throw at the project you could build the whole body out of it, but I would use it to add a nice rubbery grip to your clay or plastic base.

Unfortunately you can't easily connect Cherry switches to a breadboard as the pins don't match but you can just connect where they would be using a wire to test your code, otherwise you'll need get some little switches made for breadboard.  You could solder wires to the real switches but you'd need to be careful as the legs are thin and aren't meant to bend so they snap quite easily.

Have you read some tutorials on switches and the like?  If not this one is as good as any.  The only difference when using an external breadboard is that you have "rails" down the side and/or end, usually you connect the red to your voltage (5v pin) and black to ground (GND pin) so they are easily available everywhere on the board.
120/100g linear Zealio R1  
GMK Hyperfuse
'Split everything' perfection  
MX Clear
SA Hack'd by Geeks     
EasyAVR mod

Offline Camineet

  • Thread Starter
  • Posts: 287
Thanks for joining this discussion with this helpful post. It’s much appreciated.

Interesting project, not sure why you went with the Leonardo though - it's rather large for a handheld

I am noob, so I don’t really know what’s available. I read that the Leonardo can easily be recognized by Windows as a game controller, so I went with that. As far as size goes, it’s not an issue because the setup will be handset => small project box => PC

The other materials you mentioned may in fact be very helpful for the final layering over the fired clay instead of just more clay, and I’d like to give it a try-I’ll probably go with Sugru.

The things you wrote about connecting cherry switches has made me realize that I need to buy some cheapie Arduino buttons-those little black ones that you see around. I can use those buttons for prototyping on the breadboard just so I can learn how to get this thing to work. And later I can change over to the cherry switches with soldering and such.

I’ll get to looking at the tutorial you linked in the coming days. Thanks again

Offline neverused

  • Posts: 572

Offline Camineet

  • Thread Starter
  • Posts: 287
Re: game controller build thread (PS Vita analog stick, Cherry Red, Leonardo, LoL)
« Reply #30 on: Tue, 01 September 2015, 22:59:42 »
Oh yeah, I saw that indestructible before. There’s another one like it for adding an analog to the razor orbweaver.

Okay so I had a chance to look at this tutorial

http://www.ladyada.net/learn/arduino/lesson5.html

I will be working on this one for a while. I can see now that I probably should have done something like this first. But I really scoured the Internet in prior weeks and didn’t find anything helpful like this, so I resorted to spamming messages on forums. I think this tutorial is going to be helpful. I’ll go ahead and get set up to order the parts for it in the coming days..

I don’t really understand how a proto-Shield fits into the situation. What is the difference between a proto-Shield and the Arduino board itself, and how do they work together with a breadboard? I have just briefly looked over the tutorial. I’ll have another look and see if I can start to figure out this very basic stuff and order all the parts to get started.

Offline Camineet

  • Thread Starter
  • Posts: 287
Re: game controller build thread (PS Vita analog stick, Cherry Red, Leonardo, LoL)
« Reply #31 on: Sun, 20 September 2015, 23:14:02 »
Small update.

Found a guy in Finland who has agreed to build this part for me for 50 bucks.

http://xim4.com/community/index.php?topic=31390.0


Next thing I have to do is buy all the parts and tools to be able to solder. As I'm sure you all know, something I have just discovered after receiving some more parts recently, I can't even begin playing around until I assemble a proto-Shield, which requires soldering.

That's all for now. I really should be playing around more with the clay. I've got my hands on one ice cream stick, along with a set of sculpting tools. But haven't had a chance to go back to work on the clay yet.

Offline blahlicus

  • Posts: 17
  • Location: hong kong
    • UniqueK | DIY keyboards, etc
Re: game controller build thread (PS Vita analog stick, Cherry Red, Leonardo, LoL)
« Reply #32 on: Tue, 29 September 2015, 03:47:27 »
hmmm

this is a very interesting concept

do you have any thoughts on the manufacturing techniques needed to form an ergonomic hand "pistol grip"?

ergonomics are key so laser cutting would be out right away, CNC will probably not work due to the large amounts of curves, 3d printing would not be suitable for mass production and injection moulding would require a large seed fund

we need to think of a way to produce this thing without it being too cost prohibitive, perhaps resin cast moulding?

Offline Camineet

  • Thread Starter
  • Posts: 287
Re: game controller build thread (PS Vita analog stick, Cherry Red, Leonardo, LoL)
« Reply #33 on: Tue, 29 September 2015, 17:00:32 »
Thanks for joining the conversation.

we need to think of a way to produce this thing without it being too cost prohibitive, perhaps resin cast moulding?

I like your thinking.  As I mentioned before, I’d like to do Zero Impact Gaming company at some point in the future and would need to get some of these questions answered along the way.  As far as cost prohibitive, man I’d pay something like 2 grand USD to get back into LoL TODAY if it were possible.  I imagine many of the 20 year olds who will spend the next decade banging their fingers into rubber domed keyboards to play LoL will be very happy to pony up a tidy sum for a viable way to continue playing this wonderful game into middle age when their fingers start to fail.

I’ve already prolly sunk about $150 in cash and a few hundred in opportunity cost just on the time I’ve spent designing in my head and fiddling around on forums, product pages, and with the actual parts that have arrived.

Anyway, manufacturing is fun stuff to think about and I'd like to hear more.

For now I need to learn how to use the dremmel –like tool I bought on Amazon to cut some skeleton parts to go inside the clay. 


Offline blahlicus

  • Posts: 17
  • Location: hong kong
    • UniqueK | DIY keyboards, etc
Re: game controller build thread (PS Vita analog stick, Cherry Red, Leonardo, LoL)
« Reply #34 on: Wed, 30 September 2015, 00:35:57 »
hey, just so you know, i am the owner of http://uniquekeyboard.com/store so i think i could give an accurate enough cost analysis on keyboard manufacturing

i mentioned injection moulding as cost prohibitive because getting an injection moulding manufacturing process started takes anything from ~50k to 120k, not ~5k, and that would need to be a large volume production, so you would need to be able to sell large volumes

i think you could get away with using a 3d printer for prototyping, then perhaps push the product to crowd funding?

for small volume sales, you are really looking at resin casting/some kind of casting since thats basically the only reliable method for creating durable curvy shaped objects without mass production

Offline Camineet

  • Thread Starter
  • Posts: 287
Re: game controller build thread (PS Vita analog stick, Cherry Red, Leonardo, LoL)
« Reply #35 on: Wed, 30 September 2015, 18:39:19 »
glad to have a friend in HK.  looks like a nice operation you've got going /w uniquekeyboards. 

yeah, I think just a 3D printer will be fine for the early adopters since they're usually willing to pay premium prices for innovative stuff.  i'm sure there won't be a mass market for this kind of product for at least 3 more years.

let's stay in touch and see what happens with this project.  i imagine i'll finish the controller and use it for a while with perhaps an occasional inquiry because of this thread.  and then in something like 2018 to 2020 I think we'll see the massive wave of now 25yr olds who will then be 30yrs old and have overuse injuries/RSIs ...they'll start to hit the boards looking for solutions as I did. 

Offline neverused

  • Posts: 572
Re: game controller build thread (PS Vita analog stick, Cherry Red, Leonardo, LoL)
« Reply #36 on: Wed, 30 September 2015, 19:10:01 »


Small update.

Found a guy in Finland who has agreed to build this part for me for 50 bucks.

http://xim4.com/community/index.php?topic=31390.0


Wait. $50 for a connector with 4 wires? Lordy me

Offline Camineet

  • Thread Starter
  • Posts: 287
Re: game controller build thread (PS Vita analog stick, Cherry Red, Leonardo, LoL)
« Reply #37 on: Wed, 30 September 2015, 19:22:42 »
lol, i know it's pretty silly

Offline hanya

  • Posts: 132
  • Location: Japan
PFU HHKB JP, Sanwa MA-TB38 trackball

Offline blahlicus

  • Posts: 17
  • Location: hong kong
    • UniqueK | DIY keyboards, etc
hmmm, i'll see if i could create a prototype no joystick version of this thing with the laser cutter and have my friend custom sculpt wooden handles for me just to test out the idea

i have all the materials i need to build this thing anyway so you know, might as well

im slightly worried about misclicks (popping zhonyas at the wrong time because my index finger flexed too much seemed like a mood breaker) and using the thumb for summoner spells (cant flash->ignite)

are you from hong kong too Camineet?

Offline Camineet

  • Thread Starter
  • Posts: 287
Hey blahlicus, naw i’m from detroit :/
But i have been to HK once on a visa run while living in shanghai back in ’09 or so.  Was only there in HK for like an hour or so though.

Hope to return to china in late 2016 after a 5 year project back home is complete

It’s great if you can also work on the controller with a different approach of wood and laser cutter. The more eyes on this project, the better for all aging gamers out there.

Didn’t realize you were also a LoL player. It’s been months since i flash-> ignited.  My god what i’d give to do that right now. Don’t worry about misclicks. Once xpadder is paired with the leonardo board, many possibilities come about with alt key mappings.  For example, hold down a thumb button on top for alt key map...now index and middle finger go from Q W to Flash and 2nd summoners.  Perhaps flick your index outward for zhonas.

I know from experience.  I used to play with Xbox controller in left hand and Logitech M570 in right hand.  LoL is much better with a controller or an orbweaver or with what we are trying to build. ESPECIALLY because you get true camera control /w thumb.  Not that laborious thing of pulling your pointer away from the action to the edge of the screen and ‘bumping’ it outward.  Rather, in case you haven’t somehow played in this way, let me tell you, you get an elegant continual feathering of fine camera control – positioning the camera to a tactically optimal position at all times – an activity which is INDEPENDENT of all other commands.  Its wonderful although i have not managed to convince any of my LoL friends of this or anyone else in the community for that matter. 

Anyway, point was that /w xbox controller and xpadder, i had something like 21 buttons fluidly available via alt keymaps activated by bumper and trigger.  Same on orbweaver using the thumb buttons to bring up alt key maps.  Unfortunately, due to age and the intensity of LoL along with the non-optimal ergonomics of both of those devices... RSIs.

Spectated a game of LoL last night.  You’d think i’d start mising it less. Not so.  I miss it more and more :/

And it even seems like the game is getting better with the new champs and visual upgrades.  Man, the game is looking so good just 60 days later...

Offline 3K

  • Posts: 279
  • Location: Germany
I know from experience.  I used to play with Xbox controller in left hand and Logitech M570 in right hand.  LoL is much better with a controller or an orbweaver or with what we are trying to build. ESPECIALLY because you get true camera control /w thumb.  Not that laborious thing of pulling your pointer away from the action to the edge of the screen and ‘bumping’ it outward.  Rather, in case you haven’t somehow played in this way, let me tell you, you get an elegant continual feathering of fine camera control – positioning the camera to a tactically optimal position at all times – an activity which is INDEPENDENT of all other commands.  Its wonderful although i have not managed to convince any of my LoL friends of this or anyone else in the community for that matter. 

So you basically controlled the cam with the left hand using a stick while at the same time aiming attacks with the mouse on the right? Does this work out of the box? I thought both inputs would be registered equally by the computer, making them overlap and not work this way?
« Last Edit: Sat, 03 October 2015, 14:19:48 by 3K »

                   Model M '88    | Model M SSK '87 | HHKB P2  | Zowie FK1

Offline Camineet

  • Thread Starter
  • Posts: 287
hanya,

Just like https://oshpark.com/shared_projects/2p7rQYx8 would be enough.
Connector:
http://www.mouser.com/ProductDetail/AVX/046277006001883+/?qs=%2fha2pyFadugU9ExvltPLtf03k1mhZoZgBfiT04U%252bjLiCwPsLFCj2Qw%3d%3d

these parts might be very helpful.  i hope to be able to understand them better.  maybe someone here with better understanding of electronics can assist.

Offline Camineet

  • Thread Starter
  • Posts: 287


So you basically controlled the cam with the left hand using a stick while at the same time aiming attacks with the mouse on the right? Does this work out of the box? I thought both inputs would be registered equally by the computer, making them overlap and not work this way?

3K,

I think i know what you mean about the overlapping.  But in practice, it brings about something wonderful.  Yes, when using arrow keys or a joystick to move the map, the pointer comes along for the ride. It does not get left behind in its position, but rather remains in its relative position on screen.  You can therefore place the pointer onto anything by only using camera control if you really wanted to.  Try it.  And yes, it is out of the box /w camera unlocked as anyone other than a 1st time player would choose.

Why is this helpful?  Something outstanding happens with the combo of joystick and mouse, which is a combination very similar to WASD and mouse control in an FPS.  One movement is the macro or large imprecise movement control while the other movement allows for the finer control. 

With this combo and league, you end up using the camera control continuously, which also moves the mouse pointer in an imprecise but non-laborious way, while making quick, purposeful, precise pointing commands with the mouse. The result is that you move the mouse pointer vastly less often and with much less travel distance than the conventional way of using the mouse without assisting its movement with any complementary movement. Another way to state this would be that you not only have continuous independent direct camera control, you also get a significant pointer control assist that takes something like 70% of the labor out of moving the mouse pointer because pointer control is essentially done with two hands instead of one.

The difference is night and day.  How big of a difference?  imagine playing an FPS without any WASD controls for walking, and you only had a mouse to control your reticule and could never strafe    

Offline blahlicus

  • Posts: 17
  • Location: hong kong
    • UniqueK | DIY keyboards, etc
the laser cut + wood approach will only be used for prototyping since its basically impossible to mass produce those, i just have better accessibility to that compared to 3d printing

yeah i totally get what you mean with the camera controls, being able to use a joystick with it must be nice since your cursor never have to touch the screen edges and you will also probably get better situation awareness

i dont think i will enjoy playing league with alt+key combos though, you get delays with key combinations and its easy to get confused with key combos especially when you have to do it quickly (mid main over here heh), my main worry of the current design is the top keys, i just feel it might be too easy to accidentally hit the top keys, really need to get a prototype out and use it for a while to get a feel of it though

i think i have a good solution for summoner spells, see picture below


i think its harder to mispress those keys than the keys on top

Offline Camineet

  • Thread Starter
  • Posts: 287
oh wow, this isn't just a good addition for summoner spells, it's a good design addition in general :thumb:

i never thought of having yet another dimension of finger travel to be used for another set of buttons. nice one ;D  this will just give much more options for keys without relying too much on alt keymaps.  item activations, laughs, taunts, dance, etc. will be more readily accessible.

when i get the clay version together, you'll see that it's basically impossible to hit the top keys by accident because they are actually higher than the vita analog stick.  you have to pick up your thumb a bit to lay it onto a top key and depress it.  otherwise, you just bump into the side of the keycap when moving your thumb side to side. 


Offline blahlicus

  • Posts: 17
  • Location: hong kong
    • UniqueK | DIY keyboards, etc
oh! i think we are having a misunderstanding, i meant top keys as in the keys that you hit by straightening your fingers, the "item" keys

i felt those would be easily mispressed

Offline Camineet

  • Thread Starter
  • Posts: 287
ah yes, indeed there is the possibility of that.  wish i could get my version together quicker to test these things.  amazon order /w cutting tool for next steps just shipped

Offline suicidal_orange

  • * Global Moderator
  • Posts: 4771
  • Location: England
I've been thinking about this and how close it is to being able to use two as a full keyboard, so why not add another switch per finger?


In place of the joystick I'm thinking three switches per thumb which still only takes the keycount to 38, but adding two imaginary 5th fingers (operated by the index fingers being raised toward the thumb) would make 46, which is more than a JD40...
120/100g linear Zealio R1  
GMK Hyperfuse
'Split everything' perfection  
MX Clear
SA Hack'd by Geeks     
EasyAVR mod

Offline Camineet

  • Thread Starter
  • Posts: 287
oh yeah this is great xD

i can't make anything other than the 2d version /w my planned clay efforts, but maybe you and the other guys working on different material approaches can do this kind of advanced functionality version :cool: