Author Topic: I made a case for my macropad that I'm making  (Read 2730 times)

0 Members and 1 Guest are viewing this topic.

Offline Thomas73951

  • Thread Starter
  • Posts: 28
  • Location: UK
I made a case for my macropad that I'm making
« on: Wed, 22 April 2020, 08:13:33 »
240492-0

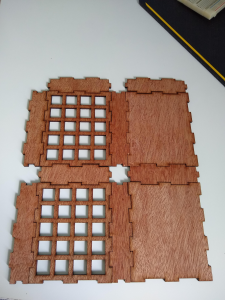
I made this laser cut case from 3mm plywood a little while ago from a simple net that slots together. Quite happy with how they turned out, the settings could do with being altered as some pieces are a little warped and it didn't cut all the way through the switch cutouts on the first one, but that can be fixed next time.
It's for the macropad prototype I made recently (https://geekhack.org/index.php?topic=105775.0) and will house a pcb (nearly finished designing it), a pro micro, and will of course also house mechanical switches. I could have made this a sandwich case which would have been easier as http://builder.swillkb.com/ makes all the files for me but this uses less plywood. I really don't know which method I prefer. I will still use the cases I just made but I might make further cases in the sandwich style instead. 
I have actually been using the initial prototype I posted about recently and it's amazing how powerful qmk and ahk are together.
Oh and I now have far too many small wooden squares.
240494-1
« Last Edit: Wed, 22 April 2020, 08:15:58 by Thomas73951 »

Offline abstractkb

  • Posts: 25
    • Abstract Keyboards Homepage
Re: I made a case for my macropad that I'm making
« Reply #1 on: Tue, 28 April 2020, 15:20:02 »
When I laser cut acrylic I end up with hundreds of those little squares!  Still looking for something to do with them other than trash.

Offline Zustiur

  • Posts: 235
Re: I made a case for my macropad that I'm making
« Reply #2 on: Mon, 11 May 2020, 17:40:55 »
You could glue pairs of the squares together, burn does into them and have your own set of dominos.

Offline suicidal_orange

  • * Global Moderator
  • Posts: 4771
  • Location: England
Re: I made a case for my macropad that I'm making
« Reply #3 on: Mon, 11 May 2020, 18:31:01 »
You wasted a bit - the top and bottom ends could have been side by side :P

Seriously though it's a good design and should be quieter than a sandwich case, if that's something you want.
120/100g linear Zealio R1  
GMK Hyperfuse
'Split everything' perfection  
MX Clear
SA Hack'd by Geeks     
EasyAVR mod

Offline Thomas73951

  • Thread Starter
  • Posts: 28
  • Location: UK
Re: I made a case for my macropad that I'm making
« Reply #4 on: Tue, 12 May 2020, 08:47:55 »
When I laser cut acrylic I end up with hundreds of those little squares!  Still looking for something to do with them other than trash.
You could glue pairs of the squares together, burn does into them and have your own set of dominos.

Yeah I could make a domino set actually. I think that would work quite well, but I don't have enough tiny squares yet. I guess I have to make more keyboards ;)

Or I could paint them and arrange them in a grid to make a chess board for example but idk if that would work very well. Perhaps doing it with two different colours of wood so they didn't have to be painted.
 
I could even make some artisan keycaps. If I add a cutout in some of the pieces for the cross part of the switch stem and a gap around that allows the keycap to go down. When I next cut some out and if I get the tolerances accurate I could then stack them and glue them together. Perhaps I could then sand them, shape them and varnish them. It would be a little small tho as normal keycaps have a small gap between them and the switch cutouts have a much larger gap between each switch.
242238-0
This is the height of 4 pieces against a R4 OEM keycap.

Hmm something tells me that the dominoes are a more practical idea and use of these little squares.

Offline Thomas73951

  • Thread Starter
  • Posts: 28
  • Location: UK
Re: I made a case for my macropad that I'm making
« Reply #5 on: Tue, 12 May 2020, 09:36:38 »
You wasted a bit - the top and bottom ends could have been side by side :P

Seriously though it's a good design and should be quieter than a sandwich case, if that's something you want.
Thanks  :)
I am assuming that you mean to arrange them like this. That is enough for two of the cases. That does use less material though which is cool :)
242242-0
I think I can reduce the height of the case from around 25mm to 15mm. I think that's enough space for switches, pcb and a pro micro below. It also makes adding a usb cutout more accurate than if it was a 5 layer (3mm each) sandwich case.

I really like quiet keyboards, but I'm curious as to why you think this method would be quieter than a sandwich case.
If it was compared to a sandwich case with 1 bottom layer, 1 plate layer, and 3 open layers (just the outer rim). The internal volume would be the same, and therefore the same amount of sound damping material can be put inside. I'm not sure about what other factors affect the sound that would be relevant here.


The main issue I have with this case design is if it's arranged and cut as shown above because of the kerf, the pieces need something to hold them together as there isn't enough friction between the joints. It is just about stable enough to put it together and take a photo of it. I could glue it together, but that makes it impossible to fix any issues or modify anything as it's stuck together.
Maybe I could glue the top to the 4 sides and use magnets to hold the bottom in place, but I'm not sure where I would put the magnets.

Instead, I could make the sides much thicker (around 6mm maybe), and put self tapping screws into the top (and bottom) plates and then into the sides. Although, the wood would probably splinter and break apart as the screw goes into the side of it. The layers of the plywood would probably split apart as the screw goes into it, also there is probably a limit to how many times a screw can be put in before the hole is too big for the screw to hold properly. The sandwich case is probably a better design but it uses about double the material and it needs standoffs.

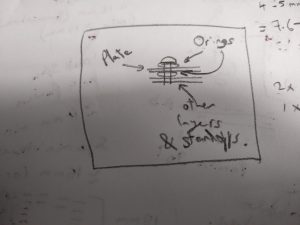
I did have a wacky idea the other day to put o rings on the screw around the plate to sort of make a gasket mount. It would leave an air gap between it and the other layers however. I don't know how well it will work to alter the sound and feel unless I try it. If the screws are around the outside of the keyboard then the switches and PCB would only be in contact with the o rings and maybe some damping material below the PCB. It might also need a larger hole so the screw isn't in contact with the plate layer and also some washers to hold it in place as the inner diameter of the o rings might be larger than the diameter of the screw head.
242244-1