Author Topic: Noppoo Choc Mini NES Themed Mod | My 1st Mod | Need Help/Advice  (Read 3634 times)

0 Members and 1 Guest are viewing this topic.

Offline Bogus Bill

  • Thread Starter
  • Posts: 8
  • Location: The Netherlands
EDIT (27/05/15): Scroll down for "work in progress" pics.

Hé Geeks and Hackers!

Short Intro.
About two years ago I bought two Noppoo Choc Mini Chery MX RED. They've always worked just fine, but lately they both seem to show some minor performance issues. Also, I want to try out other colour switches. Now, since I got two of them and they're most likely to be replaced soon I thought I'd try some modding.

It's my first attempt at modding a keyboard and I could use your help! Thanks in advance!

The Plan.
What I would like to do is make a NES(Nintendo Entertainment System) themed mod. First I only thought of doing a spray 'n' paint job. But when I googled for a bit I found that people also implemented detachable USB cords and it got me thinking about a NES themed detachable cord.

Paintjob.
I took the whole keyboard apart except for the switches and the circuit board, ready for a paint job. I'm not a professional and don't got a lot of money to spend, so I think a few simple cans of matte spray paint would be my way to go. If this is really really stupid of me and there is a better yet not very expansive way, please let me know.
Also, what would be the best way to go with getting the letters, numbers and symbols back on?

Cable Mod.
As I Opened up the board I found that it uses a simple internal USB header as expected since it connects with an USB to my computer. This is easy to convert to a mini-USB. But I'd like to convert it to a male connector from an old NES controller:

I figured this would be the easiest setup because female connecters of this same type already exist as converters to USB:


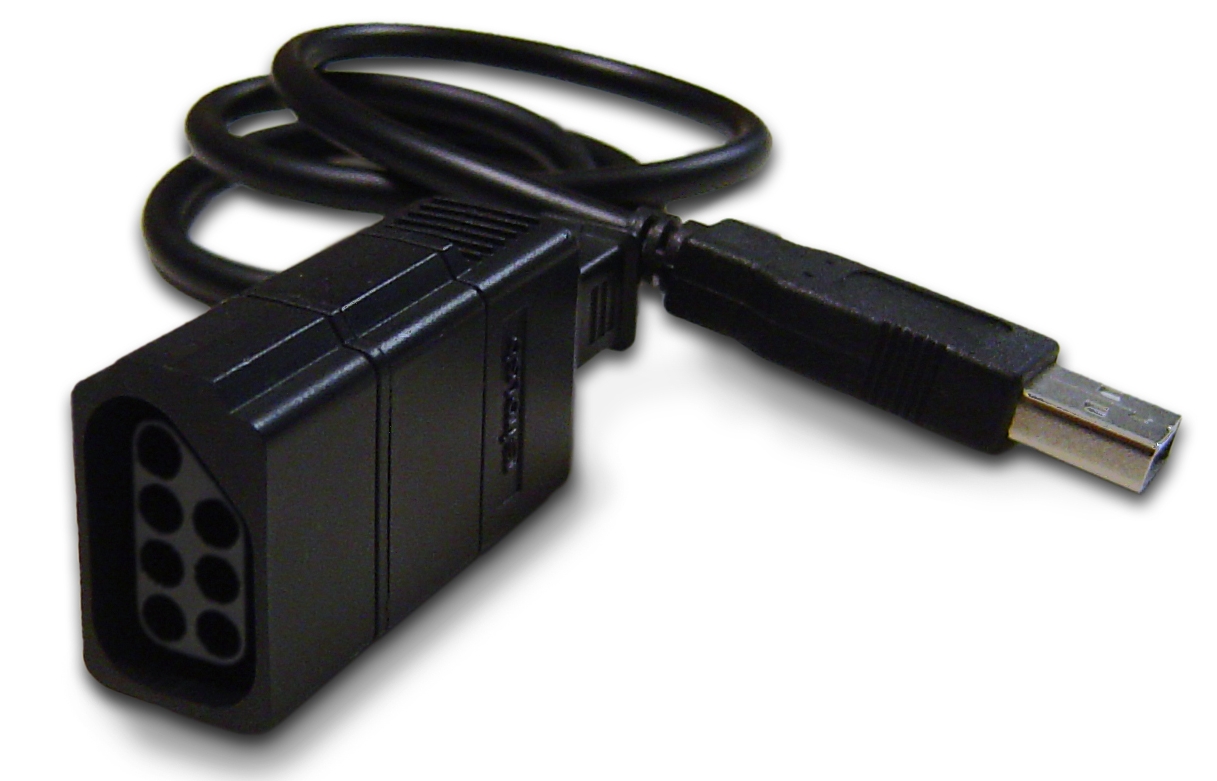
Would it be possible to craft a internal USB header to NES Male?
Would I be able to just order a NES Female connector to USB (as shown in the second picture) and use it or do I also have to craft that myself? If so, how?

This cable mod is just for show, altho the detachable is a nifty extra. I know using just USB connectors would make a lot more sense, but I'd like to try it just because of the extra NES touch.

Final words.
If people are willing to help me out, that would be so awesome. I'm still young but very passionate about this kind of stuff, this project is just the start for me that eventually might grow into a big hobby of mine. Any advice given is very very welcome. Feel free to rand if thats how you feel, I'm not easily bruised and accept every kind of feedback!

Cheers!
~Bogus
« Last Edit: Wed, 27 May 2015, 15:25:23 by Bogus Bill »

Offline suicidal_orange

  • * Global Moderator
  • Posts: 4771
  • Location: England
Re: Noppoo Choc Mini NES Themed Mod | My 1st Mod | Need Help/Advice
« Reply #1 on: Tue, 26 May 2015, 17:04:33 »
Welcome to Geek Hack, this looks like an interesting first project :)

I don't do paint so I'll leave that to someone else, but I can comment on the wires.

You can certainly run a standard USB connection through that connector but the pre-made one you've found is designed to communicate with a controller with it's own language, not a USB device like a keyboard.  To use it you would need to take out the electronics and connect the four pins from the USB wire directly to the connector, so unless you like the case you'd may as well get a bare connector (if one is available)  On the other side you would need to connect the same pins on a wire from the USB header on the keyboard to the male connector.

One other thing to note is that USB sockets are designed to connect the power before the data wires so if all the pins in this connector connect at the same time you might have issues plugging the keyboard in to an already running computer.  I would keep 5v and ground in the same place and put the two data pins at the other end of the connector, then if you plug it in pointy end first it should work (it's only a matter of microseconds)

The biggest problem looks to be the size of the connectors - I don't think the keyboard case is big enough to fit one inside, so you will have a connector box hanging out which is more likely to get damaged than a fixed cable.  Or you could glue it to the back of the case and have a sideways detachable plug but that's not like a NES...
120/100g linear Zealio R1  
GMK Hyperfuse
'Split everything' perfection  
MX Clear
SA Hack'd by Geeks     
EasyAVR mod

Offline Bogus Bill

  • Thread Starter
  • Posts: 8
  • Location: The Netherlands
Re: Noppoo Choc Mini NES Themed Mod | My 1st Mod | Need Help/Advice
« Reply #2 on: Tue, 26 May 2015, 17:28:03 »
Welcome to Geek Hack, this looks like an interesting first project :)

I don't do paint so I'll leave that to someone else, but I can comment on the wires.

You can certainly run a standard USB connection through that connector but the pre-made one you've found is designed to communicate with a controller with it's own language, not a USB device like a keyboard.  To use it you would need to take out the electronics and connect the four pins from the USB wire directly to the connector, so unless you like the case you'd may as well get a bare connector (if one is available)  On the other side you would need to connect the same pins on a wire from the USB header on the keyboard to the male connector.

One other thing to note is that USB sockets are designed to connect the power before the data wires so if all the pins in this connector connect at the same time you might have issues plugging the keyboard in to an already running computer.  I would keep 5v and ground in the same place and put the two data pins at the other end of the connector, then if you plug it in pointy end first it should work (it's only a matter of microseconds)

The biggest problem looks to be the size of the connectors - I don't think the keyboard case is big enough to fit one inside, so you will have a connector box hanging out which is more likely to get damaged than a fixed cable.  Or you could glue it to the back of the case and have a sideways detachable plug but that's not like a NES...

Wow, a reply already! Thanks man (also for the warm welcome)!

Sounds hella complicated what you are saying, I might just have to rip apart some cables and see if I can get a clear picture of how it looks and then read your guide again. I might get back to you with some questions and pics once I've taken a look. If you don't mind that is.

About the connector not fitting the case, you are correct; I knew that wasn't going to work and it as not my intention to insert that huge connector inside the board itsself. What I was thinking off is to connect the wires inside by soldering, then lead the cable outwards for like 10cm. Attatch the male connector there. So when its detachted, you'll have the board and a small cord, as if it was an actual controller (with a very short cord haha). Then make another lose cable with a female NES connector that receaves the male from the keyboard and on the other end an USB that pluggs into the PC (see second pic in original post). But as I understand from you, I will have to craft that cable myself?

Thanks once again! hope more people will join :D

Offline Bogus Bill

  • Thread Starter
  • Posts: 8
  • Location: The Netherlands
Re: Noppoo Choc Mini NES Themed Mod | My 1st Mod | Need Help/Advice
« Reply #3 on: Wed, 27 May 2015, 14:19:07 »
A few quick work in progress pictures of the paint-job. I ran out of cream white spray paint, so I'll have to continue tomorrow.
I also tried to get a delicate nickname print in red on the spacebar, but that went horribly wrong. I hope I'm able to get the paint off and start over on that. Any tips on how to handle a delicate print? I tried carving out a piece of thick paper and then spray, but it leaked all over the place. I can't use stickers cuz they remove the layer of paint.

Hope you can see the resemblance to a NES:


Also, my arrow-keys have a different angle by choice.

Offline CPTBadAss

  • Woke up like this
  • Posts: 14365
    • Tactile Zine
Re: Noppoo Choc Mini NES Themed Mod | My 1st Mod | Need Help/Advice
« Reply #4 on: Wed, 27 May 2015, 14:22:19 »
You could try using a stencil to paint something onto your spacebar then putting a clearcoat over it.

I'm interested in seeing how this turns out. NES is definitely something I'm into. Welcome to Geekhack :)

Offline neverused

  • Posts: 572
Re: Noppoo Choc Mini NES Themed Mod | My 1st Mod | Need Help/Advice
« Reply #5 on: Wed, 27 May 2015, 14:28:06 »
I know you may be on a budget, but you may want to look into a custom spacebar:

http://www.wasdkeyboards.com/index.php/products/printed-keycap-singles/custom-text-cherry-mx-keycaps.html

It shouldn't be too expensive.

Offline Bogus Bill

  • Thread Starter
  • Posts: 8
  • Location: The Netherlands
Re: Noppoo Choc Mini NES Themed Mod | My 1st Mod | Need Help/Advice
« Reply #6 on: Wed, 27 May 2015, 15:02:20 »
You could try using a stencil to paint something onto your spacebar then putting a clearcoat over it.

I'm interested in seeing how this turns out. NES is definitely something I'm into. Welcome to Geekhack :)
Thanks! Yea, the problem I run into tho is that a custom made text/logo is a pain in the ass to make since it's such a small object. the spacebar is like 1cm high and gutting out such small letter is just.. horrible :D. I'll look into it tho! thanks.


I know you may be on a budget, but you may want to look into a custom spacebar:

http://www.wasdkeyboards.com/index.php/products/printed-keycap-singles/custom-text-cherry-mx-keycaps.html

It shouldn't be too expensive.
Has to be shipped to the Netherlands, cant immagine it being cheap XD. Also, I doubt that the colour of the cap would match the one I've used. I think WASD doesn't even support the spacebar for Choc Mini, so it wouldn't work out for me. Thanks tho.


Offline neverused

  • Posts: 572
Re: Noppoo Choc Mini NES Themed Mod | My 1st Mod | Need Help/Advice
« Reply #7 on: Wed, 27 May 2015, 15:05:11 »
Can you get a water slide decal, apply it to the vertical face of the spacebar and then cover that with a coat to protect it?

Offline Bogus Bill

  • Thread Starter
  • Posts: 8
  • Location: The Netherlands
Re: Noppoo Choc Mini NES Themed Mod | My 1st Mod | Need Help/Advice
« Reply #8 on: Wed, 27 May 2015, 15:23:25 »
Can you get a water slide decal, apply it to the vertical face of the spacebar and then cover that with a coat to protect it?

I'll look into that, thanks!


Offline Bogus Bill

  • Thread Starter
  • Posts: 8
  • Location: The Netherlands
Re: Noppoo Choc Mini NES Themed Mod | My 1st Mod | Need Help/Advice
« Reply #10 on: Wed, 27 May 2015, 16:31:24 »
http://m.instructables.com/id/LEGO-Game-Boy-Transformer-Official-Parts-List-/step12/Custom-Decals-Labels/

Very Nice! I will check the stores here in town tomorrow 1st. If I can't find it there I'll buy them off the webs.

Offline Bogus Bill

  • Thread Starter
  • Posts: 8
  • Location: The Netherlands
Re: Noppoo Choc Mini NES Themed Mod | My 1st Mod | Need Help/Advice
« Reply #11 on: Thu, 28 May 2015, 09:35:07 »
Welcome to Geek Hack, this looks like an interesting first project :)

I don't do paint so I'll leave that to someone else, but I can comment on the wires.

You can certainly run a standard USB connection through that connector but the pre-made one you've found is designed to communicate with a controller with it's own language, not a USB device like a keyboard.  To use it you would need to take out the electronics and connect the four pins from the USB wire directly to the connector, so unless you like the case you'd may as well get a bare connector (if one is available)  On the other side you would need to connect the same pins on a wire from the USB header on the keyboard to the male connector.

One other thing to note is that USB sockets are designed to connect the power before the data wires so if all the pins in this connector connect at the same time you might have issues plugging the keyboard in to an already running computer.  I would keep 5v and ground in the same place and put the two data pins at the other end of the connector, then if you plug it in pointy end first it should work (it's only a matter of microseconds)

The biggest problem looks to be the size of the connectors - I don't think the keyboard case is big enough to fit one inside, so you will have a connector box hanging out which is more likely to get damaged than a fixed cable.  Or you could glue it to the back of the case and have a sideways detachable plug but that's not like a NES...

Wow, a reply already! Thanks man (also for the warm welcome)!

Sounds hella complicated what you are saying, I might just have to rip apart some cables and see if I can get a clear picture of how it looks and then read your guide again. I might get back to you with some questions and pics once I've taken a look. If you don't mind that is.

About the connector not fitting the case, you are correct; I knew that wasn't going to work and it as not my intention to insert that huge connector inside the board itsself. What I was thinking off is to connect the wires inside by soldering, then lead the cable outwards for like 10cm. Attatch the male connector there. So when its detachted, you'll have the board and a small cord, as if it was an actual controller (with a very short cord haha). Then make another lose cable with a female NES connector that receaves the male from the keyboard and on the other end an USB that pluggs into the PC (see second pic in original post). But as I understand from you, I will have to craft that cable myself?

Thanks once again! hope more people will join :D

How about I order one of these(NES controller cable extension):

And only use the socket(female) and the plugg(male), throw the cable away.
Then mod the two in between my kayboard's USB cable?
Visual:
[Kayboard]---[NESmale] // [NESfemale]-------------[USB]