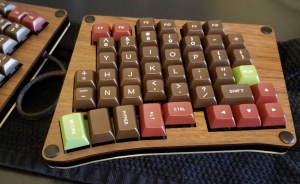
Author Topic: The SHARK (Split Hand ARc Keyboard) build log  (Read 9960 times)

0 Members and 1 Guest are viewing this topic.

Offline TD22057

  • Thread Starter
  • Posts: 177
  • Location: Southern California
The SHARK (Split Hand ARc Keyboard) build log
« on: Tue, 31 May 2016, 19:12:49 »
Introducing the SHARK (Split Hand ARc Keyboard)

OK - so it doesn't look like a shark or even remotely aquatic, and there isn't that much "arc" in the thumb keys, but I felt the acronym was just too cool to pass up.  So here it is:
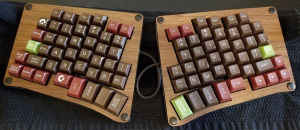
138534-0

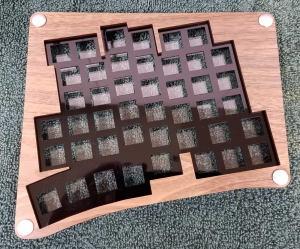
I'm very pleased with the result - the case looks fantastic and it turned out just like I envisioned.

HELP: I'm missing a few key caps for my 2nd keyboard so if you happen to have a 1u run, 1u tab, 1u del, 1u ctrl, 1.5u blanks (2) keys from DSA retro (or the 1/1.5u mods kits) that you'd be willing to sell, please PM me.

Background

I've been looking for a good, mechanical split hand ergonomic keyboard ever since my trusty Microsoft Natural died a few years ago.  I tried an Ergodox and a Kinesis but neither felt right.  So here's my version of a good split hand keyboard.  My goals were:
  • split hand, matrix layout, ~10 deg angle
  • close to a qwerty layout
  • consistent key caps (no R1 keys in the R4 row)
  • function layers for keys I use in programming: []{}()+-*/=\'~|
I work 1/2 time from home so I need to build two keyboards - one for work and one for home.  I was originally going to have it made out of steel and was looking a BigBlueSaw.  That lead me to design a symmetric layout because of the multi-unit price break they give.  But - after reading several threads on using plastic cases, I looked into using Ponoko which was going to be much cheaper so I decided to give that a try.

I lucked out and got two full DSA Retro key cap sets which makes doing a custom build much simpler.  The huge selection of cap sizes and the DSA profile means I could move keys around as much as I liked without worrying about cap row profiles and cap sizes.

Case and Plate

The case is a five layer design.  There is a clear acrylic 3 mm base, two black acrylic 3 mm spacers, a black acrylic 1.5mm switch plate, and a walnut veneer 3.5 mm top plate all laser cut by Ponoko.  I had them make a prototype out of cardboard (for about $20) so I could test all of the spacing and general layout which worked very nicely.
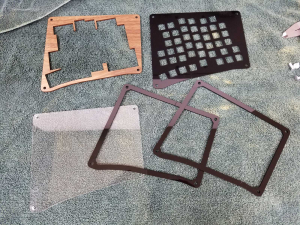
138536-1138538-2138540-3

The biggest problem with using plastic is the switch plate.  The 1.5 mm switch plate is very flexible.  Super-gluing the spacers to the switch plate helps a lot but I still had one part of the plate crack after inserting a switch (not a problem in the end as the super-glued spacers kept it rigid).  And many of the switches will pull out if I try to remove the cap.  I'll probably end up gluing the switches into the plate but I wasn't sure about that so I haven't done that yet.  Using a metal switch plate might be a lot simpler (but a lot more money).

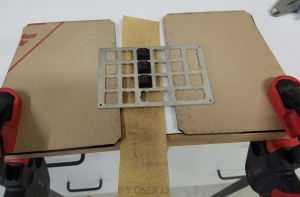
To keep the switch plate from bending while typing, I used two 3mm spacers.  The height of switches below the switch plate is ~6mm so the plastic posts on the switch rest against the bottom plate which eliminates any flexing after it's been assembled.  The switch leads are also too long so I cut every lead down below the plastic posts on the switches.  Another problem with plastic is that the sheets have a thickness tolerance of about +/- 10%.  My spacers came out to be about 5.8 mm thick and the switches were more like 6.2 below the plate.  I used an old number plate I had laying around to make the sanding jig shown below.  I little experimentation and I found if I used two spacers on each side (1 w/ the protective wrap still on it), I could reliably sand down the switch posts to 5.8 mm to match the spacer depth.  It took a little while (I did 180 switches, 3 at a time and clipped 4 leads/switch) but I think it was worth doing.
138542-4

Wiring

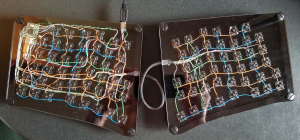
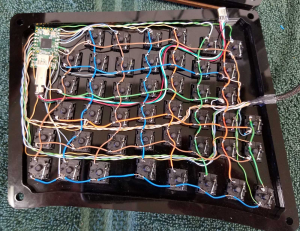
The switches I had all have diodes in them so I used those and hand wired the matrix together.  I've found the best wire to use is cat-5 cable.  You get 8 wires with different colors from each cable, they're very cheap, and you can get 26ga, 30ga, solid and stranded wire.  I ordered a 10' cat 5 cable with 30ga stranded wire, 26ga solid wire, and a USB cable from Monoprice for less than $10 which gave me all the wire I needed. 

I find soldering stranded wire to be a pain - the strands always get loose so I use solid wire whenever I can.  The row and column matrices are all down with 26ga solid wire.  The connections between the hands and to the Teensy are done with 30ga stranded wire to keep the size down.  It would be nice to have a detachable cable (I really like the ErgoDox Infinity system) but I didn't want anything that complicated so I ran 14 wires (7 twisted pairs) between the hands which worked fine.  It's definitely not as robust as a disconnectable cable but it should be fine for my use.  Wiring 22 stranded 30ga wires into a Teensy is a real test of patience...

I did one hand using the "mark and melt the insulation" technique and the other by stripping longer pieces of insulation, cutting them and sliding them back on the wire.  Melting is faster, but uglier and harder to get the gaps in the right places.  Stripping, cutting, and putting the insulation back on takes longer but looks nicer and is easier to get right the first time.

I cut a slot in both spacer layers (with a bandsaw) to accommodate the cable between the hands and hot-melt glued it in place.  The micro USB connector fits in a slot cut in one of the spacers and is also hot-melt glued.
138544-5138546-6

Conclusion

I'm still working on firmware options (using TMK) and I have one key that is blocking any other keys in the column (diode problem?) to debug but overall everything is working great. And I have to build a second board for work and make a small stand to tent the back up a little bit.  Overall I'm very pleased with the result.  I've attached the CAD file I used to do the design in case anyone is interested (if you want the Ponoko files split into layers, let me know).


Offline xtrafrood

  • formerly csmertx
  • * Elevated Elder
  • Posts: 2715
  • Location: Gainesville, FL
  • wildling
Re: The SHARK (Split Hand ARc Keyboard) build log
« Reply #1 on: Tue, 31 May 2016, 21:41:45 »
Well.. well.. I really like the layout. And the wood grain/Retro DSA set looks amazing on that keyboard.

Were you planning to devise a way to detach the two halves in the future?

Offline TD22057

  • Thread Starter
  • Posts: 177
  • Location: Southern California
Re: The SHARK (Split Hand ARc Keyboard) build log
« Reply #2 on: Tue, 31 May 2016, 22:04:30 »
Were you planning to devise a way to detach the two halves in the future?

I wish.  There are currently 14 wires going between the halves (6 rows, 8 cols) so I think any detachable system is going to need a controller in each half.  The ergodox infinity seems like the best system but that's a complete rewire and probably needs a pcb which isn't not worth my time at this point.

Offline xtrafrood

  • formerly csmertx
  • * Elevated Elder
  • Posts: 2715
  • Location: Gainesville, FL
  • wildling
Re: The SHARK (Split Hand ARc Keyboard) build log
« Reply #3 on: Tue, 31 May 2016, 22:11:38 »
Were you planning to devise a way to detach the two halves in the future?

I wish.  There are currently 14 wires going between the halves (6 rows, 8 cols) so I think any detachable system is going to need a controller in each half.  The ergodox infinity seems like the best system but that's a complete rewire and probably needs a pcb which isn't not worth my time at this point.

I see your point; thank you for the answering my question. Portability is not much of an issue for me, but I know others might want a way to separate the halves.

Offline Darkshado

  • Posts: 79
  • Location: Montréal
Re: The SHARK (Split Hand ARc Keyboard) build log
« Reply #4 on: Tue, 31 May 2016, 23:04:26 »
A VGA connector has 15 pins, breakouts and extensions should be reasonably easy to find and not too expensive. // Flies away...

Very interesting results, close to the layout I'd go for on a custom of my own. :thumb:

Offline MOZ

  • KING OF THE NEWBIES
  • * Maker
  • Posts: 3981
  • Location: Jo'burg
  • Busy making stuff
Re: The SHARK (Split Hand ARc Keyboard) build log
« Reply #5 on: Wed, 01 June 2016, 00:06:28 »
Very nice, very nice indeed.

Offline TD22057

  • Thread Starter
  • Posts: 177
  • Location: Southern California
Re: The SHARK (Split Hand ARc Keyboard) build log
« Reply #6 on: Wed, 01 June 2016, 23:36:34 »
A VGA connector has 15 pins, breakouts and extensions should be reasonably easy to find and not too expensive. // Flies away...

I did think about that actually but VGA is way too big.  I checked EasyEDA and it looks like I could get 5 PCB's made for about $40 assuming I can use a single design for both hands (symmetric layout pays off).  It's really tempting to try and design something similar to the ErgoDox Infinity and use USB and UART to do the communication between the hands.  But that means doing a PCB design, retro fitting it to my build, working on the firmware, etc, etc so it seems unlikely that I'll bother.  It would be cool though...

Offline MOZ

  • KING OF THE NEWBIES
  • * Maker
  • Posts: 3981
  • Location: Jo'burg
  • Busy making stuff
Re: The SHARK (Split Hand ARc Keyboard) build log
« Reply #7 on: Thu, 02 June 2016, 00:57:58 »
Have you used EasyEDA before? I've placed an order with them, waiting for the deliver, will post a review about their quality, once I have them in hand.

Offline TD22057

  • Thread Starter
  • Posts: 177
  • Location: Southern California
Re: The SHARK (Split Hand ARc Keyboard) build log
« Reply #8 on: Thu, 02 June 2016, 09:39:16 »
Have you used EasyEDA before? I've placed an order with them, waiting for the deliver, will post a review about their quality, once I have them in hand.

Nope.  I've had great results using Elecrow for small Arduino sensor boards but I assumed (incorrectly) that the larger keyboard sized boards would be too expensive.  I like http://pcbshopper.com/ to quickly check prices on things - they also have reviews but there isn't much there for EasyEDA yet.

Offline MOZ

  • KING OF THE NEWBIES
  • * Maker
  • Posts: 3981
  • Location: Jo'burg
  • Busy making stuff
Re: The SHARK (Split Hand ARc Keyboard) build log
« Reply #9 on: Thu, 02 June 2016, 09:49:56 »
Yeah, couldn't find much reviews about EasyEDA online (Regarding the PCB fabrication, plenty of good reviews of online tool).

I've put in an order, let's see. If the quality is good, you might see some offers (read discounts for gh members) soon ;)

Offline tufty

  • Posts: 347
  • Location: French Alps
Re: The SHARK (Split Hand ARc Keyboard) build log
« Reply #10 on: Thu, 02 June 2016, 12:35:00 »
Hey, I can do this.

two handed ortholinear nano grid.
split hand independent typing
bimanual ergonomic linear matrix

Nice work, by the way.

Offline xtrafrood

  • formerly csmertx
  • * Elevated Elder
  • Posts: 2715
  • Location: Gainesville, FL
  • wildling
Re: The SHARK (Split Hand ARc Keyboard) build log
« Reply #11 on: Thu, 02 June 2016, 12:49:16 »
If you do decide to have metal plates made could you possibly have someone make a Cherry MX compatible one with switch-opening notches, and an Alps compatible one?

I look forward to more updates :)


Offline chuckdee

  • * Destiny Supporter
  • Posts: 1308
Re: The SHARK (Split Hand ARc Keyboard) build log
« Reply #12 on: Thu, 02 June 2016, 12:56:22 »
Nice work... especially the aesthetic of the whole thing.  Thanks for sharing- I'm trying to get more deeply into this aspect, and the more I read, the more I know.

Offline TD22057

  • Thread Starter
  • Posts: 177
  • Location: Southern California
Re: The SHARK (Split Hand ARc Keyboard) build log
« Reply #13 on: Thu, 02 June 2016, 17:47:36 »
If you do decide to have metal plates made could you possibly have someone make a Cherry MX compatible one with switch-opening notches, and an Alps compatible one?

I don't have any interest in that - but if you want that, why not do it yourself?  It's really very easy using free CAD tools (I used DraftSight) to make anything you want. Lots of good stuff in this thread.

Offline xtrafrood

  • formerly csmertx
  • * Elevated Elder
  • Posts: 2715
  • Location: Gainesville, FL
  • wildling
Re: The SHARK (Split Hand ARc Keyboard) build log
« Reply #14 on: Thu, 02 June 2016, 17:58:19 »
If you do decide to have metal plates made could you possibly have someone make a Cherry MX compatible one with switch-opening notches, and an Alps compatible one?

I don't have any interest in that - but if you want that, why not do it yourself?  It's really very easy using free CAD tools (I used DraftSight) to make anything you want. Lots of good stuff in this thread.

Ah, so I guess you would have no interested in creating a GB for the keyboard. Alrighty

Offline TD22057

  • Thread Starter
  • Posts: 177
  • Location: Southern California
Re: The SHARK (Split Hand ARc Keyboard) build log
« Reply #15 on: Thu, 02 June 2016, 19:13:07 »
Ah, so I guess you would have no interested in creating a GB for the keyboard. Alrighty

Given that no one has actually expressed an interest in making a copy, that never entered my mind.  My impression of other group buys is that they take a lot effort and time to run and it's unlikely I have time for that.  However, my design files are in the first post, so if some one wants to take this design and run with it, more power to them. 

Offline TD22057

  • Thread Starter
  • Posts: 177
  • Location: Southern California
Re: The SHARK (Split Hand ARc Keyboard) build log
« Reply #16 on: Sat, 11 June 2016, 11:19:47 »
I thought I would update this with my feelings after using the board for a couple of weeks.  I've done normal typing, gaming, and programming with it.  It's taking me awhile to get used to the lack of row stagger.  The upper keys are easy, but the lower row (ZXC,etc) has been more difficult to get used to.  I'm only using this board every other day (I haven't finished the second one yet for work) so I expect this will get better over time. 

For regular typing, the layout is fantastic.  Having the backspace and return keys next to the space bar on each thumb is perfect and saves a ton of time.  The escape key location works really well, much easier than the upper left corner.  I've been doing a little gaming (WASD) and that works great too.  I'm considering a gaming layer in the firmware to assign something different to the hyper button but it hasn't really been necessary so far.  I spend most of my time programming (c++, python using emacs, and working on the linux command line).  I have a ton of short cuts set up using the ctrl, alt, and hyper keys and overall this works great.  I have the left hand hyper layer set as keyboard movement and fwd/back delete keys.  The right hand hyper is the various shifted keys I use a lot in programming like (){}[] +*/-#.  Having all of those keys available easily is really nice.

However, I'm finding the lack of homing bars on the DSA retro caps to be a huge problem.  My thumbs especially are moving a lot to hit alt, hyper, space, enter and since each key is only 1u wide, it's easy to get lost and hit the wrong key with my thumbs.  I'd also like it if the left hand ctrl and tab keys were 1.5u wide.  I could have made them that way, but I was focused on a symmetric layout for cheaper metal machining costs and didn't think about the fact that in plastic, I could have made that change without any cost.  I'd also consider moving the page up and down keys to the right side just because I'm so use to them being over there.

Overall I'm very pleased.  The shortcomings aren't large enough that it would be worth doing another iteration for (at least anytime soon) and I'm hopeful that when I get the second board built for work, I'll get used to the new layout that much faster.  I'm experimenting with creating homing dots on F, J, and the space bars using super glue and I'm hopeful that will help reduce my mistakes.

ps: if anyone has any dsa retro 1u mods, 1.5u mods, and 1.5u blanks they'd be willing to sell, please let me know.